|
|
Post by hairy apple on May 19, 2009 15:44:05 GMT -5
 I wasn't going to post this here because I figured the stitch nazis would hate this, however I've had a lot of people asking me about it so here it is.  Starting out. 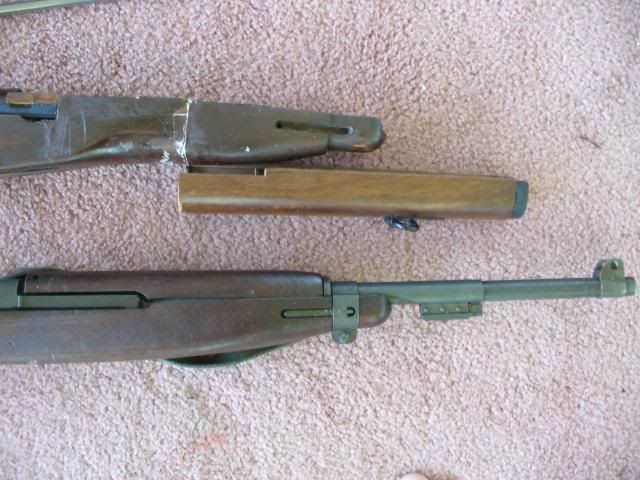 That's how much I cut off the front of the m14 stock. 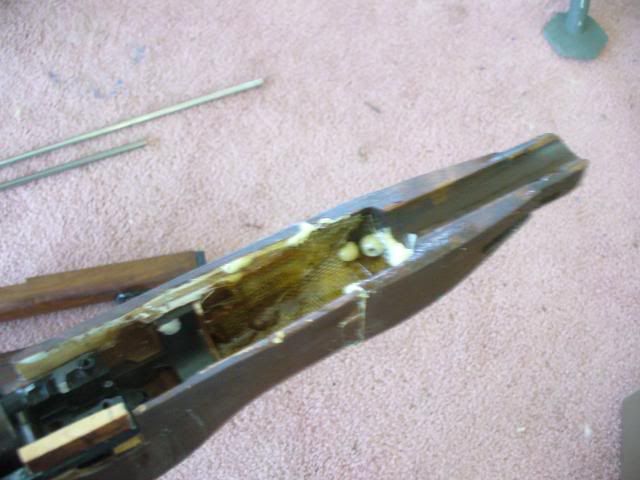 Glued and fiberglassed the m14 stock to the front of a real carbine stock. 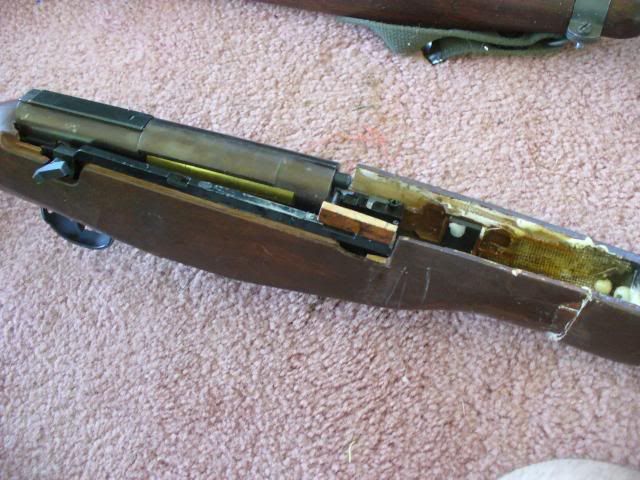 M14 gearbox. 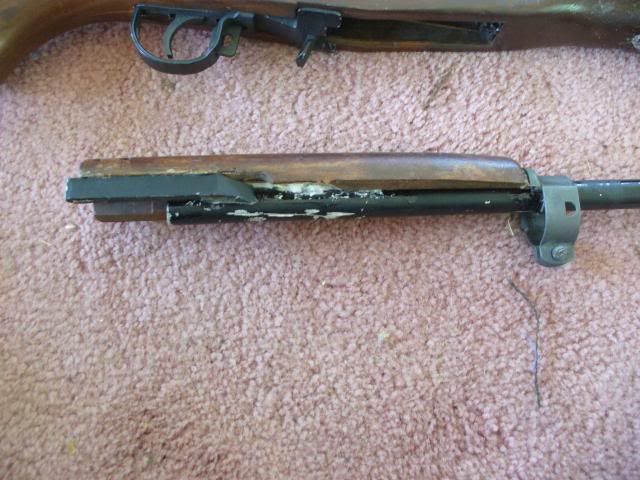 Glued the outer barrel, handguard, and barrel band together. 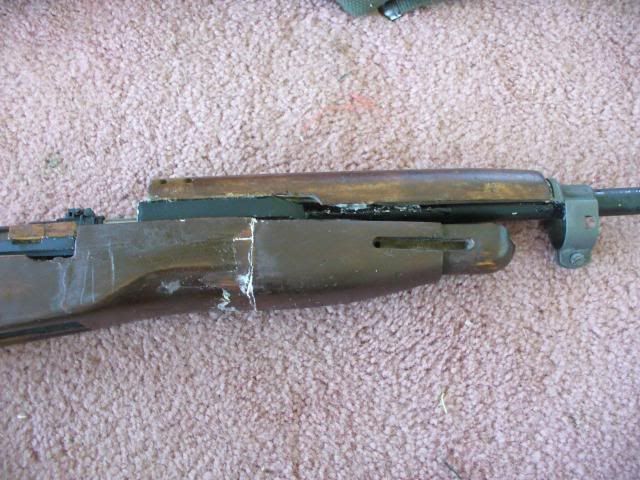 Put the hopup and inner barrel in, slide front part on and use the barrel band to hold it all on. 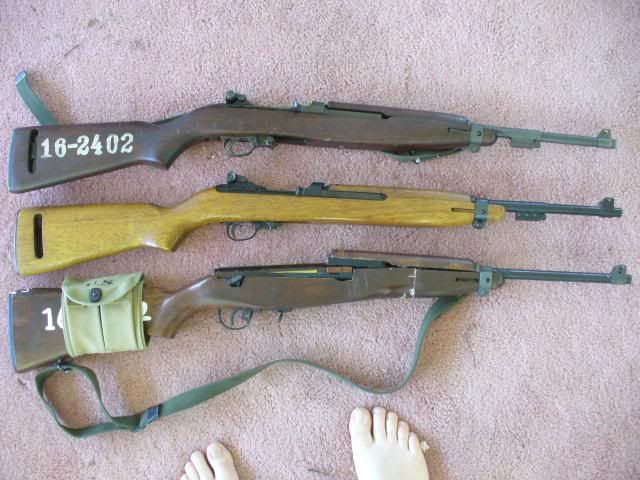 Next to the real deal to show you the scale and whatnot. I need to finish the reciever and rear sights. The front sights and barrel band are off a real m1. The outer barrel is the m14 outer just cut down to size. The inner barrel is also m14 cut down to fit. It wasn't all the hard to build, what was hard was figuring out the design and how to get it all to fit together and come back apart easy for repair if needed. At some point I am going to replace the stock and use a real wood stock for the m14 part and then cut the oiler and sling hold in the back. Also, if the first few photos it's hard to tell but I had to add some wood to the stock to get it to all be flush with the hand guard, and it all needs to be repainted as I damaged the paint regluing it after some damage. All in all, I think it came out pretty good. It will get better as I figure some stuff out. I have a plan for correct magazines however have not had time or money to get to that part yet. Right now it still takes m14 mags and it looks kinda funny. But it shoots great and it's differant. |
|
|
|
Post by lrich on May 19, 2009 18:40:20 GMT -5
The only major thing i could think of was to cut the cocking lever down to the right size, and put the upper receiver back on (it looks funny without the rear sight and stuff), although you might want to cut it a little to match the m1 upper better.
Overall, a great start into unknown territory.
|
|
|
|
Post by hairy apple on May 19, 2009 18:50:07 GMT -5
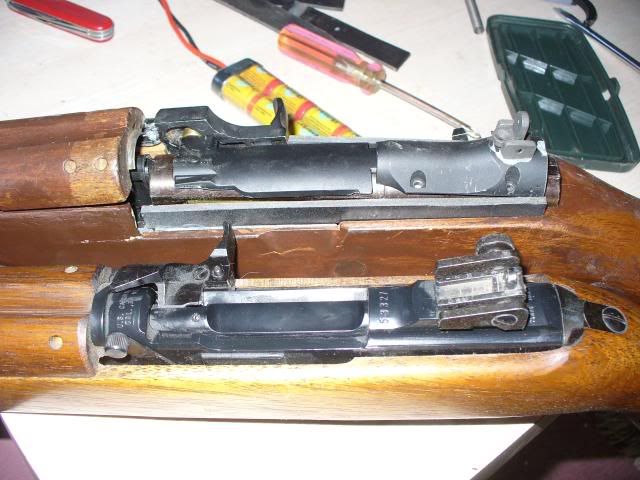
Yeah, I am going to get a real charging handle for it. I tried to work with the one I had and it wasnt' working. I also need to build the reciever and put the rear sights on it. I just haven't had the time/money for anymore work on it right now. I also need to finish filling in some of the gaps and just cleanin up some stuff that needs fixing. It's been a work in progress and I keep finding things I could have done better and fixing them.
|
|
Sgt_Tom
Technical Sgt.
   Combat!
Posts: 3,580
|
Post by Sgt_Tom on May 19, 2009 19:52:52 GMT -5
Amazing Job. It has great potential and looks fantastic. Can't wait to see it finished. How do you plan to do the mags?
|
|
|
|
Post by hairy apple on May 19, 2009 19:55:23 GMT -5
I have a few ideas for the mags. I have not actually expermented with them yet so I'm not going to go telling everyone what I'm planning/thinking untill I'm sure it will work.
|
|
|
|
Post by volkssturm on May 19, 2009 21:47:35 GMT -5
Gotta give you an "E" for Effort. An interesting approach.  |
|
TommyGunner
Staff Sgt.
   Hackjob Mauro
1st Marine Division, 1942
Posts: 2,265
|
Post by TommyGunner on May 20, 2009 1:51:47 GMT -5
I saw this post and thought "oh god another person asking for the 10,000th time on how to build an AEG Carbine. But then I actually saw pics of an AEG carbine in the thread!!!!!
Regardless of any shortcommings I think that this is a great step forward, you did what I have yet to see anyone else do, build an AEG Carbine. Good job on this and keep working at it.
TommyGunner
|
|
|
|
Post by hairy apple on May 20, 2009 12:47:18 GMT -5
It looked a lot better before I damaged the paint with that last repair. Once I get the reciver done, fill in some gaps, and repaint it it will look a lot better. I have to say, it looks much better in person then it does in these photos. 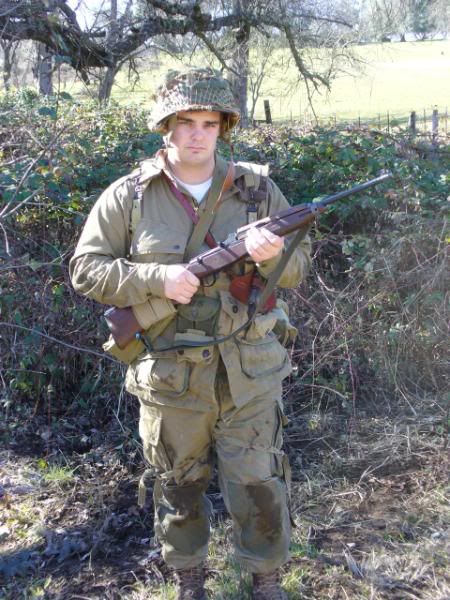 Here is a photo before I repaired the front while it was still painted a little better. Once I get an m14 wood stock I will add the oiler/sling hole in the rear as well. |
|
|
|
Post by CharleyNovember on May 20, 2009 13:49:30 GMT -5
I think it looks pretty good. Not 100% but a real good start. Kudos to you for taking the plunge. I look foward to seeing what refinements you come up with...I want a para version darn it.  |
|
|
|
Post by hairy apple on May 25, 2009 23:59:45 GMT -5
Thanks for the positive comments everyone. I will continue to work on this and refine and improve it. And I will continue to post up photos as progress continues.
|
|
|
|
Post by corporalkitten on Jun 11, 2009 19:35:40 GMT -5
How do you plan to do the mags? I have been thinking about this, but keep in mind-I'm not familiar with the m14 or modding mags so go easy on me: As far as the m14 mag goes into the magwell, keep the m14 mag original size. Then what visible part sticks out, use the internals from an UMP mag or mp5 mag, depending on which to use- straight short, or long banana shaped mags in the M2. If it succeeds, it would look fairly good and be realistic to the M1 Carbine. |
|
|
|
Post by hairy apple on Jun 11, 2009 19:56:36 GMT -5
That is more or less one of the ideas I have in mind as well. Use real m1 mags and make them into airsoft mags, use the m14 magwell, and have an "adapter" made out of the top part of an m14 mag to bridge the gap between the m1 mag feed tube and the hopup on the gun. Just haven't had the time to work on much lately. Edit: This reminds me, new photos... did a little sanding and chipped away some of the seam where the glud is. Wood filler is drying right now and then I'll repaint and take some new photos.  |
|
|
|
Post by corporalkitten on Jun 12, 2009 8:51:18 GMT -5
Oh, I forgot to tell you: It looks fantastic. Simply great. ;D The only things I could tell you are make the stock a little smaller, and cover up some of the visible cocking lever with wood to the same level as picture #2 so the cocking levers are even. Also you may want to drill throught the stock for a sling point. Other than that, you have seriously done a stunningly fantastic job here  . I wish I were crafted enough to attempt such a project. simply incredible. BTW- I said mp5 or ump mag internals, but I really meant anything of the same size that fits the dimensions. |
|
2nd Bat
Master sergeant  
Posts: 11,813
|
Post by 2nd Bat on Jun 14, 2009 23:45:58 GMT -5
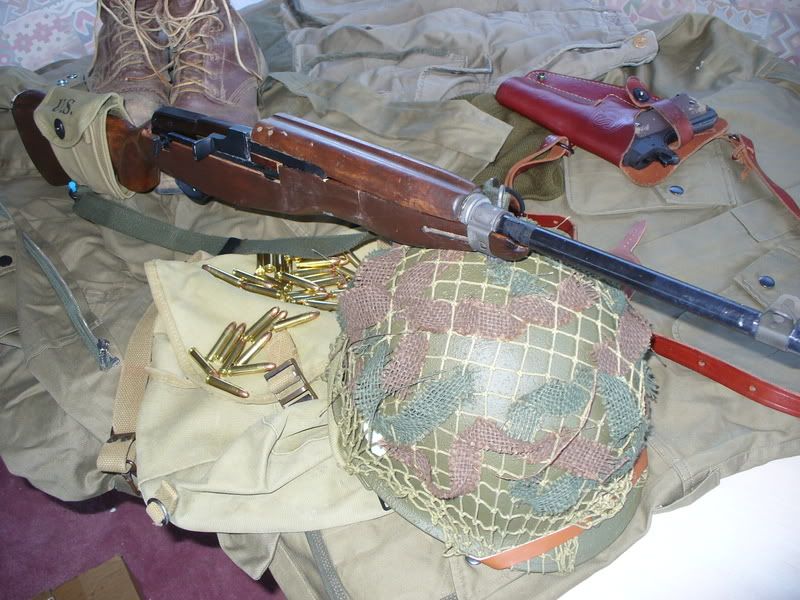
The picture with your impression tells the story quite well. At a glance there is no doubt what rifle it depicts and it fills a noticeably empty slot in the US arsenal with a skirmishable AEG carbine. Thanks for sharing and keep up your ongoing effort to refine and improve the concept.
|
|
|
|
Post by hairy apple on Jun 26, 2009 20:58:30 GMT -5
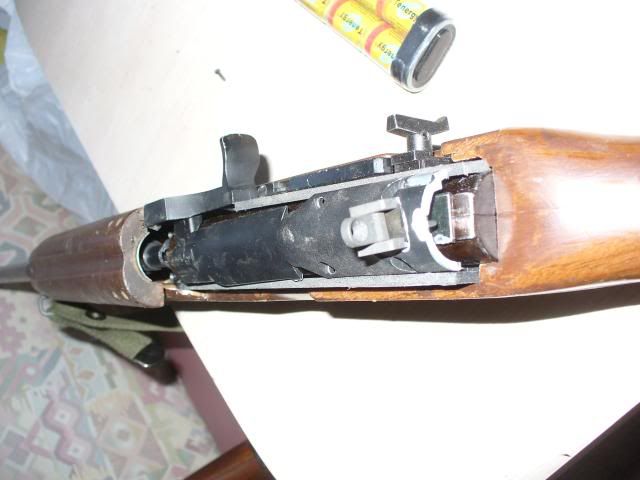
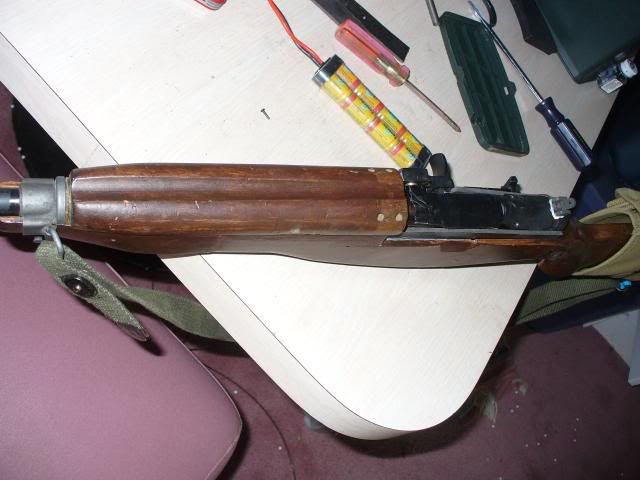
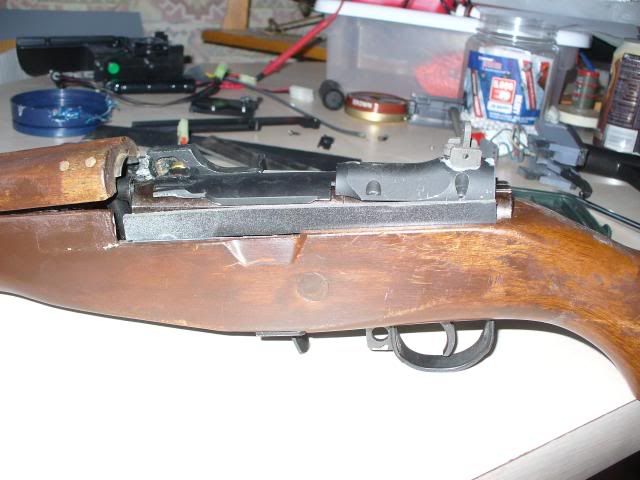
Been working one the reciever for the carbine finally. It's coming along, a lot of trial and error right now, but I think I have a basic idea of how to get this thing to work. Keep in mind, this is just mocked up right now. I need to trim and cut and bondo this all a lot more. But you get the idea. I think will look halfway good when done. 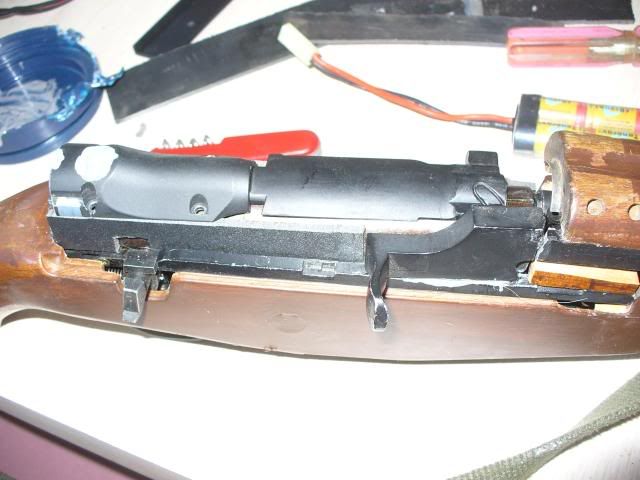 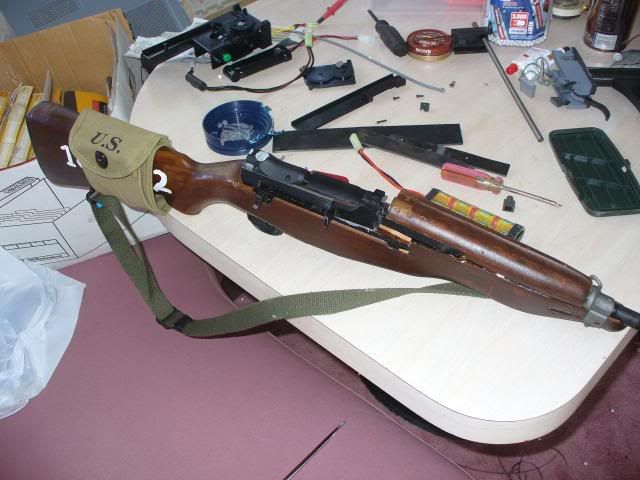 I need a real bolt/charging handle. The m14 one is far too large. |
|
|
|
Post by hairy apple on Jun 26, 2009 22:29:36 GMT -5
|
|
|
|
Post by lrich on Jun 27, 2009 18:16:30 GMT -5
That looks pretty good. And compared to all the other m1's out there, it is amazing. Great job going out on a limb, and making an excellent item. I look forward to the finished product.
|
|
masterchief
Private
I?m six sigma certified, but does not change anything.
Posts: 28
|
Post by masterchief on Aug 28, 2009 19:58:10 GMT -5
|
|
kalbs
Master sergeant  
Posts: 1,142
|
Post by kalbs on Aug 28, 2009 22:19:38 GMT -5
That is a really nice job. I guess my only question are what you are using for the magazines shells over the UMP mags? Do you have any pictures we could see?
|
|
|
|
Post by hairy apple on Aug 29, 2009 0:39:19 GMT -5
Thank you guys! I haven't had a chance to mess with magazines yet. I keep getting discracted with other projects... it happens. I have hoped to use MP7 mags inside a real m1 carbine magazine. It's going to be a bit of a pain as I'm going to have to build a magazine "adapter" for the magazine well. It's going to be tough... part of the reason I haven't got to it yet.
|
|


