|
|
Post by caldwellb734 on Apr 17, 2016 10:15:11 GMT -5
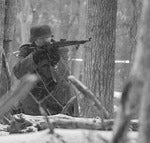
Hello, I'm new here and this is my first post, so if I'm in the wrong place I apologize. I've been scouring the internet for an airsoft version of an original-run, pre-A1 1911 pistol. I can't seem to find anything and was wondering if anyone here had some information. I've included a picture of what I'm looking for (Taken from IMFDb, I'm seeking the top example): 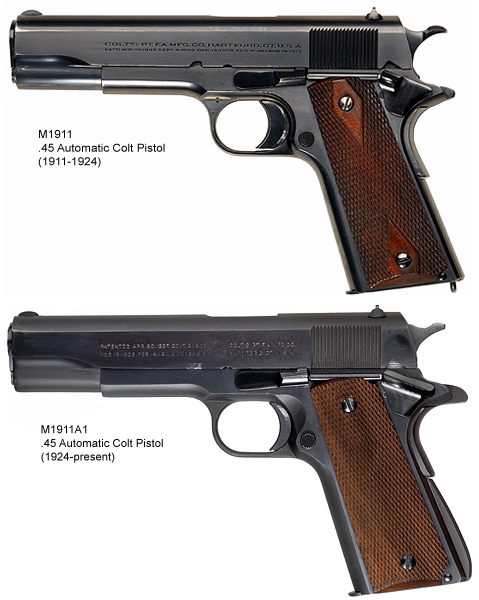 Any help is much appreciated, thank you! |
|
2nd Bat
Master sergeant 
Posts: 11,813
|
Post by 2nd Bat on Apr 17, 2016 11:56:38 GMT -5
The differences at a glance are quite nuanced. I doubt anyone produces a precise example of the early version. It's hard enough frankly getting reasonably close versions of the government issued .45s in the myriad of do-dad equipped, quasi modern, long magazines 45s that are made.
Welcome to the Forum by the way! Would you mind sharing a specific list of the differences between the mass produced Wartime models and the earlier ones. This would serve to be educational and provide us with the tools for a more enlightened search.
The two posted pictures are a nice start!
|
|
|
|
Post by volkssturm on Apr 17, 2016 14:05:49 GMT -5
Here's a Youtube video pointing out the external difference. www.youtube.com/watch?v=gcqMHGN7lWoAnd from an American Rifleman article on the subject. 1. Sights, both front and rear, were increased in size to allow for a wider and more immediately visible sighting notch with a square bottom. Early sights were hard to find and align under stress. 2. The tang, or rearmost extension, of the grip safety was extended rearward over the web of the shooter’s hand. The original design was prone to bite the shooter’s hand when skin rolled up over the short tang and was pinched by the pivoting hammer. 3. Semi-circular relief cuts were installed at the rear edge of the trigger guard on both sides of the frame. This effectively shortened the trigger reach and made the pistol easier to handle for soldiers with smaller hands. 4. The trigger was shortened in its front-to-back dimension and the trigger face was checkered. This was another effort to make the pistol usable in a variety of hands. It created the terminology “long” trigger and “short” trigger. 5. The mainspring housing in the lower rear corner was arched and checkered. This tended to correct the tendency to shoot low when pointed and fired. In fact, it did just the opposite when the gun was raised to eye level and aimed. www.americanrifleman.org/articles/2013/2/20/m1911-m1911a1/ |
|
|
|
Post by caldwellb734 on Apr 17, 2016 15:39:03 GMT -5
|
|
|
|
Post by insterburger on Apr 17, 2016 21:45:22 GMT -5
I think with some PC-7 epoxy, some basic metalworking equipment and skills, and some appropriate spray paint to refinish, it wouldn't be that tough to mod out a M1911A1 to much more closely resemble the earlier version. But since the differences are all quite subtle and would not be noticeable except on close inspection, and as 2nd Bat pointed out airsoft guns in general are not always perfectly rendered copies of the real thing in the first place, I'd have to question what circumstances would justify going through the effort.
FWIW, my "WWII" M1911 was a "Blck Ops" branded gun I got for an absolute steal on clearance from Wal-Mart. The pistol was pretty plain except for an unsightly "BLACK OPS" etched on the slide. After wire-brushing the logo off, repainting the slide, false barrel, and grips, it's a decent enough copy of a WWII M1911, at least for my purposes.
|
|
|
|
Post by caldwellb734 on Apr 18, 2016 22:09:13 GMT -5
I think with some PC-7 epoxy, some basic metalworking equipment and skills, and some appropriate spray paint to refinish, it wouldn't be that tough to mod out a M1911A1 to much more closely resemble the earlier version. But since the differences are all quite subtle and would not be noticeable except on close inspection, and as 2nd Bat pointed out airsoft guns in general are not always perfectly rendered copies of the real thing in the first place, I'd have to question what circumstances would justify going through the effort. FWIW, my "WWII" M1911 was a "Blck Ops" branded gun I got for an absolute steal on clearance from Wal-Mart. The pistol was pretty plain except for an unsightly "BLACK OPS" etched on the slide. After wire-brushing the logo off, repainting the slide, false barrel, and grips, it's a decent enough copy of a WWII M1911, at least for my purposes. What is PC-7 epoxy and where can I get some? Is it similar to Bondo? I have some crafting skills and would probably be able to replica the version I want decently, and I think that's the way I'll end up going. I actually don't play airsoft (if that makes my presence on the forums erroneous, my apologies), I'm a filmmaker and prop weapons handler. I use airsoft guns for movie props because they look the part, and are cheaper and safer than using blank guns. I wanted a pre-war 1911 for a gangster movie, and also because I've come to prefer the look of it more than the A1 version. Thanks for your help! |
|
2nd Bat
Master sergeant
Posts: 11,813
|
Post by 2nd Bat on Apr 18, 2016 22:55:00 GMT -5
We have a number of members who are actively involved in film work and whose primary interest are props and costumes. If you go to a hardware store there are a wide variety of two part resin fillers with assorted properties and textures when hardened. The PC7 comes in small tubes so not much waste on a small project. Easy to work with, shapes and sands decently and will handle paint although you will want to primer first.
Good luck with the process. It would be a major close up for anyone to see the difference but it should make for a nice project. Please share your progress.
|
|
|
|
Post by insterburger on Apr 19, 2016 8:04:47 GMT -5
Caldwell, we are glad you're here!
There are a few different brands of two part epoxy as 2nd Bat describes. The main ones I use are JB Weld, JB Weld Putty, and PC7. Each has its benefits and drawbacks:
Standard JB Weld is sold in smaller tubes, the consistency when blended is a smooth, creamy paste. This stuff bonds generally very well, especially if the surface is roughed up a bit. Good for smaller fill/build-up jobs as well.
I like PC-7 for BIG glue jobs or for building up areas (such as on your pistol) as you can get it in jars, so you get a ton of it, and it has a heavier, chunkier consistency than JB Weld-- it is a lot like thick peanut butter (and just as sticky). This is a great bet for filling in large or thick areas. It can be a little hard to tame when freshly mixed because of its consistency, but I will usually slather it on and then as it just begins to harden a bit (after an hour or a few, I go by feel), I will "sculpt" away any protrusions, press it in to build up low points, and generally smooth it out. Saves time sanding/filing down later when it dries rock-hard.
JB Weld Putty is useful, but only for specific things. The good news is that it's already a putty and can be easily sculpted and manipulated. The bad news is that it doesn't seem to adhere as well as the paste epoxies (which should come as no surprise). It also hardens FAST-- while the pastes need to dry at least overnight, this stuff is hard in about 5-10 minutes. You need to REALLY know what you want to do with it, and get it done. I mostly use it to tack parts together quickly, that I will then use JB Weld or PC7 to do a more permanent bond on.
I think this project is entirely do-able. Please keep us updated as to your progress, and feel free to reach out for any technical advice you might need.
One bit of advice off the bat-- when you build up the trigger cutouts, I would first take a small drill bit (or even a few different sizes) and drill little holes into the crescent that is going to be filled in-- not going through the frame to the other side, just little holes and/or depressions. When you apply the epoxy, it will squeeze into these little crannies and create a much better bond than if you just applied it to the smooth outer surface (or even a sanded surface).
Also, when it comes time to refinish, you have many options, but if you're pleased with the factory paint that comes on airsoft guns as their version of bluing or parkerization, it is exceedingly easy to duplicate: I have found that the "Chalkboard" black spray paint available at any big box hardware store produces a finish almost identical to what the airsoft companies use. Given that you will be building up the metal with epoxy and then priming it, this might be a good option, as many of the faux finishes people use need bare metal to work, which is not going to fly in this case.
|
|
|
|
Post by caldwellb734 on Apr 19, 2016 22:37:15 GMT -5
Thank you so much for the help, gentlemen! It is greatly appreciated! Also, when it comes time to refinish, you have many options, but if you're pleased with the factory paint that comes on airsoft guns as their version of bluing or parkerization, it is exceedingly easy to duplicate: I have found that the "Chalkboard" black spray paint available at any big box hardware store produces a finish almost identical to what the airsoft companies use. Given that you will be building up the metal with epoxy and then priming it, this might be a good option, as many of the faux finishes people use need bare metal to work, which is not going to fly in this case. I've been looking into duplicating the bluing process on airsoft guns for months now, but haven't tested it yet. I've heard of people using everything from pencil graphite to Krylon BBQ spraypaint to actual bluing agent. I know most airsoft guns aren't made of steel, they're pot metal, so actual bluing probably won't work. What's the best way to paint a dark blued finish? EDIT: Also (While I'm asking questions) where can I buy a separate flat mainspring housing? |
|
|
|
Post by insterburger on Apr 21, 2016 7:06:32 GMT -5
Since you intend to fill in the trigger cuts, which has to be done with epoxy, you will need to paint it-- PC7 is very different from even pot metal and you need to hide that work-- paint is the only thing that will cover that up. Nothing is going to look exactly like bluing, so if it were my project, I'd test a few finishes to see what I like best. The "chalkboard" might skew a bit toward a dark Parkerizing for your tastes. I never thought the BBQ paint looked like anything other than black paint (used it on some non-gun projects). You might want to look into some of the dark metallic paints available out there, although they tend to look a bit too much like a car finish. One way or the other, always keep in mind that it will be practically impossible to REALLY replicate bluing on this, so you'll have to settle for what gets you closest. Probably a dark grey or black metallic or the chalkboard are your best bets.
As for the mainspring housing, I doubt you will find this. For legal reasons airsoft manufacturers go out of their way to make their parts similar to, but not compatible with, real gun parts. I don't think any airsoft makers do models with a flat mainspring housing (and if they did, there would be no guarantee that it would work with your gun... further, if they did, then they probably did a true M1911 and you should get that instead!).
The good news is that this looks to be a problem easily solved by removing material-- I would just grind away the back of the mainspring housing until it's about as flat as I want, then file/sand/buff the metal smooth and refinish. The one problem I could foresee with that would be if the housing is hollowed out (they sometimes do this with the airsoft castings to save money). In that case you might find yourself grinding away your entire back surface. Even this is not insurmountable-- that could be built back up with epoxy easily enough.
Good luck with this, keep us posted!
|
|
|
|
Post by caldwellb734 on May 4, 2016 22:26:05 GMT -5
So I just ran across this! It appears Western Arms DID produce original 1911s, one of them was even the Norwegian Kongsberg 1914! airsoftnews.eu/news.php?id=4363#.Vyq99mQrL5YUnfortunately, they were quite expensive and I can't find them for sale anywhere. Anybody know more about these? |
|