Post by sir veilance on Dec 31, 2009 15:46:36 GMT -5
I converted six AGM Hi-Caps to 100 round Mid-Caps using modified Mag Brand MP7 mags for an internal. They work great! The first one took me 45 minutes to convert  By the time I had done two I could do it in less than 15 minutes
Here's how I did it.......
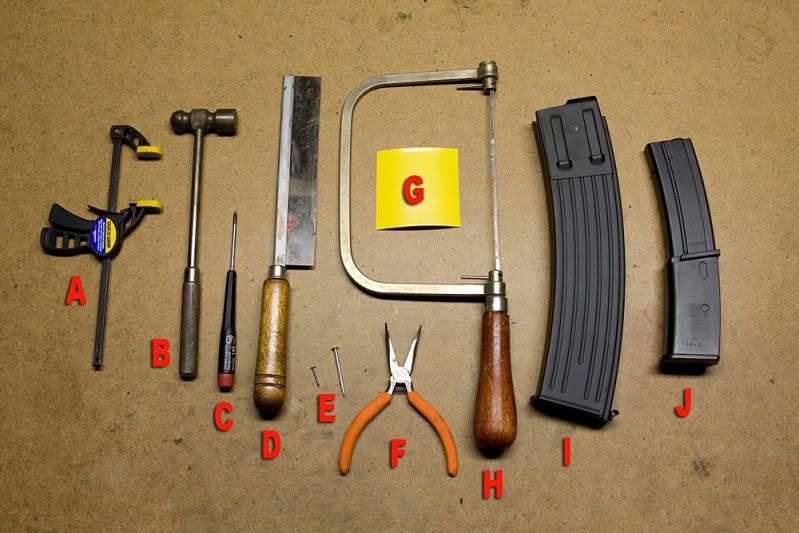
Items Needed (Above)
A:Small Carpenters Clamp (A small C-clamp should work too)
B:Hammer
C:Small Phillips Screw Driver
D:Razor Saw (Wide Blade)
E:Small Nails to drive out pins
F:Needle Nose Pliers
G:Heat Shrink (Tape will work also)
H:Coping Saw ( I found that a Hacksaw works better)
I:AGM Hi-Cap MP-44 Mag
J:Mag Brand Mid-Cap MP7 Mag
(Not shown, Sanding Block, Popsicle Sticks and a 3mm Drill Bit)
(Step One Below)
Remove Screw at bottom of AGM Mag.
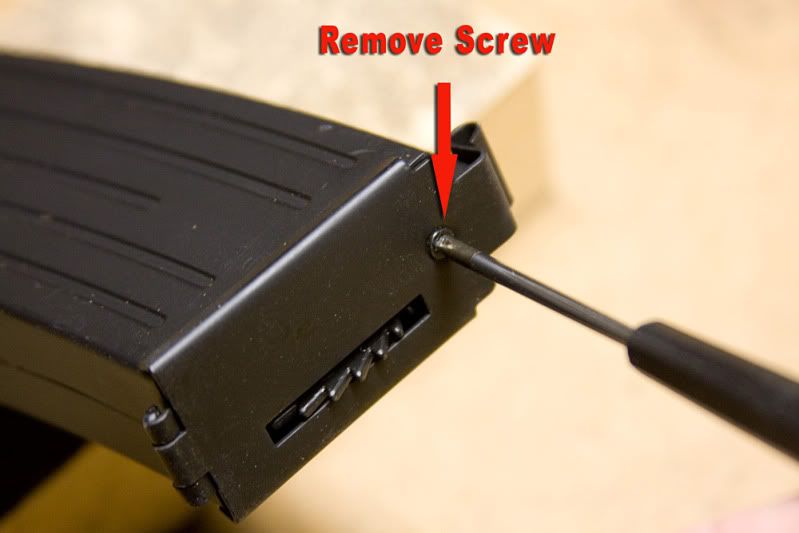
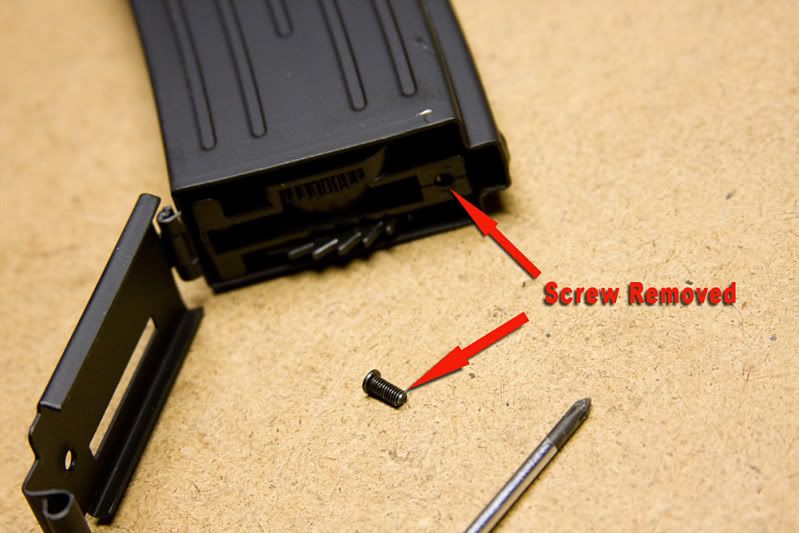
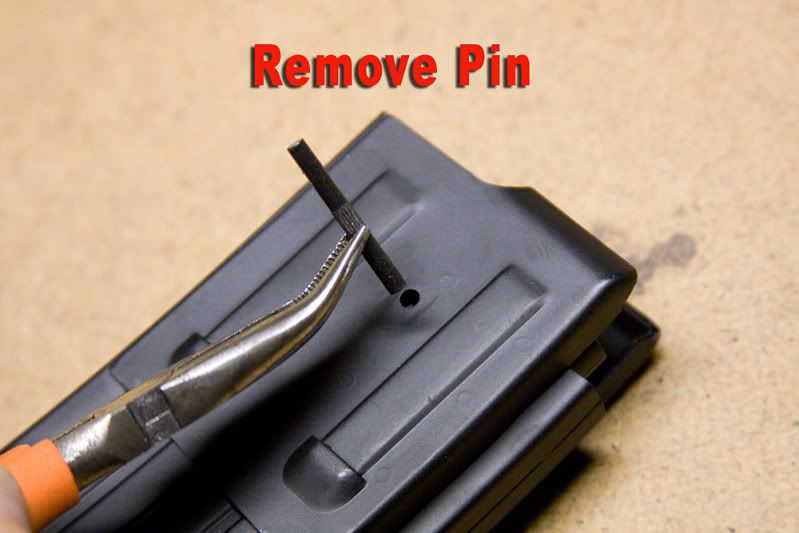
(Step Two Below)
Knock out Retaining Pin with Hammer and Small Nail.
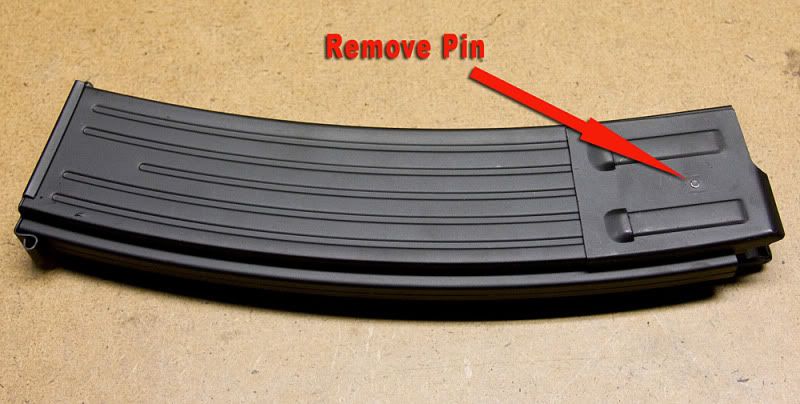
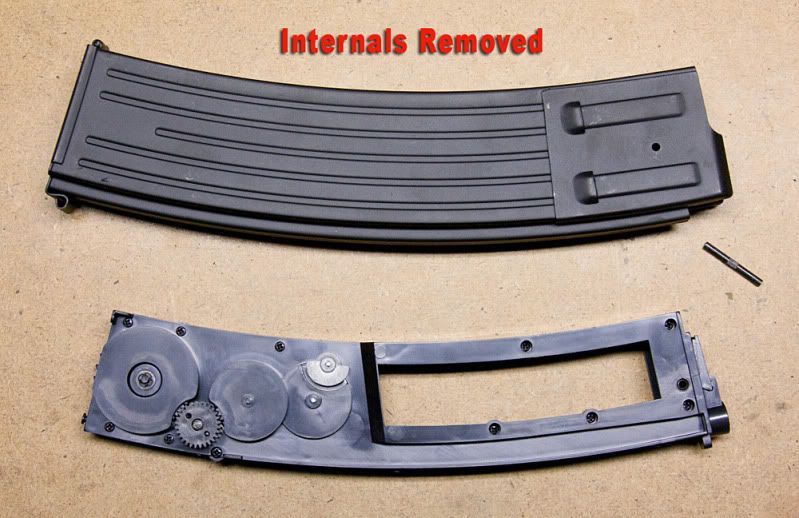
(Step Three Below)
Remove Hi-Cap Internal
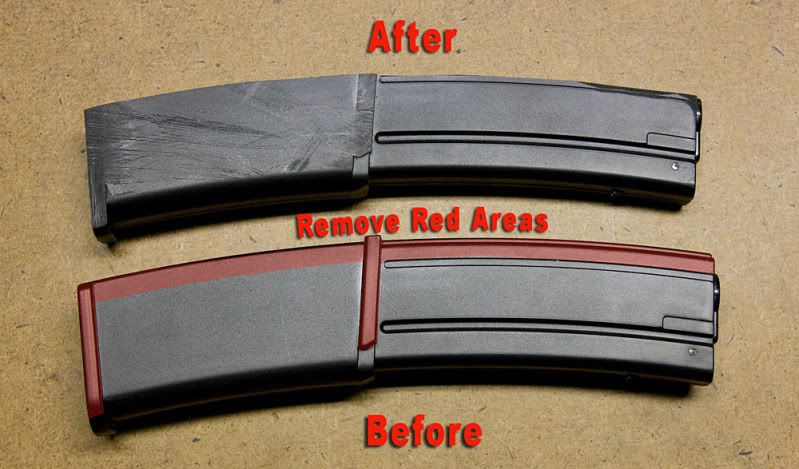
(Step Four Below)
With the Razor Saw remove the tabs on the sides and bottom of the Mag Brand MP7 Mag. (Highlighted in Red) Then with a Hacksaw remove the remove the area at the top of the mag in the photo. (Also Highlighted in Red) Clean up with a sanding block. I made a sanding block with a piece of 2x4 that I spray glued a piece of coarse sand paper to.
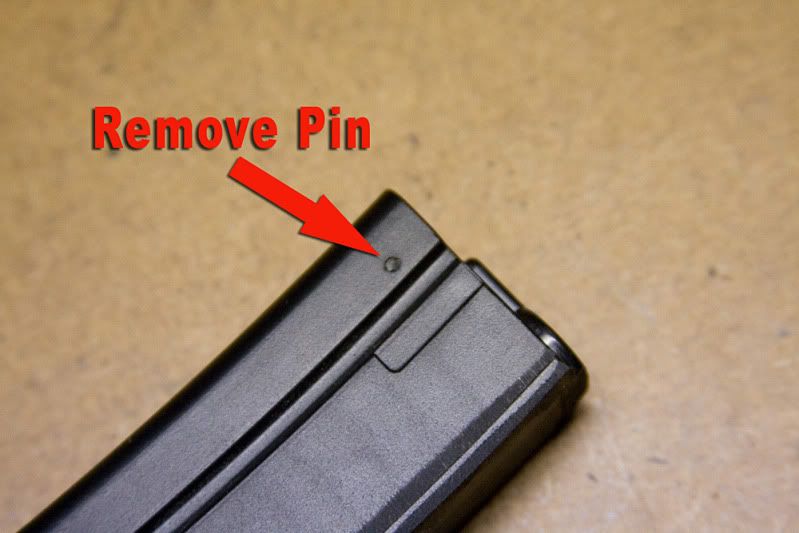
(Step Five Below)
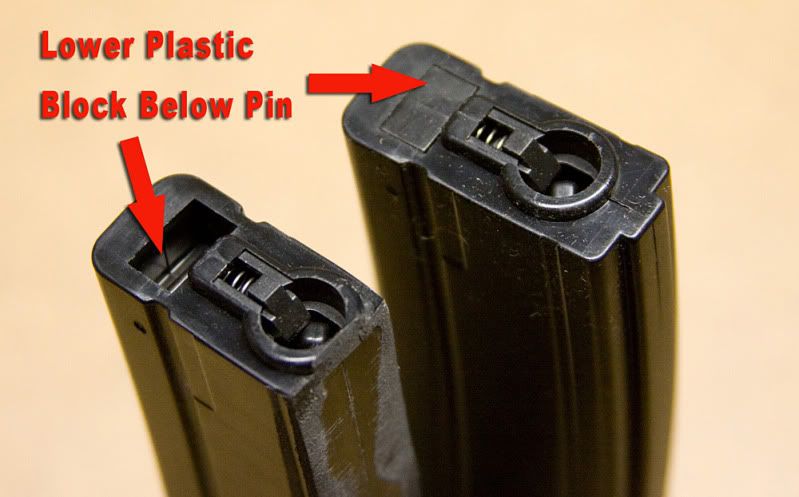
Knock out the pin, that retains the block, that holds the end of the spring in place. Hold the block in place when removing pin or it can fly out. Push the block below the pin and replace the pin as shown below. Later when it comes time to drill through the new internal, to make a whole for the retaining pin, the whole will go through the repositioned plastic block and not through the end of your spring!
(Step Six Below)
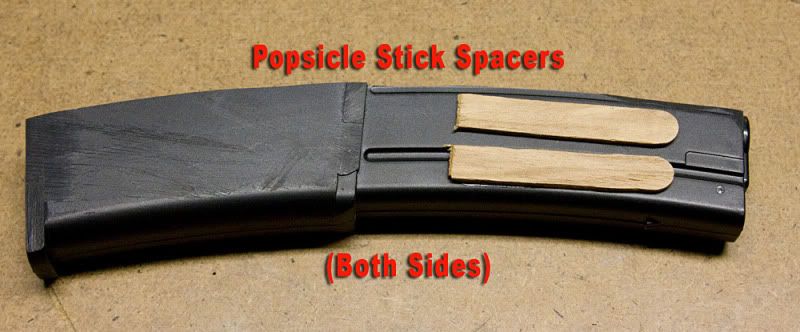
Cut two Popsicle Sticks in half and spot glue to each side of mag as shown. These will keep the thinner top of the MP7 mag centered in the MP44 mag housing.
(Step Seven Below)
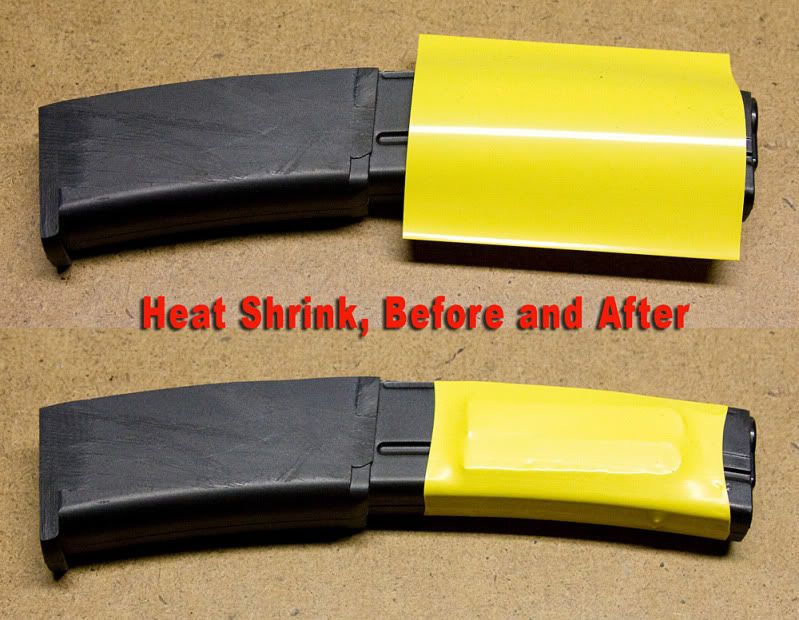
For this step I used some Heat Shrink made for power packs, but tape could be used as well. When the long edge of the MP7 mag was removed, the glue/weld that held the two sides together was also removed. Without this step the mag can split open when loaded with BB's!
(Step Eight Below)
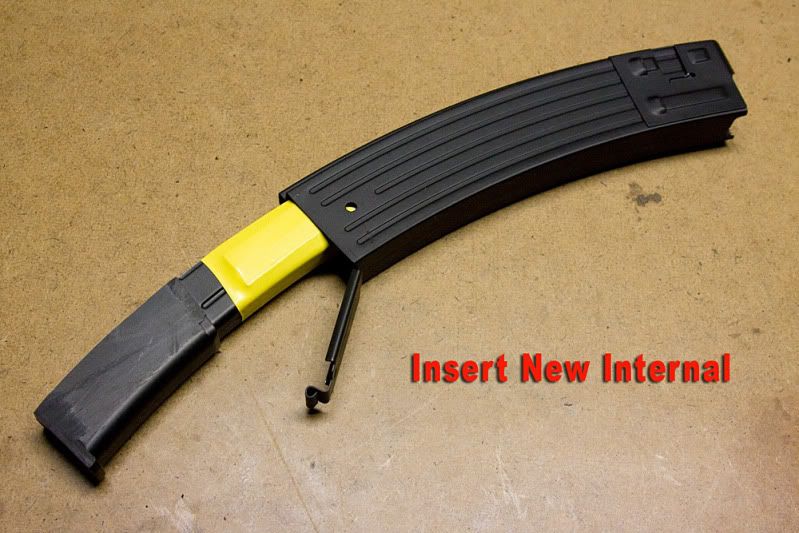
Insert new internal.
(Step Nine Below)
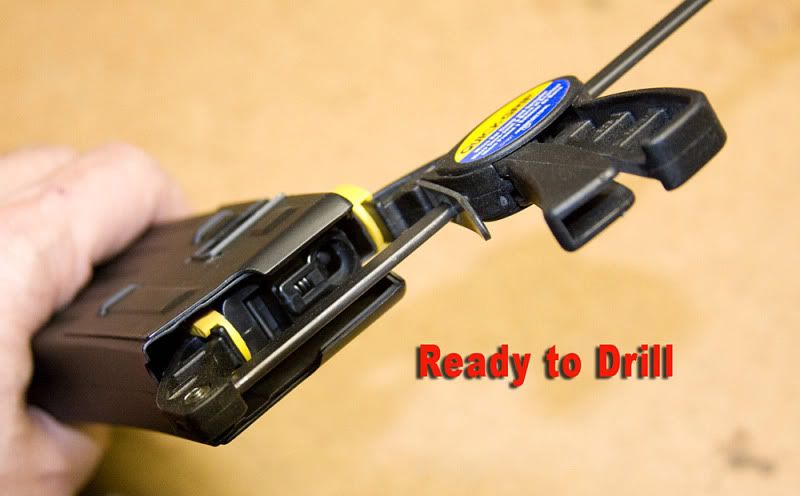
Carefully position the new internal to match position of original mag feed location. I kept one original MP-44 Hi-Cap as a reference for this step! When satisfied, use a clamp to hold internal in position. Then using a 3mm drill bit, drill half way through the old retaining pin location on each side of the MP-44 mag. Do not try to drill all the way through from one side to the other. A drill press works best for this step!
(Step Ten Below)
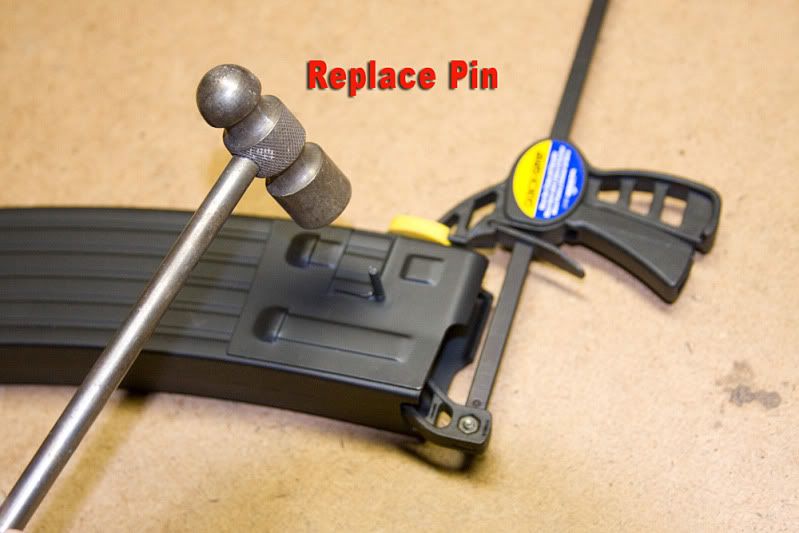
Replace the retaining pin, with clamp still in place, then remove the clamp.
(Step Nine Below)
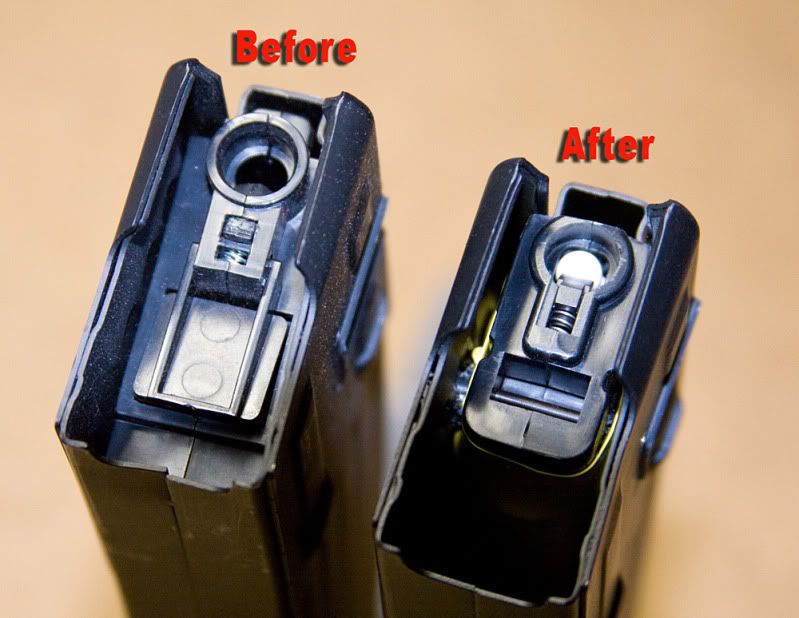
Side by side comparison of finished conversion.
This conversion was not my idea, it was the brainchild of Ulrich Von Offenberg, who posts on the Midwest Ostfront Airsoft boards. I just took his idea and modified it a bit.
 By the time I had done two I could do it in less than 15 minutes
Here's how I did it.......

Items Needed (Above)
A:Small Carpenters Clamp (A small C-clamp should work too)
B:Hammer
C:Small Phillips Screw Driver
D:Razor Saw (Wide Blade)
E:Small Nails to drive out pins
F:Needle Nose Pliers
G:Heat Shrink (Tape will work also)
H:Coping Saw ( I found that a Hacksaw works better)
I:AGM Hi-Cap MP-44 Mag
J:Mag Brand Mid-Cap MP7 Mag
(Not shown, Sanding Block, Popsicle Sticks and a 3mm Drill Bit)
(Step One Below)
Remove Screw at bottom of AGM Mag.


(Step Two Below)
Knock out Retaining Pin with Hammer and Small Nail.


(Step Three Below)
Remove Hi-Cap Internal

(Step Four Below)
With the Razor Saw remove the tabs on the sides and bottom of the Mag Brand MP7 Mag. (Highlighted in Red) Then with a Hacksaw remove the remove the area at the top of the mag in the photo. (Also Highlighted in Red) Clean up with a sanding block. I made a sanding block with a piece of 2x4 that I spray glued a piece of coarse sand paper to.

(Step Five Below)
Knock out the pin, that retains the block, that holds the end of the spring in place. Hold the block in place when removing pin or it can fly out. Push the block below the pin and replace the pin as shown below. Later when it comes time to drill through the new internal, to make a whole for the retaining pin, the whole will go through the repositioned plastic block and not through the end of your spring!


(Step Six Below)
Cut two Popsicle Sticks in half and spot glue to each side of mag as shown. These will keep the thinner top of the MP7 mag centered in the MP44 mag housing.

(Step Seven Below)
For this step I used some Heat Shrink made for power packs, but tape could be used as well. When the long edge of the MP7 mag was removed, the glue/weld that held the two sides together was also removed. Without this step the mag can split open when loaded with BB's!

(Step Eight Below)
Insert new internal.

(Step Nine Below)
Carefully position the new internal to match position of original mag feed location. I kept one original MP-44 Hi-Cap as a reference for this step! When satisfied, use a clamp to hold internal in position. Then using a 3mm drill bit, drill half way through the old retaining pin location on each side of the MP-44 mag. Do not try to drill all the way through from one side to the other. A drill press works best for this step!

(Step Ten Below)
Replace the retaining pin, with clamp still in place, then remove the clamp.

(Step Nine Below)
Side by side comparison of finished conversion.

This conversion was not my idea, it was the brainchild of Ulrich Von Offenberg, who posts on the Midwest Ostfront Airsoft boards. I just took his idea and modified it a bit.


