2nd Bat
Master sergeant 
Posts: 11,813
|
Post by 2nd Bat on Feb 23, 2008 14:16:32 GMT -5
Both issues have been revised on later productions and I can show you simple but very effective fixes. A matter of taking and posting pictures. I'll get them up and you can revise your gun to incorporate them if you'd like. I now use the removable stock ferrule from the M14 gas assembly and a small PVC tube to represent the M1 Barrle muzzle and hold the locking lug in place. I can mail you the part. PM me with your address again. I know it's overseas but it's a small, light part, easily installed. It does not interfere with the Bbs which was a worry I had.
|
|
|
|
Post by spitfire740 on Feb 23, 2008 14:43:00 GMT -5
I had an earlier problem with the gun malfunctioning, and I think the problem was that I got too much sand in the internals at one of our beach events. I cleaned it off, but it must have gotten on the inside. If I buy a new gearbox, which one would you reccomend (I'd assume just the standard Tokyo marui), and will I need to do any filing/milling to get it to fit in?
|
|
2nd Bat
Master sergeant
Posts: 11,813
|
Post by 2nd Bat on Feb 23, 2008 18:13:12 GMT -5
I would say the AGM M-14 gearbox would be the least expensive and best way to go. What base gun was your rifle built on. (I don't recall) I can get individual gear boxes for the M14 along with my next group M-14 order it would bolt right in with no alteration
|
|
2nd Bat
Master sergeant
Posts: 11,813
|
Post by 2nd Bat on Feb 23, 2008 18:26:19 GMT -5
Here are some pictures to show the current approach I take to attach the lower stock to the barrel assembly which works well and would be a fairly easy adaptation to most existing guns. First find the old gas assembly ferrule off the M14 gas assembly. It's a thin piece of sheet metal with two large holes to accomodate the sliding gas tube for the M14 and the M-14 barrel 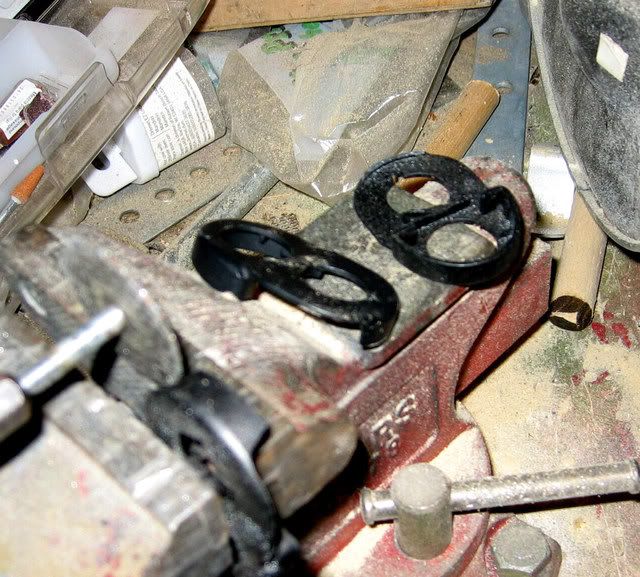 In the picture above you can see three such ferrules, One in the vice and two behind. Note that the first aleration you do is to cut off the small flange so it can mount flat on the shortened M14 stock The ferrule to the extreme right has already had this flange removed while the one in the vice shows the intended cut. 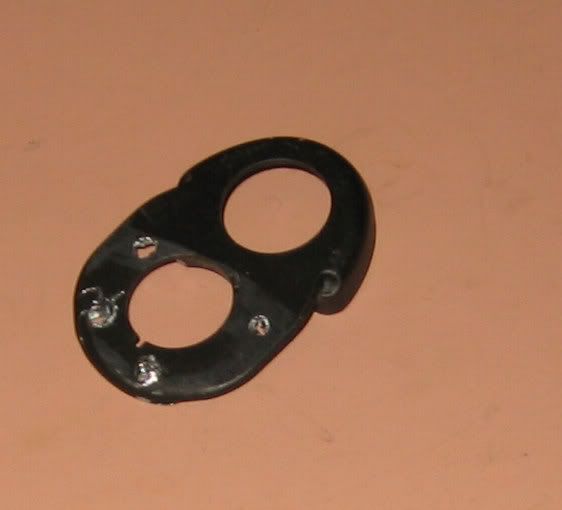 Next drill four tiny holes into the flat surface and file till smooth The upper grooved channel on the ferrule with end up seating the forward portion of the thin Garand heatshield (wooden hand guard) 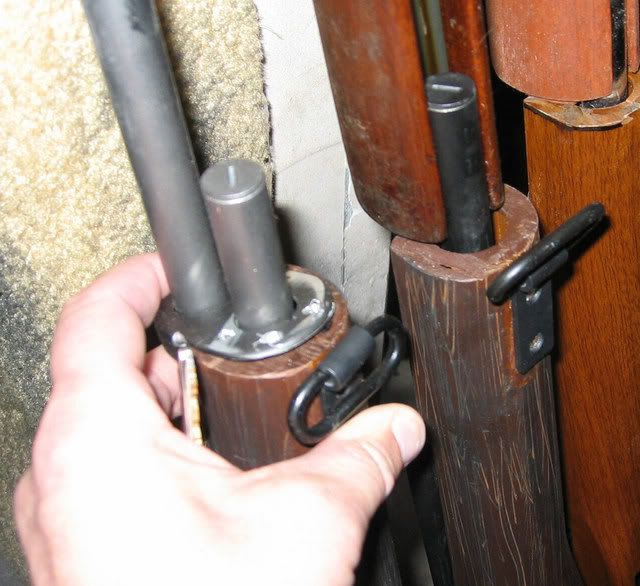 Slide the newly fashoined ferrule down the barrel and position it so the sliding gas tube will enter and exit the lower hole without snagging and then use your predrilled holes as a template to drill into the stock forward bulkhead surface and once aligned attach with four small screws. 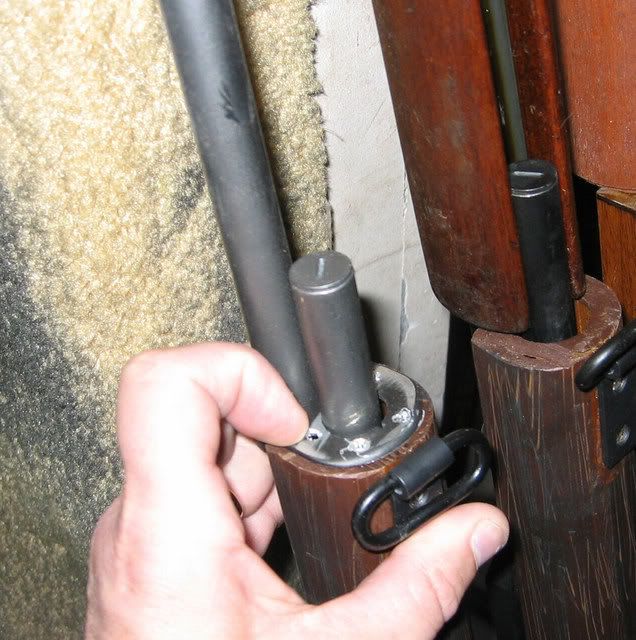 I usually pinch it all into place and attach one screw as a guide to steady everything before positioning the other screw holes into the stock. To facilitate positioning the drill I also draw back the sliding gas tube so it is out of the way while drilling. Again makijng sure the gas tube hole is properly aligned. If not, you're going to end up impeding the sliding gas tube and will no be able to rack your bolt. Once in place paint all the exposed metal and screw heads to match your Garand metals (flat brack or medium dull grey) slide the handguards into place using the same spacers and mount the Garand gas reservoir assembly at the guns muzzle. This will eliminate the need for the old zip ties and exposed cloth tape. It holds solidly and looks much much better. On the AGM and CYMA stock there is a natural bulkhead (Which you can clearly see in the pictures above after they have been cut and filed) These are built into the M14 stock and facilitates this adaptation beautifully. For the others makes (Marui, UTG, TSD, etc. you'll have to create this area to drill into with resin paste or wood filler. |
|
|
|
Post by lindir on Feb 24, 2008 9:38:34 GMT -5
PM sent with address for the parts  Thank you very much. |
|
YankeeDiv26
Staff Sgt.
 Frustrated Mac Owner
BDM<33
Frustrated Mac Owner
BDM<33
Posts: 2,462
|
Post by YankeeDiv26 on Feb 24, 2008 13:30:51 GMT -5
Nice idea with the ferule 2nd bat, it seems like it would work very well. I did this not too long ago just using a small bracket, a screw, and an original sling swivel ferule. Minimally visual externally and actually is suprisingly sturdy. I took a small peice of scrap metal and bended it in an oval around the top of the barrel and then threaded it for the proper screw.Next I threaded the screw through one of the existing holes from that was left from the m14 style sling mount. Then I simply placed the original ferule and swivel sling ferule (glued together) in it's place. Note: you MUST place the ferule/swivel sling ferule in place BEFORE tighening the screw, if you don't it will pull down on the barrel and you will not be able to place any hardware on it. Then I simply tightened the screw, replaced all the hardware, and the project was done. i192.photobucket.com/albums/z133/thuntley82/DSC02226.jpgi192.photobucket.com/albums/z133/thuntley82/DSC02220.jpgOnly took about 15 minutes alltogether. The only extra expense is an original swivel sling ferule which only costs a couple bucks. I like it because the sling configuration is closer to that of a real garand than that of the m14 sling mount. |
|
2nd Bat
Master sergeant
Posts: 11,813
|
Post by 2nd Bat on Feb 24, 2008 14:07:10 GMT -5
Wouldn't that impede the gas tube and prevent you from racking the bolt?
|
|
YankeeDiv26
Staff Sgt.
Frustrated Mac Owner
BDM<33
Posts: 2,462
|
Post by YankeeDiv26 on Feb 24, 2008 14:22:00 GMT -5
It does. The gas tube on the m14 is too long to use with an original swivel sling ferule. What i did was just put a long bolt in place of the gas tube and locked the bolt in place. My bolt was loose anyways and would occasionally slide out of place. Very annoying. Racking the bolt on an aeg serves 0 real purpose anyways, so I could care less.
|
|
2nd Bat
Master sergeant
Posts: 11,813
|
Post by 2nd Bat on Feb 25, 2008 0:35:46 GMT -5
You can use the original Garand sling swivel but it takes a great deal of precision filing and even then often snags the gas tube. It's also hard to firmly attach to the plastic lower stock. I'm assuming you fill out the open area under the forward handguard with a dowel or some such thing.
|
|
2nd Bat
Master sergeant
Posts: 11,813
|
Post by 2nd Bat on Feb 27, 2008 0:47:28 GMT -5
My work on the revised and enhanced lower stock is progressing and the apparently availability of affordable, functional, flush mounted magazines has reinvigorated my interest in proceding with this along with the disappointment I see in the AZR offering. Essentially a very precise Garand like stock will be offered as an option for new customers of my AEG Garand and as an enhancement accessory for folks who already have one. The stock will be thicker through the mag well area and taper to the forward handguard and will not have to utilize stock fillers for the M14 stock bolts or butt plate flap. Most importantly it will be a solid wood lower stock. It will be very hard to distnguish from an actual Garand even with the magazine in place and it will be some where around a $200.00 enhancement. (depending on my net costs after development and production)
|
|
Dog
Master sergeant
Posts: 50 
|
Post by Dog on Mar 1, 2008 16:44:39 GMT -5
Here you are John. Eventually there are only 8 rifles in this picture. Two guys canceled and the rest managed to leave early. I didn't have mine with me, since I was organizing this event.  |
|
TommyGunner
Staff Sgt.
Hackjob Mauro
1st Marine Division, 1942
Posts: 2,265
|
Post by TommyGunner on Mar 1, 2008 17:23:30 GMT -5
Damn you guys all look great. Thats the most airsoft Garands I have seen in one place at an event. Congrats guys they all look fantastic.
TommyGunner
|
|
2nd Bat
Master sergeant
Posts: 11,813
|
Post by 2nd Bat on Mar 1, 2008 19:15:08 GMT -5
Wow! That picture from across the planet makes me feel very very proud. Thank you for sharing. You guys look great. Love seeing all my Garand AEGs all in one place together with great impressions and smiling faces. I'll bet your German opposition don't like seeing them all!
|
|
|
|
Post by lindir on Mar 20, 2008 12:07:03 GMT -5
Hi there, First thank you to 2nd bat for the spare parts I received. I was wondering if you could spare a few advices on how to fix the new problem ? The front end wood part isn't any more hold very well because the new part isn't blocking it unlike the garand RS part. Please look on the pictures you can see very well that the part of the front end that should be hold by the metal connection piece isn't anymore "covered" Sorry for my awkward english i'm not used to explain such things. Thank you for your help i256.photobucket.com/albums/hh164/Lindir49/DSCN3311.jpgi256.photobucket.com/albums/hh164/Lindir49/DSCN3312.jpg |
|
2nd Bat
Master sergeant
Posts: 11,813
|
Post by 2nd Bat on Mar 20, 2008 12:21:04 GMT -5
Remove the handguard that is loose and wrap a 1/2 inch perhaps 20 inches long section of cloth tape around the barrel back at the point where it links up to the lower (skinny) handguard and main stock) Wrap another section of cloth tape up toward the end of the upper handguard although because the inner hole in the handguard is narrowerer there you will want about a 12 inch length of cloth tape. Size the wrap so the handguard has to be forced into place (but not so much so that there is danger of the handguard cracking) This will very firmy hold the handguard and prevent it from either wiggling or sliding up and down. The lengths quoted above are esteimates so you'll have to add or subtract until it's good and snug. Then attach the gas reservoir assembly as befire and add a set screw through the lower ring into the M14 outer barrel to hold it all firmly into place. (As mentioned earlier in this thread.) I hope that helps. I typically paint the exposed thin bezel on the handguard so it doesn't look so naked.
|
|
|
|
Post by lindir on Mar 25, 2008 4:28:06 GMT -5
Thank you, do you have any pictures of this ? i would help a lot Thanks a lot
|
|
2nd Bat
Master sergeant
Posts: 11,813
|
Post by 2nd Bat on Mar 30, 2008 0:17:53 GMT -5
I'll try to get some pictures from the next build out. Sorry I just finished four new rifles that are getting shipped on Monday. The next batch should be at that point in about two weeks and I'll try to remember to take a picture when I get to that stage of the production.
|
|
2nd Bat
Master sergeant
Posts: 11,813
|
Post by 2nd Bat on Mar 30, 2008 0:23:52 GMT -5
I'm getting all kinds of questions in PMs on the shortened clips and have now built over 100 of them but have done so three different ways. I have two major approaches here. For guns I build and ship as finished guns I am filling in the mag well walls to eliminate the gap that is present along the sides of the flush mounted clips. (They are skinnier then the M14 mags)
For magazines that will work in existing guns I am adding cut down M1 enblock clips which effectively fill the side gaps and prevent the shorty clips from wobbling around inside the mag well. If a customer wants to be able to continue to use the M14 full sized magazines they'll have to state that preference as otherwise I am going to fill in the side walls of the mag well and ship my newest designed shortened clip without the enblock clips. (I am doing it in a way that maintains a great look however)
|
|
click
Sergeant
 Company G, 3rd Battalion, 1st Marines, 1st Marine Division
Posts: 1,764
|
Post by click on Apr 17, 2008 7:23:42 GMT -5
2nd Bat, on my Garand, I am planning on doing what you did above. Is there any further modification needed to attach the front stock to the lower stock?
Click
|
|
2nd Bat
Master sergeant
Posts: 11,813
|
Post by 2nd Bat on Apr 19, 2008 12:54:09 GMT -5
Not really. Just take care to insure your ferrule is properly aligned with the cycling gas tube so it is free to move in and out with out getting hung up. Otherwise you won't be able to freely rack your bolt which of course has no function but feels cool after you reload. What I do is cycle the bolt back and tape it down and out of the way. I then align my custom made ferrule and use a pen to mark the small holes I want to drill. I visually look straight down to insure the tube is properly centered. I then release the tape and screw the ferrule into place with the tube in it's forward position again insuring that the tube is centered, Unless you tape back the bolt the protruding tube makes it hard to get a clean and even hole drilled.
|
|
2nd Bat
Master sergeant
Posts: 11,813
|
Post by 2nd Bat on May 13, 2008 14:33:21 GMT -5
Several people have asked about the CYMA base rifle I have now chosen as my prefered base M14. It is marginally better than the AGM which I think is also quite good as a base rifle. The CYMA seems to be slightly better quality in materials and finish and does shoot a bit harder. (326 to 334 FPS on the AGM and 356 to 362 FPS with the CYMA using the same ammo. The CYMA seems to shoot a bit tighter which makes me thing perhaps it has a better barrel. The CYMA is typically a bit more expensive but either is extremely reasonable at $135 to $160 which seems to be what they sell for in the states.
The AGM as mentioned before comes cross wired and are set up for the larger Tamiya clips while the CYMA come with a attached fuse and a small Tamiya clip. With the fuse you need to use a smaller battery which works fine for WW2 skirmishing where fewer rounds are typically fired. On my custom guns I'll set up the batteries however the customer would like.
|
|
|
|
Post by biguk on May 25, 2008 10:32:24 GMT -5
Hey i was passed your details from the UK ww2 Airsoft site. Well im in the market for an M1 garand.
I here yours are top class. So well here i am registering my interest..
Would love to chat more about getting one of your creations.
|
|
YankeeDiv26
Staff Sgt.
Frustrated Mac Owner
BDM<33
Posts: 2,462
|
Post by YankeeDiv26 on May 25, 2008 10:34:16 GMT -5
biguk, try PM'ing 2nd bat. It will be much easier to contact him via PM.
<YD>
|
|
2nd Bat
Master sergeant
Posts: 11,813
|
Post by 2nd Bat on May 25, 2008 21:03:10 GMT -5
Thanks YD. He did so and once I'm rested up from Jump to Destiny (Just got back an hour ago) I'll get him off the answer to his specific questions. For all the other PMs forgive me but I have a lot of catching up to do after a week long trip to Texas and then the 3 days at Jump to Destiny including the 1:30 AM wakeup prepping for the night drop this morning. Great time!
|
|
|
|
Post by biguk on May 26, 2008 6:54:45 GMT -5
Cool...i sent you another PM today so just ignore that one...my browser played up so i wasnt sure if it sent.
Look forward to hearing from you
|
|
2nd Bat
Master sergeant
Posts: 11,813
|
Post by 2nd Bat on Jun 7, 2008 18:19:16 GMT -5
The Jump to Destiny are all sold and have been shipped. I have perhaps the materials to do another seven or eight of the version ones and will play it by ear as to whether or not it makes sense to produce the components for more. I will be getting in another grouping of materials to build another run of version twos in the next week or so.
|
|
|
|
Post by burke on Jun 10, 2008 16:52:44 GMT -5
forgive me if i missed it but will you be offering your enhaced stock by itself for those of us already with converted m1's...
|
|
2nd Bat
Master sergeant
Posts: 11,813
|
Post by 2nd Bat on Jun 10, 2008 20:29:09 GMT -5
If you bought it from me I will make them available, once I handle the set up costs.
Hopefully with some volume I'll be able to get the price down. Right now the cost per stock is way too high.
|
|
2nd Bat
Master sergeant
Posts: 11,813
|
Post by 2nd Bat on Oct 10, 2008 0:03:44 GMT -5
I probably get four PMs a day asking for advice and tips from you Garand conversion do-it-yourselfers. I don't mean to be rude or un sympathetic and I admire your desire to build your own. The fact that my design has inspired you is flattering and not at all offensive to me. I've posted tips and suggestion in the assorted threads and want to see more and more Garands on the WW2 airsoft boards but geez guys I build these things and sell them. I typically have two to three thousand dollars invested in inventory and awaiting components so I can keep up with orders which seem to come in spirts rather than any consistent flow.
At what point does it really make sense for me to keep spending 30 to 60 minutes a day responding to inquiries and endless questions on how you need to go about doing your own? Is it unreasonable to suggest you think a little bit about what you're asking? These aren't terribly hard to build although they do take some time and indeed you do risk cracking stocks, making a bad cut or ruining handguards. Guys, it's part of the deal and yes there are steps you probably hadn't anticipated and stuff that doesn't just slide into place. I know it can be frustrating but yikes I've had a few of you get MAD at me (or so it seems) because something in your little project went over the hill.
Please stop posting PMs on "How do I do this?" and what length should this be...and where do I make the cut to...and how do you attach the...(I posted a thread for Gods sake) and where do you get your clips...and how do I modify the clips? (I posted a thread for Gods sake)
Am I just a grumpy old crumugeon or does this seem like a reasonable request? By all means PM if you bought one of mine and have a question or concern or if you are considering buying one of mine. Frankly I think I've been more than reasonable in supporting everyones individual projects and efforts.
Is this post unreasonable?
|
|
Seff
Private
.30-06 - Turning Cover into Concealment since 1906
Posts: 344
|
Post by Seff on Oct 10, 2008 12:57:44 GMT -5
Not at all.
If I were you I'd refer people to either your threads or the .pdf from Ontario Airsoft if they insist on PM'ing you. I agree with you, it's a fairly easy conversion to do.
|
|


 Thank you very much.