click
Sergeant
 Company G, 3rd Battalion, 1st Marines, 1st Marine Division
Posts: 1,764
|
Post by click on Jun 19, 2008 8:34:38 GMT -5
Hey guys, I have a problem here. I have been acquiring parts for my garand conversion, and just when everything was coming I get a new twist. I was going to have a friend who was going from the US bring me a small bucket of bondo. But, I was unaware that it was a flammable substance so it was confiscated at the airport never to be seen again.
My problem is that I have a green stock on my AGM M14. I was thinking, and 2nd bat confirmed, that I would be able to just bondo over the stock, stain it a few times and presto! But now without the bondo it is a little more difficult. Would anyone suggest any other substances that I could use as a substitute? Should I just try to paint the stock? What should I do?
2nd Bat in your conversions you sent along small amounts of bondo right? And they weren't confiscated?
Click
|
|
Sgt_Tom
Technical Sgt.
 Combat!
Posts: 3,580
|
Post by Sgt_Tom on Jun 19, 2008 8:37:56 GMT -5
Hey why can't you just buy it from a local store??
|
|
Adler69
Master sergeant
Legio Patria Nostra
Posts: 2,859
|
Post by Adler69 on Jun 19, 2008 8:41:22 GMT -5
Click ,
i'm sure they have something similar to BONDO in Poland , i remember from growing up in Argentina that there was a 2 part compound similar to BONDO my Grandfather used to fix his old CJ6 a few times.
|
|
click
Sergeant
Company G, 3rd Battalion, 1st Marines, 1st Marine Division
Posts: 1,764
|
Post by click on Jun 19, 2008 9:19:42 GMT -5
Click , i'm sure they have something similar to BONDO in Poland , i remember from growing up in Argentina that there was a 2 part compound similar to BONDO my Grandfather used to fix his old CJ6 a few times. Yeah, I guess I could check an auto shop. how would you describe it? I personally have never handled it so I am a little  when it comes to Bondo. Click |
|
Adler69
Master sergeant
Legio Patria Nostra
Posts: 2,859
|
Post by Adler69 on Jun 19, 2008 9:41:04 GMT -5
Click, Bondo is a 3M product and after checking their website I found that they do have Poland on their list of countries that 3M products are sold in , so I am guessing that Automotive part stores over there might have Bondo in stock. Ed.
|
|
click
Sergeant
Company G, 3rd Battalion, 1st Marines, 1st Marine Division
Posts: 1,764
|
Post by click on Jun 19, 2008 9:48:43 GMT -5
Thanks! ;D I should be heading there within the next week or so!
Click
|
|
2nd Bat
Master sergeant
Posts: 11,813
|
Post by 2nd Bat on Jun 19, 2008 10:42:33 GMT -5
It is usually described as resin paste or body filler. There are a number of brands and I have no doubt it is available in Poland. It is reasonably easy to work with although messy but do be careful NOT to mix it too hot (Use too much hardner) If you do it will harden far too quickly to use AND potentially be hazardous as there is a reason they call it "mixing too hot." It literally gets very, very HOT and could present a hazard which is why it has shipping restrictions.
If you plan to create the proper Garand shape on your modified M14 stock that's awesome and done well it can come out really good, creating an affordable and attractive Garand. Here are some things I've learned: Put a dowel inside the BB nozzle (or tape over it) inside the mag well so no bondo or bondo dust will end up inside the gun during the process or when you're sanding. Build a levy with tape or plastic resin around the mag well where you intend to enhance and thicken the stock. To support this effort, drill in and partially set some small screws to create a template for the shape you want. (Where the M14 angles at the mid point on the mag well I place a row of tiny screws and carry that line straight to the front of the mag well. This will help guide you as you slop on the bondo. I place additional tiny screws into the stock in front of the mag well creating the sloped angled shape of a Garand. Don't be worried too much about the shape you end up with initially when you slop on the bondo and realize you will have to apply in layers with multiple coats. Once you have an exaggerated shape created and it has dried you can file it down to the desired shape and the screws will serve as rebar for strength so the bondo won't just chip away from your base plastic stock. You will find yourself coating over and over as gaps and folds will be discovered as you sand and file.
Sand it all smooth and then use a rasp and rough sand paper to create "wood grain" Then shoot a base color using spray paint. (Brown, Medium brown or if you can find it "Expresso") Allow that to dry and then follow the tips elsewhere in the thread to enhance your "wood finish" by wiping a thinned wash of black paint and using a roughed up brush to dabble effect the base color. You will be amazed at how good it will come out.
I've done a couple of Garands this way and followed this process when making my plug for the final version two stock. It's tedious and time consuming but bondo is cheap so the cost of materials is quite low. It will add weight and rigidity to your stock and feels good in the hands actually once properly finished.
Share your results and good luck.
|
|
click
Sergeant
Company G, 3rd Battalion, 1st Marines, 1st Marine Division
Posts: 1,764
|
Post by click on Jun 19, 2008 13:37:23 GMT -5
Thanks 2nd Bat! The more you explain the clearer it is to me (funny how that works isnt it? ;D ) Adler, I did a little more checking and it seems that there is no BONDO, as a brand name, for sale in Poland. Although I am sure that there is an alternatives. I guess I will just have to ask.  Click |
|
2nd Bat
Master sergeant
Posts: 11,813
|
Post by 2nd Bat on Jun 19, 2008 14:49:20 GMT -5
Here are some photos of the process that might help you and others.  First determine where you will build up the stock to modify it from a M14 to a fuller more Garand like shape. I had an actual Garand to use as a model and that helped a lot but photos should work as well. Drill small holes and insert a selection of screws and screw them in until their profile is slightly inset from your intended shape. 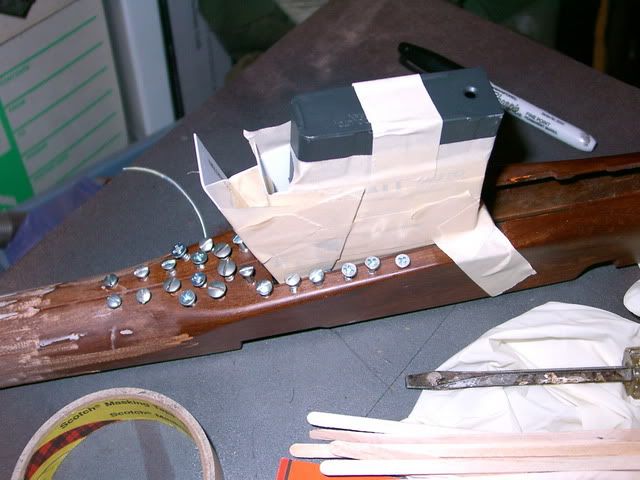 Mask off the mag well area so as to keep the resin paste out and to provide an inner form for the built up wall around the mag well. 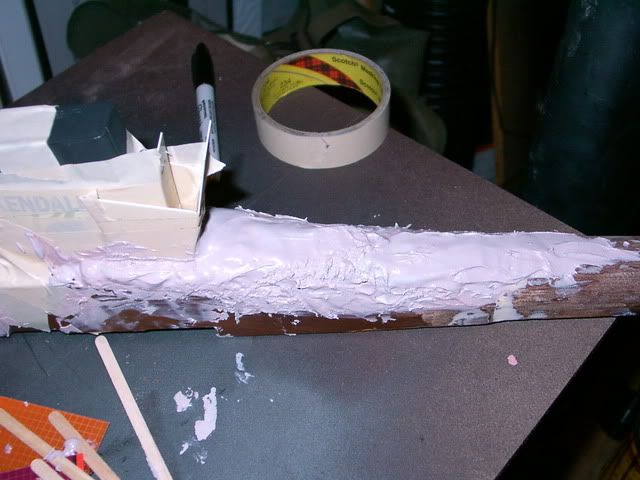 Slop on the paste (you may have to do several coats) 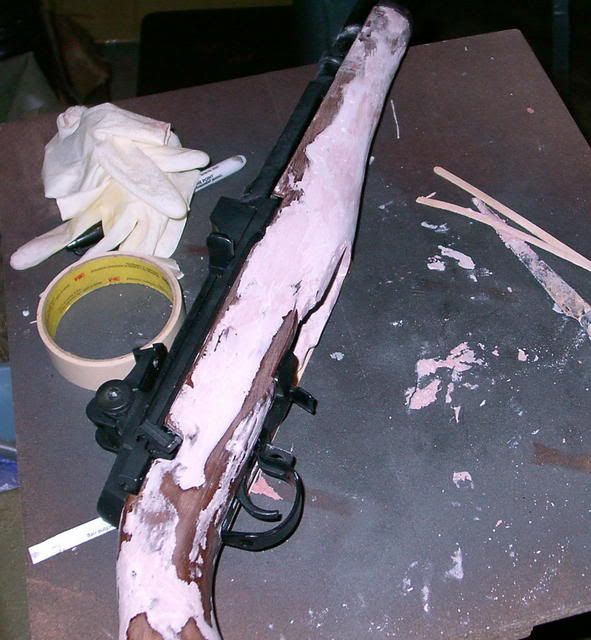 Allow to dry (several hours depending on thickness) and then file and sand to the desired shape. (You will need to add thin layers to dips and inevitable voids) and then file and sand unitl you attain the desired shape and surface. Note: if you wished to eliminate the selector switch you can use tape as a bulkhead for the inner stock recess and fill in the selctor switch recess and then file and sand for a finished shape that virtually eliminates that infidelity. You will also want to fill the Butt plate flap grooves, M-14 stock bolts and bolt release recess. I do those steps on all the version one, revised stocks. 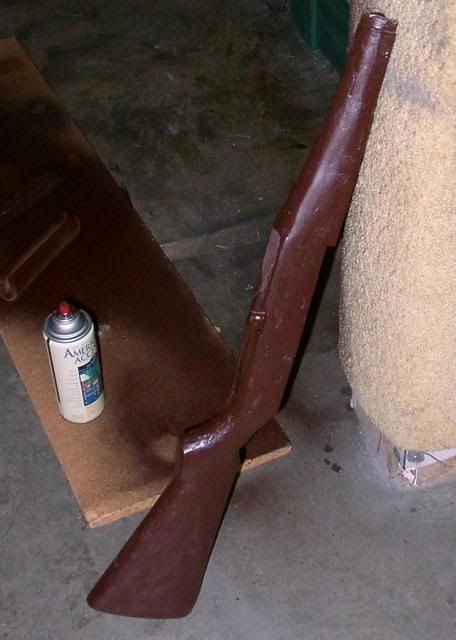 Once ready paint your base coat. (Expresso is shown) I file and sand this finish to create false grains and then coat in an acrylic combination of browns and black wiping it unitl I attain the desired finish that will closely match the woods from the original Garand handguards. As you can see this process is extremely labor intense but inexpensive in terms of materials. The end result is quite nice and provides an authentic shape and very solid stock. I've had a lot of people handle the two rifles I did this way and hand them back believeing they were all wood. This is however not a project for the faint hearted or folks without a good ventilated room and ability to leave a work area quite messy for many many days. Be sure to wear latex gloves and a respirator when sanding! Very toxic materials. |
|
click
Sergeant
Company G, 3rd Battalion, 1st Marines, 1st Marine Division
Posts: 1,764
|
Post by click on Jun 19, 2008 15:52:43 GMT -5
Great tutorial! Thanks!
Click
|
|
Sgt_Tom
Technical Sgt.
Combat!
Posts: 3,580
|
Post by Sgt_Tom on Jun 19, 2008 17:11:40 GMT -5
Can you show what you do on the butt stock too.
|
|
YankeeDiv26
Staff Sgt.
 Frustrated Mac Owner
BDM<33
Frustrated Mac Owner
BDM<33
Posts: 2,462
|
Post by YankeeDiv26 on Jun 19, 2008 19:18:23 GMT -5
Tom, I think he may have put that in the "responces to PM's on garand" thread many moons ago, not sure though. You may have some better luck looking in there.
<YD>
|
|
2nd Bat
Master sergeant
Posts: 11,813
|
Post by 2nd Bat on Jun 19, 2008 21:12:24 GMT -5
It's probably buried way back there somewhere. It's pretty straight forward and shouldn't really require much of a tutorial. Obviously you remove the butt plate flap. To do that you remove the entire butt plate assembly with the two screws in the back. The lower sling swivel will come out when you remove the long lower screw as it serves as the bolts nut. Once out you pop out the retaining pin and jiggle the assembly until the pin that's serves as a flap lock pops out. It is held in by a spring. These parts are not needed so if the spring goes flying not to worry. I then reattach the butt flap housing which includes the trap door. This will leave two grooves in the butt plate and two upper grooves into the stock that will need filling. 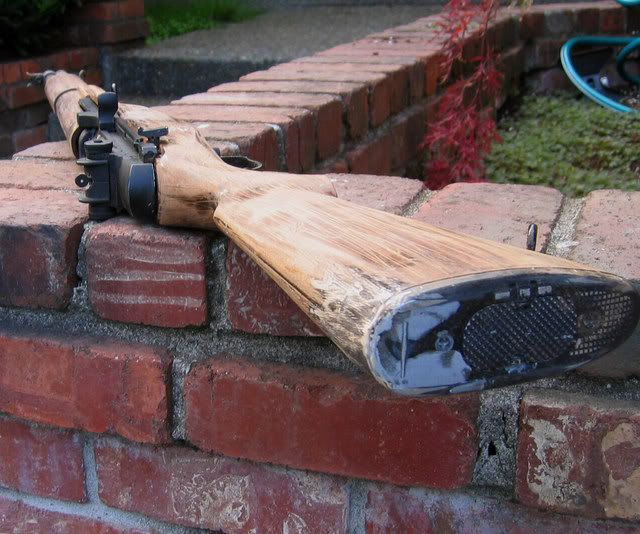 I use wood stir sticks and dab the resin paste in, slopping enough about to cover the exposed upper metal section from the M14 and further coat the exposed plastic seam from the M14 stock. While you are at it, fill the areas on the receiver group and the stock bolts as well as the bolt release indentation on the M14 and if desired the section that dips for the selector switch (if you remove it.) 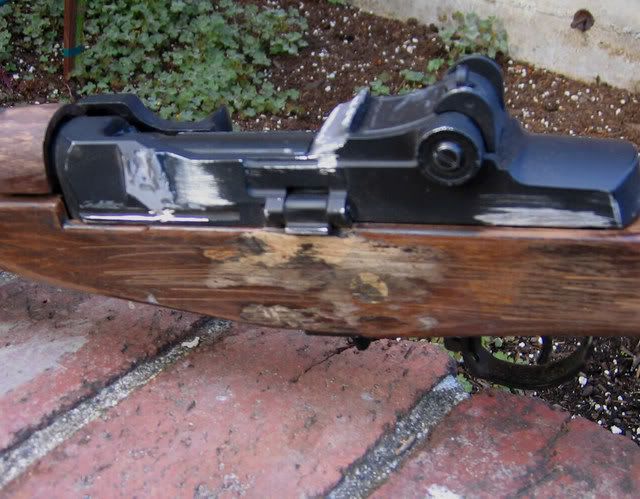 Once everything has been filled and drys. Sand it all down and provide your final finish and paint either flat black to match the finish of a new unissued gun or a parkerized grey (I use gunmetal mettalizer) For a field finish go over exposed surfaces with a silver pen highlighter 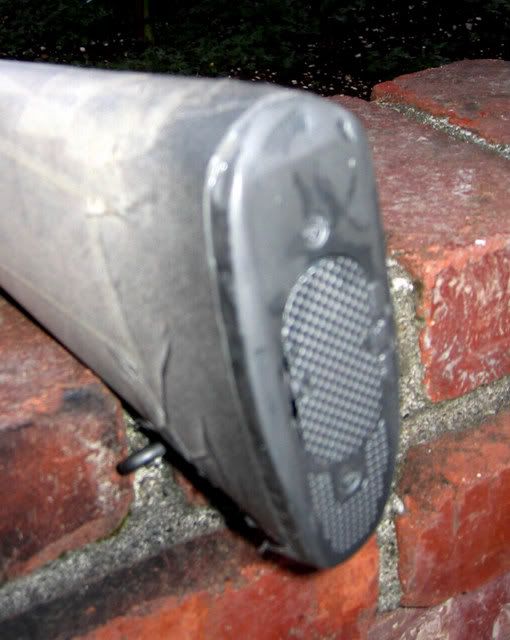 Your finished Garand should look great! 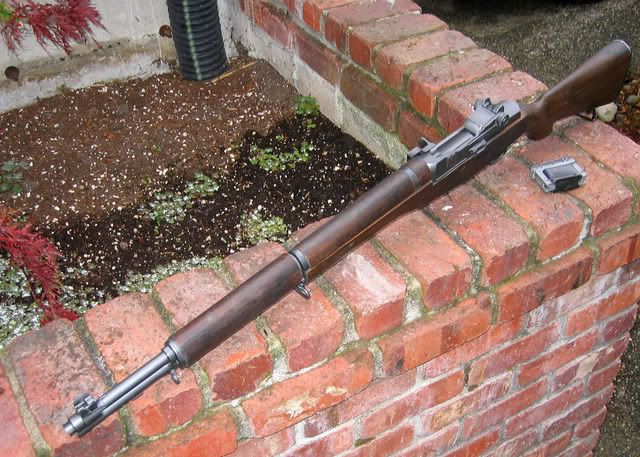 Note: this is an early version one and doesn't reflect some of the later enhancements I do (Barrel tip, and set screw in the gas reservoir assembly rear barrel ring.) I hope this all clarifys why I charge what I do for the finished guns. Obviously if you have the confidence, tools and proper place to do it yourself you can save yourself a good deal of money and save me a whole lot of time to devote to other projects. I suspect as many of my rifles have been built by do it yourselfers as ones I built and that's great. If true, there are over 300 Garand AEGs out there! If I may say so I think even the version one looks a great deal better than the AZR version which just doesn't look right even with the dramatic improvements. The front stock handguard is still too short, the gas reservoir is also too short and looks goofy and the stock shape is weird. I'm amazed that no major producer has offered a viable Garand AEG and until they do a Hooah Airsoft or do-it yourself modified M14 seems to be the best bet. |
|


 when it comes to Bondo.