|
|
Post by jugendkrieger on Jan 2, 2008 19:24:31 GMT -5
are the Stock and foregrip going to be wood ?
|
|
|
|
Post by Capt. Zak on Jan 2, 2008 19:39:02 GMT -5
Very nice job on the sight Jer.
|
|
sharpshooter
Private 1st Class
 "Shoot anything that moves and if it screams in German...shoot it again"
Posts: 510
|
Post by sharpshooter on Jan 2, 2008 21:30:59 GMT -5
Looks amazing TommyGunner. I must admit that I had some doubt as to what the plastic would turn out to be.....but you have blown away any small trace of doubt I once had. It really looks like this could be an awesome asset to the allies arsenal!!!!! Watch out you krauts, HERE WE COME!
|
|
TommyGunner
Staff Sgt.
   Hackjob Mauro
1st Marine Division, 1942
Posts: 2,265
|
Post by TommyGunner on Jan 2, 2008 21:35:15 GMT -5
Thanks guys the support means alot. Its been a tough project so far but one I really do think will pay off.
jugendkrieger:
No the stock will not be wood, I am going to paint mine black to repliacte the composite stocks most WW2 issue BARs were fitted with. Also the front fore grip will nto be wood either. Replacing the piece would compramise the structural integrity of the BAR.
TommyGunner
|
|
|
|
Post by 101steasykid on Jan 2, 2008 22:29:30 GMT -5
I can't view the pictures. It just shows up as a red X in a white box. Could somebody please copy and save them into their photobucket, and send me a direct link by PM.
-Michael
|
|
Russian
Corporal
  Magician
Posts: 923
|
Post by Russian on Jan 2, 2008 22:37:59 GMT -5
Jer, impressive, yada yada yada, but you did something to your photobucket.  Just kiddin, it's startin to look like a bar....or a BAR, I guess...  |
|
TommyGunner
Staff Sgt.
   Hackjob Mauro
1st Marine Division, 1942
Posts: 2,265
|
Post by TommyGunner on Jan 2, 2008 23:16:23 GMT -5
Hmm I think photobucket is having some major problems. I have not done anything to my photobucket account and ther seems to be other people here on the boards with the same problems.
TommyGunner
|
|
|
|
Post by jugendkrieger on Jan 3, 2008 0:08:27 GMT -5
Jeremiah, (did i get that right ?)
i see. Well anyway its looking AMAZING. even though i cant see it anymore
(Photobucket Chokes on It)
|
|
TommyGunner
Staff Sgt.
   Hackjob Mauro
1st Marine Division, 1942
Posts: 2,265
|
Post by TommyGunner on Jan 3, 2008 10:57:43 GMT -5
Ok this is strange it is still showing me the dreeded red x so Im gonna try posting a pic just for the hell of it to see what happenes. 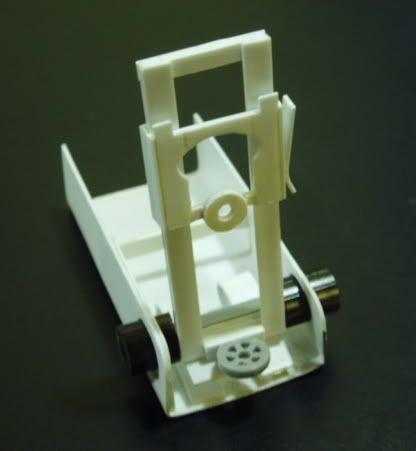 TommyGunner |
|
TommyGunner
Staff Sgt.
   Hackjob Mauro
1st Marine Division, 1942
Posts: 2,265
|
Post by TommyGunner on Jan 3, 2008 10:58:43 GMT -5
Well I guess what ever problem there was it is now fixed.
TommyGunner
|
|
Cpl. Hicks
Sergeant
   Unofficial Flaggrantly Wrong Weapons Policeman
Posts: 1,425
|
Post by Cpl. Hicks on Jan 3, 2008 18:44:26 GMT -5
Yup, It looks fine now, great site.
|
|
TommyGunner
Staff Sgt.
   Hackjob Mauro
1st Marine Division, 1942
Posts: 2,265
|
Post by TommyGunner on Jan 5, 2008 2:12:50 GMT -5
I just bought a wal mart Spring colt.45 and damn this thing shoots really really hard and acurate. So I decided to test out the finish that I am going to put on my BAR by painting this clear plastic pistol with the gun metal paint I will be using on the BAR. It came out fantastic, so good infact that Im not goign to be ashamed of bringing this pistol with me to events as my side arm. I even out new hand grips on it from my old UHC colt.
I will have pics tomarrow afternoon.
|
|
TommyGunner
Staff Sgt.
   Hackjob Mauro
1st Marine Division, 1942
Posts: 2,265
|
Post by TommyGunner on Jan 11, 2008 0:42:05 GMT -5
Back on track. I got the AGM M-14 from 2nbat today (again thank you so very much for helping me with that) and I am back on track.
I got the box late this afternoon, and with only today and tomarrow left before I go back to college I had to work very very fast. So I ripped into the gun and took her apart. I tore her down and started modifying the internals to fit the BAR. I found that there was very little to modify and very litle I had to add to the sides of the gear box to get the internals to mount inside the BARs reciver. By tomarrow I wil have the entire gun closed up and ready to begin the 2nd to last phase of the project, the massive ammoutn of puttyng and seem work I will have to do to make her acceptable.
Unfortunetly I doubt very much I will be able to have it finished. Infact I knwo for a fact I will have just enough time to close her up and glue the major components togeter and get it ready for the final cosmetic work. The cosmetic work will have to wait until I get back home for spring break...DAMN!!!! lol Im so close, actually All I needed was posibly three more days and it would be done...oh well, at least I will have the internals mounted and the gun functioning.
I will have pics tomarrow.
TommyGunner
|
|
|
|
Post by fido on Jan 11, 2008 5:50:55 GMT -5
just a small question: when you say "close her up" do you mean you install the m14 gearbox and then when you glued everything together, you wont be able to open it to maintain the gb?
|
|
TommyGunner
Staff Sgt.
   Hackjob Mauro
1st Marine Division, 1942
Posts: 2,265
|
Post by TommyGunner on Jan 11, 2008 10:34:58 GMT -5
Yep. thats exactly what I mean. If worse comes to worse with the gear box I will simply tear into the BAR again. I doubt anything will happen. I also have to glue the body to the gear box because there is no practical way for me to have designed the BAR receiver to be capable of being disassembled and the reassembled. Plus having the ability to do that would no doubt have an effect of the structural integrity of the BAR.
TommyGunner
|
|
2nd Bat
Master sergeant  
Posts: 11,813
|
Post by 2nd Bat on Jan 11, 2008 12:24:49 GMT -5
With my BAR replica which was built from the Resin replicas it too was done as a solid self inclosed body that I sealed. To get the the mechanicals you literally had to break the gun apart. It certainly isn't ideal but it makes for a very solid gun! 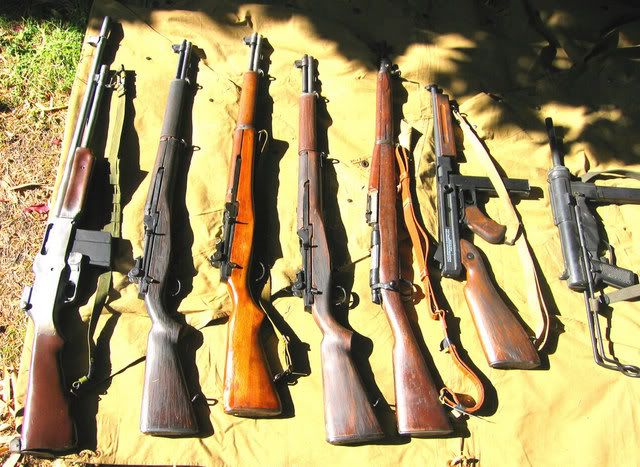 (Odd collection of my WW2 airsoft weaponry all are airsoft AEGs except the Springfield which is spring powered.) At the time there was no viable alternative as the VFC offering wasn't available. My total cost in materials was under $250.00 and the gun worked great and looked decent. Given the amount of work and the increase in quality the VFC is a bargain. Still I don't regret building it and I know the customer is pleased with it. I plan to build another for myself applying what I learned the first time but I have no plans to do them commercially. At $1000.00 the VFC is a great deal and a marvelous replica. I'm sure now knowing what's involved TG will agree although there is great fun in building and completing a project of your own. I'm hoping Tommy Gunner will make me one of his rear site assemblies and I plan on this one to build a bipod. |
|
TommyGunner
Staff Sgt.
   Hackjob Mauro
1st Marine Division, 1942
Posts: 2,265
|
Post by TommyGunner on Jan 11, 2008 14:40:35 GMT -5
Yep, I have seen some other pics of Johns BAR and it has the quality put into a Resin replica And performed just as the Stock AEG. Im looking forward to seeing his next attempt at a BAR, it should be very nice. Concerning the VFC, I can honestly say I agree with John. this has been a very time consuming build so far, not too difficult but there have been some hurdles. I already have a great ammount of pride attached to this build and seriously, how many other people can say that they have built a BAR...only one other that I know of, and he helped me get the M-14 to make mine possible. But if I had the money I would probably buy the VFC in addition to building my own.. It really has an oustanding build to it. And from how my project is going I will give my BAR an 8 out of 10 so far and probaly when finished Ill give it an 8 out of ten. It will deffinatly be a weapon you can get close up too and handle and go wow thats plastic?  , but there is only so much I can do with styreen to make it look like the reall thing. Oh and anytime you want me to make tht sight, just hit me up a PM. Also if anyone else would like sights built. I will be home for Spring break and during the summer. I will be able to fill out any requests for sights then. They will be universal for the BAR, Springfield, and 30cal MGs. I have yet to figure out a cost yet. Next up will be an M3A1 Grease Gun AEG. TommyGunner |
|
|
|
Post by troyluginbill on Jan 11, 2008 22:04:36 GMT -5
to add to tommygunners sight build ability, those of you that have the air sharp .30 and want an affordable accurate sight to go with it the browning used a BAR sight as the base sight. That is the only thing off of ians guns that I was disappointed in. And now Tommygunner has gone and fixed it.
|
|
TommyGunner
Staff Sgt.
   Hackjob Mauro
1st Marine Division, 1942
Posts: 2,265
|
Post by TommyGunner on Jan 12, 2008 0:04:16 GMT -5
Internal pics are posted. Alright now I got everything fitted inside the gun, it all lines up and is ready to be glued in and secured. I had very little to do in modifying the M-14 parts to fit. I was able to make the barrel, hop up, gear box and mag well all one giant piece. This really helps with the structural integrity of the BAR and making sure that everything is lined up inside. I used popsicle sticks to build up the sides of the BAR gear box to meet with the BAR receiver and it fits perfectly. I then cut pieces of pink styrofoam to stuff into the various crevices to make sure that the internals were supported. and here it is. Sorry for the poor quality pics. I was rushed to take them and finish packing up to head bck to college tomarrow. 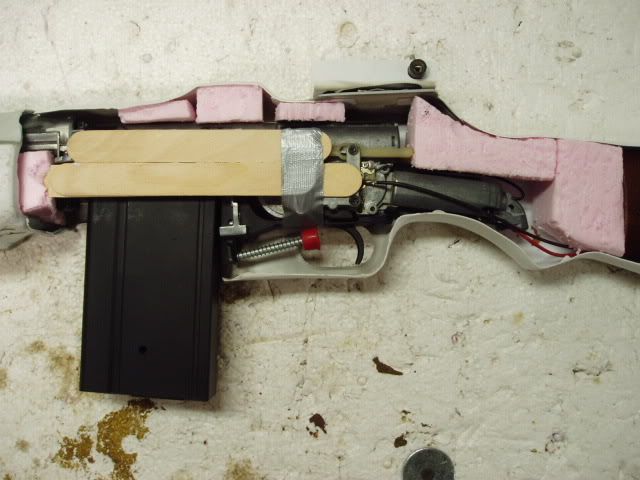 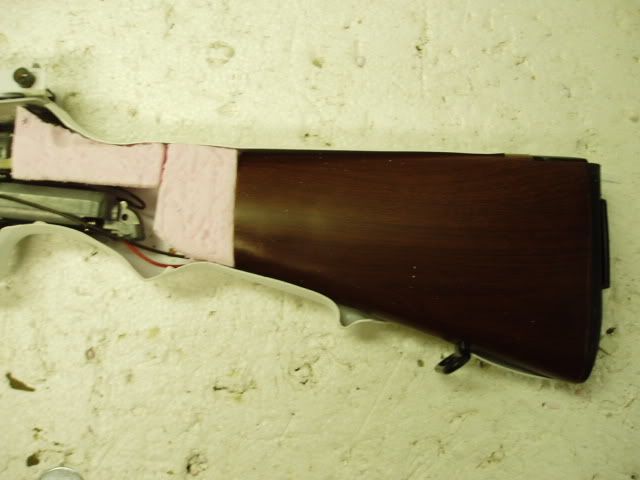 I used the M-14 rear stock and put it inside the BAR stock to house the battery and so that I would not have to build a new butt plate for the BAR. I can simple mod the one that came with the M-14. 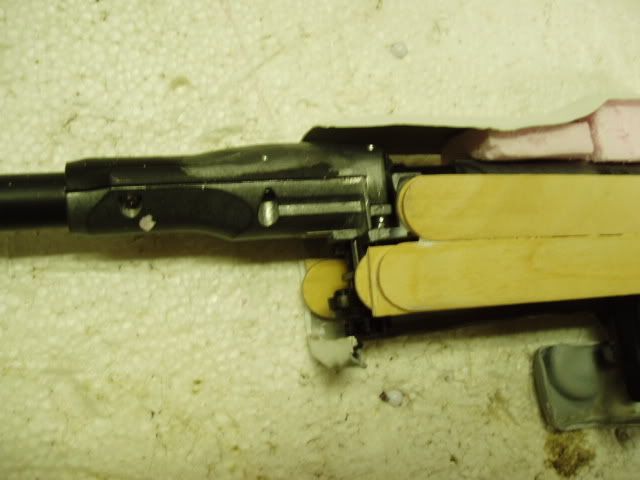 A pick of the spot where the barrel and gear box have been screwed together. I had to fo alot of grinding on the metal bits to make them fit into the BAR. 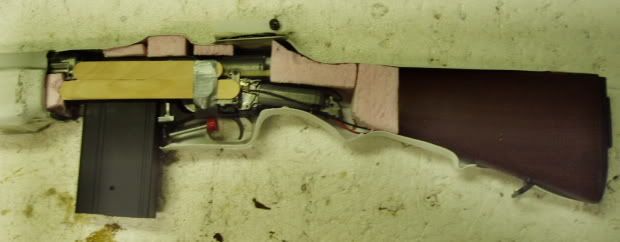 And there you have it. This will be all the work I can do until I can work on it again....which wont be until .......SPRING BREAK...in MARCH!!! AGHHHHHH...damn oh well lol. Thats the price I pay for going to college. TommyGunner |
|
deacon
Private 1st Class

Posts: 748
|
Post by deacon on Jan 12, 2008 2:52:30 GMT -5
very amazing. you definately helping me out. because im working on the same project.
|
|
|
|
Post by burke on Jan 12, 2008 15:01:22 GMT -5
Does it feel cheap?
|
|
TommyGunner
Staff Sgt.
   Hackjob Mauro
1st Marine Division, 1942
Posts: 2,265
|
Post by TommyGunner on Jan 12, 2008 16:19:03 GMT -5
Nope, I had the entire thing ducktaped together before I pulled it apart to show off the internals and it felt very very sturdy. Infact I was quite impressed with the feel and weight.
TommyGunner
|
|
TommyGunner
Staff Sgt.
   Hackjob Mauro
1st Marine Division, 1942
Posts: 2,265
|
Post by TommyGunner on Jan 18, 2008 2:02:11 GMT -5
Alright, this is gonna sound rediculous but Im gonna rip off the gas tube on the front end and replace it with either PVC pipe, or metal tubing. It will go into the front hand guard where I will have a block of wood put inside for it to fasten too. This way I will be able to attache a sling to the gun without fear of the gas tube ripping off.
TommyGunner
|
|
2nd Bat
Master sergeant  
Posts: 11,813
|
Post by 2nd Bat on Jan 18, 2008 17:46:54 GMT -5
You could insert non expanding foam or better still resin paste into all the hollow areas not covered by your pink foam and stuffing and once dry the gun would be remarkably solid.
I hollowed out the section directly below the mag release to access the M-14 set up while still being camouflaged with the BAR looking arrangement. It looks like you have rigged a plunger arrangement of some sort.
Unless you take the time to fill all the hollow segments I forsee some problems over time. Your model building skills are really going to come in handy as you do your cosmetic finish work.
Are you doing anything to artificially add a little weight? I'm not a fan of heavy guns especially although if too light it would seem a bit distracting.
|
|
TommyGunner
Staff Sgt.
   Hackjob Mauro
1st Marine Division, 1942
Posts: 2,265
|
Post by TommyGunner on Jan 18, 2008 20:38:12 GMT -5
The gun weighs about 7 pounds right now. SO Im gonna add weight to the stock and the front hand guard. Ill add about 5 pounds in each end so the gun should be about 16-17 pounds in the end.
But I never thought about the expanding foam. I like that, would that harm the internals at all though?
TommyGunner
|
|
TommyGunner
Staff Sgt.
   Hackjob Mauro
1st Marine Division, 1942
Posts: 2,265
|
Post by TommyGunner on Jan 19, 2008 22:41:54 GMT -5
Well I came hoem today to check out the Grease Gun and I started working on the BAR again. And I finished the internal set up glued everything in place, and closed everythign up and glued her shut. All I have left to do is the final cosmetic work. Whcih I may be able to get everything puttied up by tomarrow and ready for the primer and finishing coat to be applied the next time I come home for the week end. Which will Be Febuary 2nd.
In short this gun is only one more weekends worth of work from being finished.
TommyGunner
|
|
2nd Bat
Master sergeant  
Posts: 11,813
|
Post by 2nd Bat on Jan 20, 2008 13:55:15 GMT -5
That's terrific. The non expanding foam would bugger your mecahnicals up significantly if it reached them so you'd want to be careful to insure there wouldn't be access to any moving parts. I would have just squirted a bit in each of the vacant areas. Since the areas were fairly small. (You did a great job of filling in with your pink foam) I would have filled the vacums with bondo.
It's got to be exciting to be so close to being done. I'm sure you're anxious to finish it up. I anxious to see your pictures of the finished product and get a report on it's function.
|
|
TommyGunner
Staff Sgt.
   Hackjob Mauro
1st Marine Division, 1942
Posts: 2,265
|
Post by TommyGunner on Jan 20, 2008 15:21:28 GMT -5
I will have pics up today of it. I made mofre pieces of pink foam to insert nto the gun and then I did exactly what you said. Just squirted a bit into the creveces aaround the pink foam to ensure that they would not move around after being glued in. The apoxy has dried and I am about to go and sand the last of the seems down and the take pictures. This is getting exciting!!
TommyGunner
|
|
TommyGunner
Staff Sgt.
   Hackjob Mauro
1st Marine Division, 1942
Posts: 2,265
|
Post by TommyGunner on Jan 20, 2008 19:58:06 GMT -5
Well I finally attached the front asembly to the innser barrel. I simply put it on and put wedges of pink foam in it to make sure it was alligned properly and the drilled several holes in the outterbarrel and proceded to fill the entire forn end up with expanding foam. It is now hardened and fully secured. All I have to do now is finiedh the end of the stock and putty up the space between the barrel and the reciver and then she will get her primer coat tomarrow!!! But at this point it is fully operational and can be skirmished with.
TommyGunner
|
|
DeB
Private
AGM MP40 - Marui M733 and G3A4 Revenant
Posts: 179
|
Post by DeB on Jan 21, 2008 12:18:13 GMT -5
Hi Tommy!
Great gun!
so this replicas are empty inside, but in the photos you did I see that you cut the receiver from the front handguard and barrel assembly... so How will you reattach all togheter??
It's very beautiful! The only disappointing thing is that you have to glue all inside... maybe some screws from the open side that screw in some resin blocks...But the side is always plastic... I don't know...
Bye bye!
|
|