2nd Bat
Master sergeant  
Posts: 11,813
|
Post by 2nd Bat on Sept 30, 2007 0:24:03 GMT -5
Here are some photos documenting my latest efforts on what is currently my 5th Springfield. It is a straight stock, M1903A3 and it will be set up with a scope. 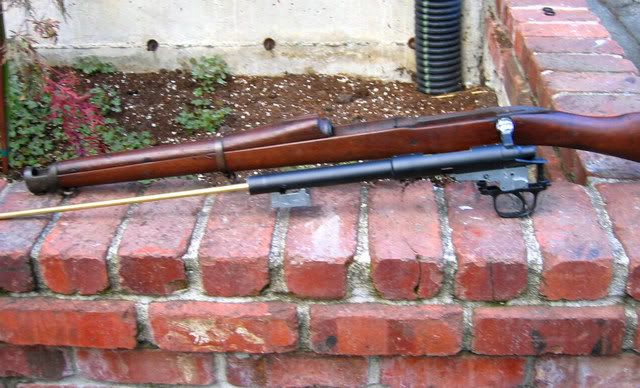 Here are the Springfield parts you'll need along with the base rifle. The parts from a Springfield you'll need as a bare minimum is the main stock with sling hardware and butt plate. and upper handguard (There are two types of upper handguards A1 and A3 styles) The upper stock band which includes the bayonet lug and connecting screws, The lower stock band with sling swivel. The ready switch and bolt lock mechanism with pin. For visual impact I use a drawer knob which I will add to the bolt for looks and a drawer knob that will approximate the extension on the rear of a Springfield bolt. These items are used to give more complete visual effects from the base rifles bolt and reciever areas. 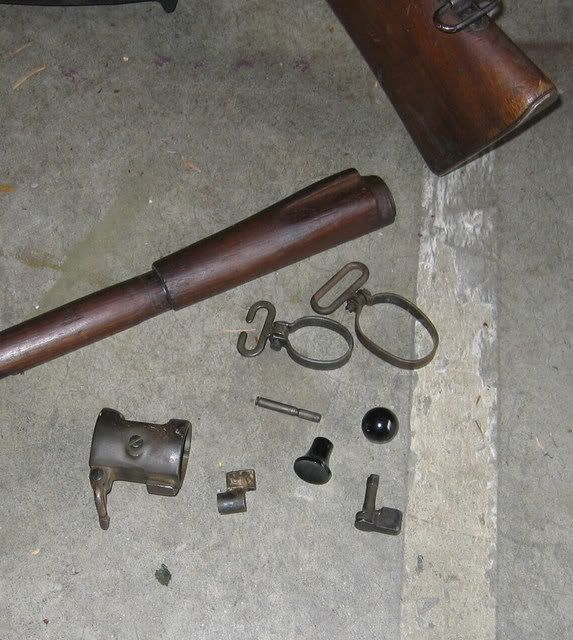 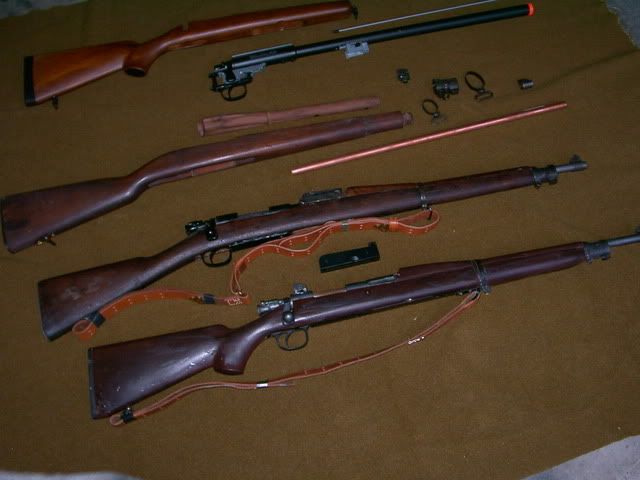 The photo above shows some of the stock variants (Straight, scant and C stock) that can be used and are WW2 correct. Note the base VSR rifle and dissasembly of the required parts. This photo shows the stock and the base rifle preliminarily adapted for use inside the gun. Note that the fat outer barrel of the VSR style rifle is cut an inch in front of the hop up system exposing the narrow inner barrel. I have flattened the modern bolt area with a dremel and file and attached a half marble ball to give it a WW2 looking bolt. 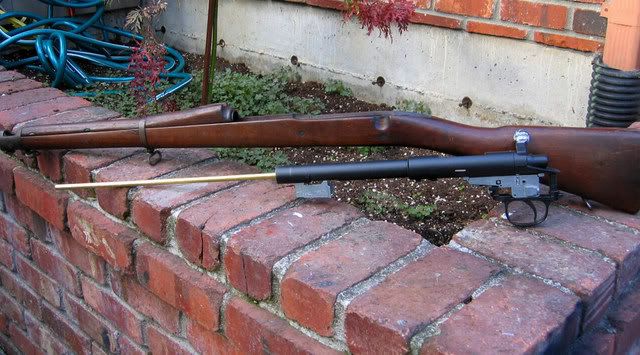 Using the base airsoft rifle as a template determine where and how much you have to file out of the actual Springfield stock. Mark it as best you can and I begin the process with a series of carefully drilled out holes using a drill 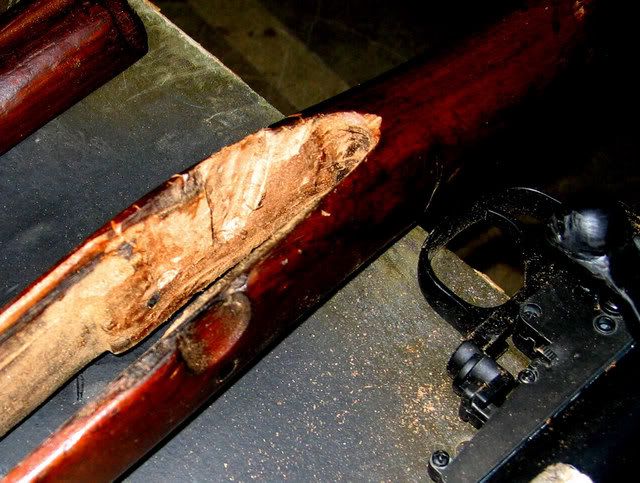 I repeat the process with the mag area. 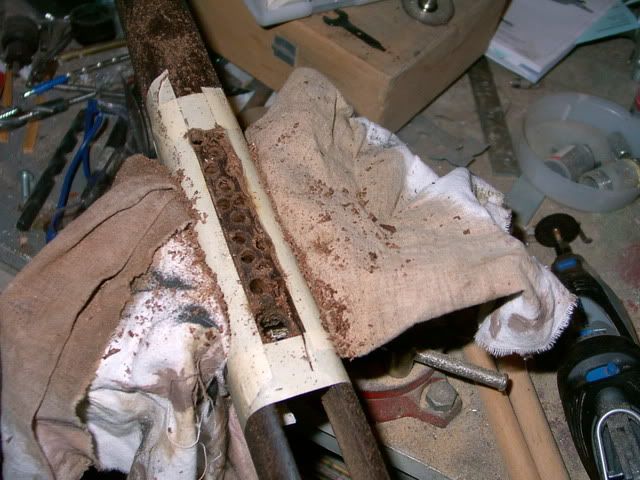 Tape off the rim of your cut area to protect the stock from your drill and dremel bit. Using a dremel with a rough chisel device I connect the drill holes to further shape the stock to accomodate the new internals. Note that I do so conservatively leaving the finish area to be done with a sanding tip. 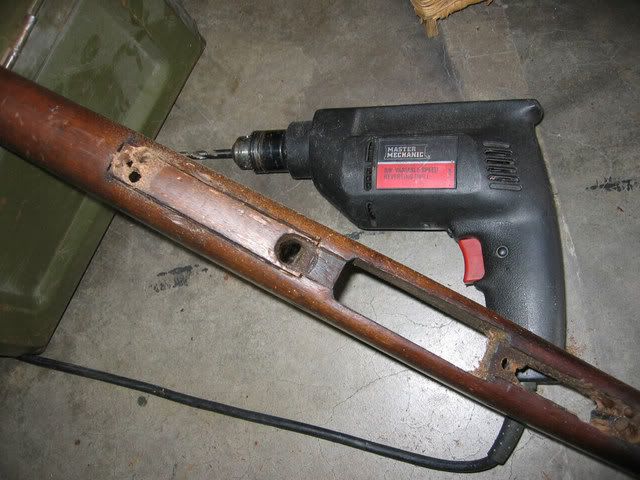 You will typically have to work around stock bolts and in the trigger area a screw channel which can be tricky but must be done. 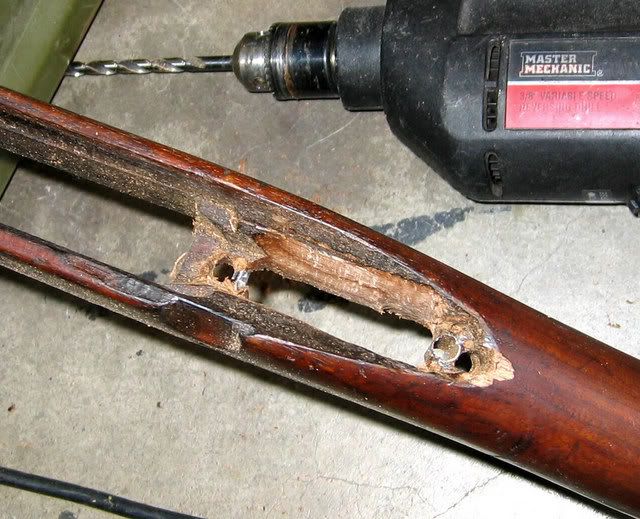 The area in front of and above the mag area must be cleared out to accomodate the base rifles hop up and mag catch. I determine how deep it is to go and then mark my drill bit with tape drilling only to that depth. I use that as my guide when later I do the finish work with a dremel and sanding tool. 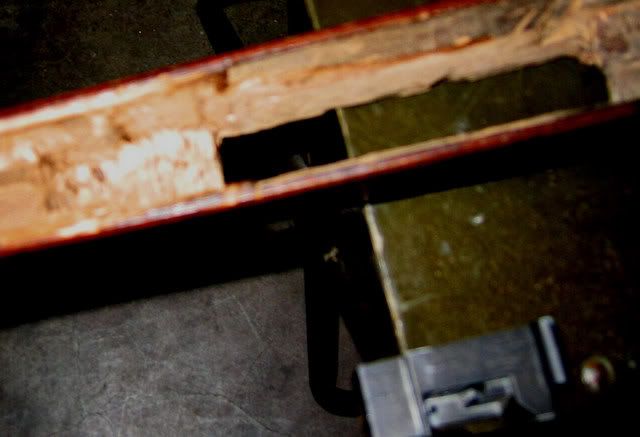 The trigger area needs some fairly precision cuts to accomdiate the trigger assembly and the saftey mechanism. Small grooves are chiseled using the various bits on a dremel and a steady hand. Throughout all of this saw dust will be everywhere and pieces of wood and metal shavings will be flying so wear eye protection and respirator mask. 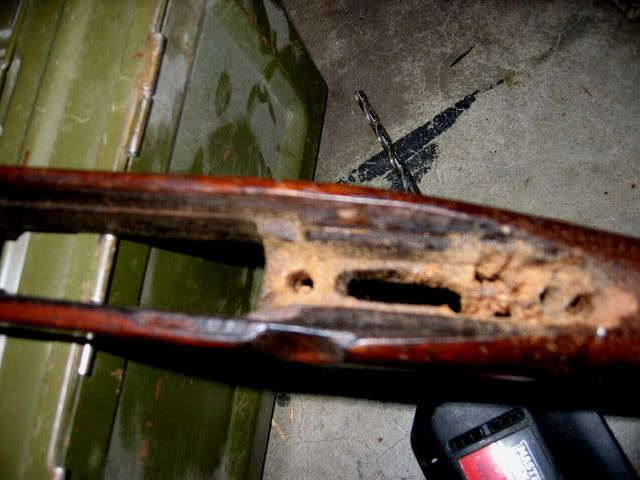 At last all the drilling out, chiseling and filing and sanding are finished. After several attempts to shape it the base rifle at last fits in and out snugly. Note how thin the wood sides end up. For this reason a finger grooved springfiled stock will not work. 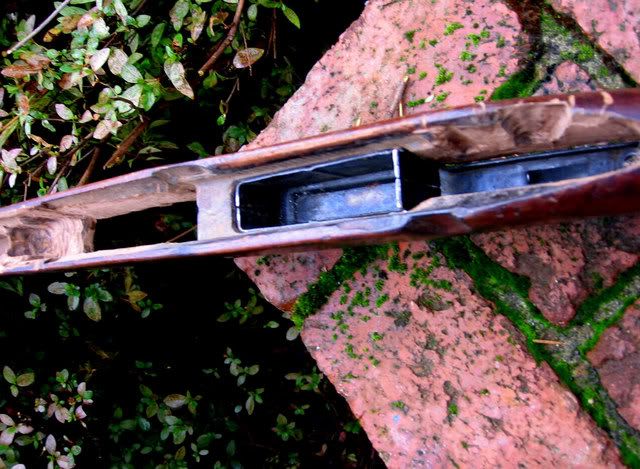 Tomorrow I will work on the reciever group and scope mount which needs to be replacfed with a more period correct mount. In addition I will build and install a new outer barrel and shape the upper handguard to accomodate the new innards. I'll photograph those steps and post them as they get done. |
|
|
|
Post by troyluginbill on Oct 1, 2007 0:31:44 GMT -5
John do you leave the trigger guard on yours or do you use the lower trigger housing from a springfield (that is what I did)?
|
|
2nd Bat
Master sergeant  
Posts: 11,813
|
Post by 2nd Bat on Oct 1, 2007 12:49:06 GMT -5
I use the base rifle trigger guard as frankly I think the outline is fine and it fits nicely into the stock. I do use the magazine base plate however which I should have included as a needed part. In addition for most of the rifles I do you also need the Springfield front site with blade and either style of rear site M1903A1 and A2 ladder type or the later war Peep site. This particular rifle is going to be scope mounted so no sites.
|
|
2nd Bat
Master sergeant  
Posts: 11,813
|
Post by 2nd Bat on Oct 4, 2007 19:16:00 GMT -5
Here are some additional photos to aid in others understanding what is involved with a Springfield conversion Simple dissassembly of the VSR base rifle (Two bolts using the hex wrench provided) 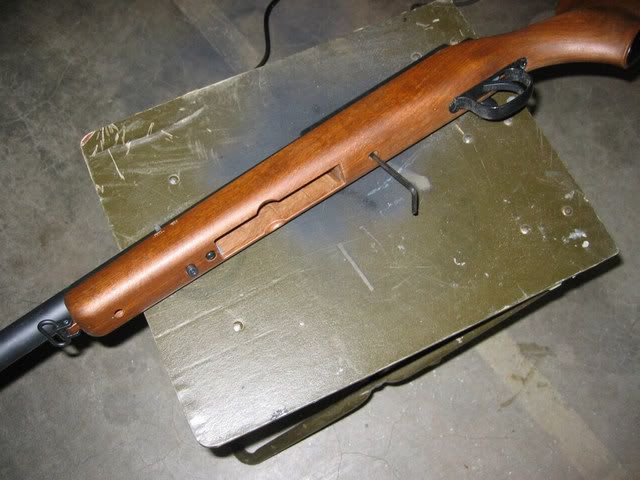 Cut the VSR outer barrel barrel an inch or so in front of the hop up being careful not to contact the thin brass inner barrel 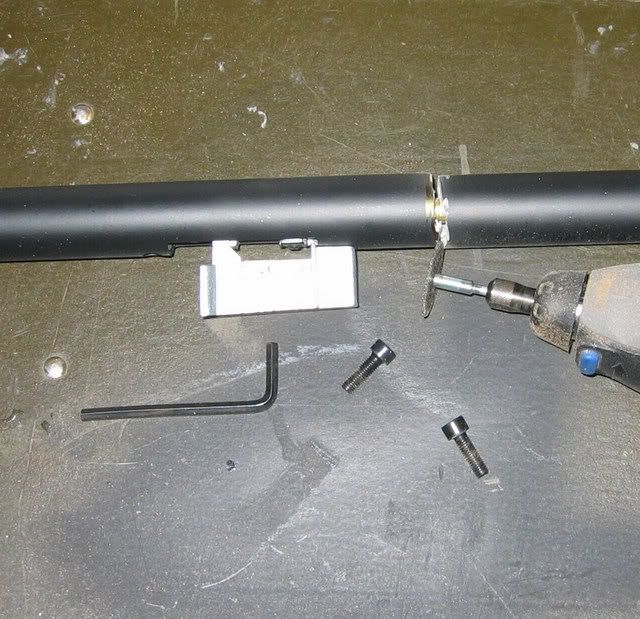 Once the VSR outer barrel is cut off and discarded wrap the inner barrel with thin strips of tape and size so your new replacement brass outer barrel (9/16th brass tube) I place one strip at the rear, one at the muzzle and one in the center. Carefully size then so the new outer barrel fits snugly. Surprisingly if done well this makes for a very solid barrel. I add some on the outside at the base where it slides slightly into the old VSR base rifle remaining section of outer barrel. 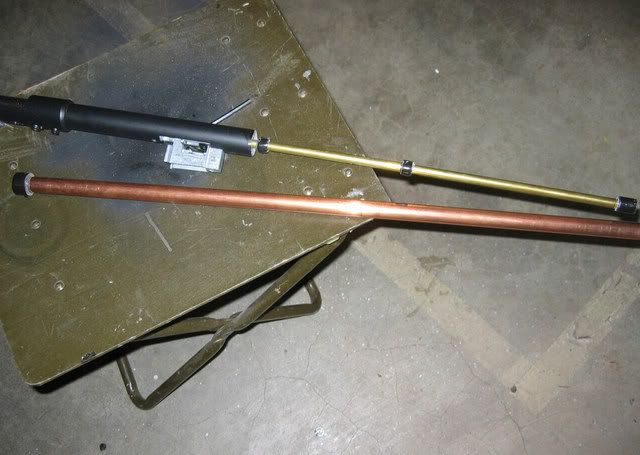 The section of new replacement barrel will be too long. To size it correctly I used a bayonet as a guide to insure the barrel length is correct. An actual bayonet should slide onto the new muzzle behind the front site and slide into place on the front stock band bayonet lug. Mark this point and then make your cut. File and sand the brass barrel. once done paint the brass barrel first with a primer and then with your finish coat. 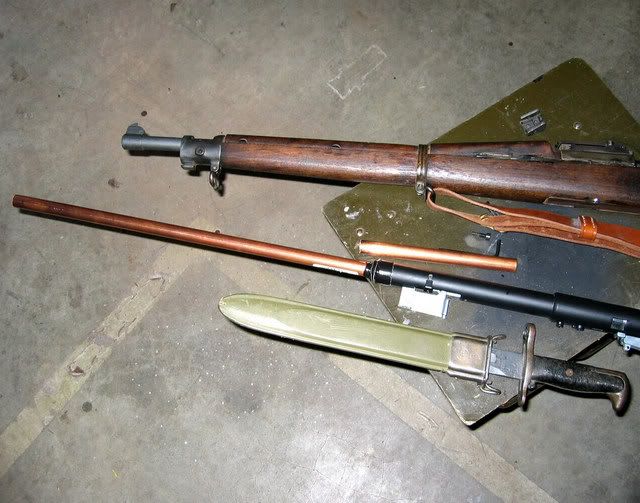 More later on putting it all together. You still need to modify the mag well and trigger guard and dremel out the hand guard and fit your sites (One of two styles here) You also need to do some sculpting to make the VSR receiver group look right. 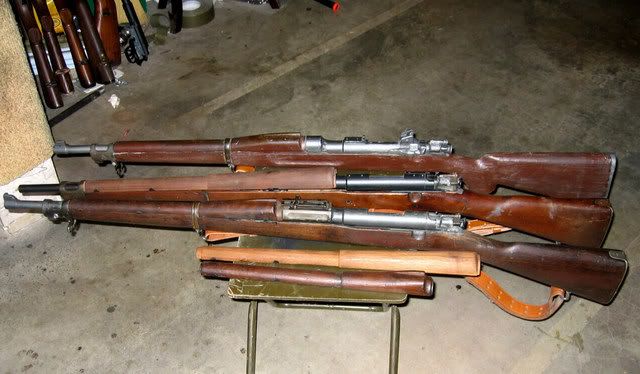 Preliminary work shown. Note the bolt is filed down and a half ball added to elinimate the modern look from the VSR. A firing pin nozzle is added, the READY switch attached and the bolt ON OFF switch preliminarily attached. The rear site shown is the late war peep site 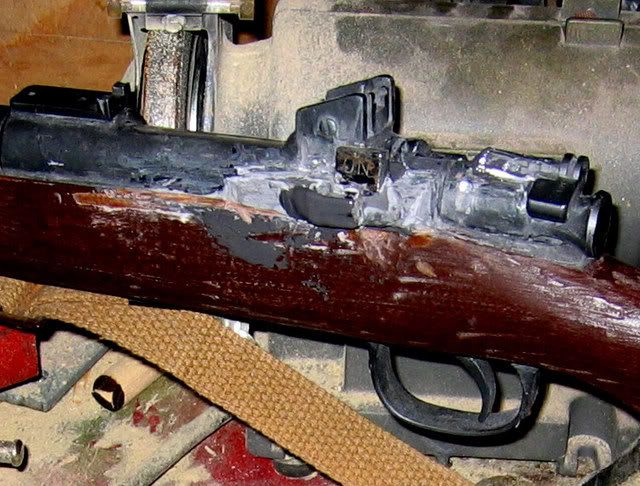 |
|
|
|
Post by wade on Oct 4, 2007 19:36:09 GMT -5
Awesome 2nd Bat. I got my stuff today, and should get a jumpstart on it tomarrow night. Thanks for the help.
|
|
YankeeDiv26
Staff Sgt.
   Frustrated Mac Owner
BDM<33
Posts: 2,462
|
Post by YankeeDiv26 on Oct 4, 2007 19:52:50 GMT -5
Wow, lots of work. You must thank god for the Dremel tool everytime you enter your workshop.
|
|
2nd Bat
Master sergeant  
Posts: 11,813
|
Post by 2nd Bat on Oct 4, 2007 23:46:44 GMT -5
The dremel is a Godsend especially with all the marvelous attachements. Please appreciate that the receiver group sculpting is just begun on the sample shown and has lots of additional steps and finish work before it's "ready" You have to apply the resin paste in layers, allow to dry and then file and sand till the fullness and shape you're seeking is attained.
When done the VSR bolt and receiver group looks pretty darn close and holds up real well to field use. I am going to use the trigger housing in addition to the mag plate on this rifle if all goes according to plan. On my past guns I either fabricated a base plate out of Styrene sheeting or only used the mag plate as I had a couple of them all ready cut off. If all goes according to appearances using the entire assembly (with modifications) might be easier still. Obviously if it's doable it will look even better.
|
|
2nd Bat
Master sergeant  
Posts: 11,813
|
Post by 2nd Bat on Oct 4, 2007 23:56:00 GMT -5
Here are some pictures of the trigger housing complete assembly 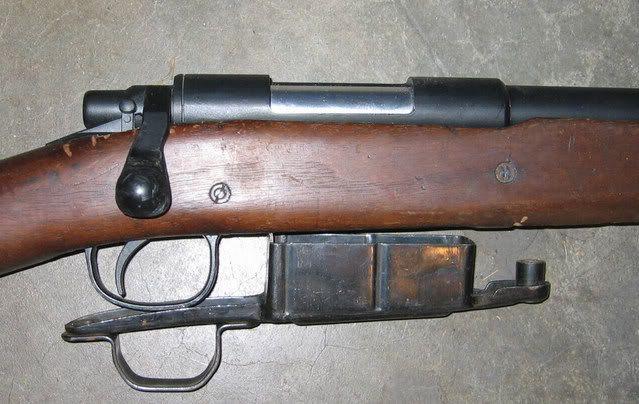 Obviously sections of it will have to be carefully cut away before you can mount the base VSR rifle. 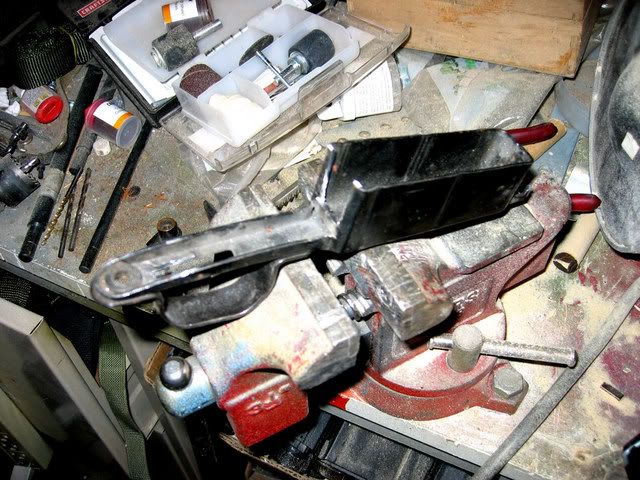 The forward most portion on the bottom will have to be shortened to accomodate the VSR mag The existing screw hole cut away. 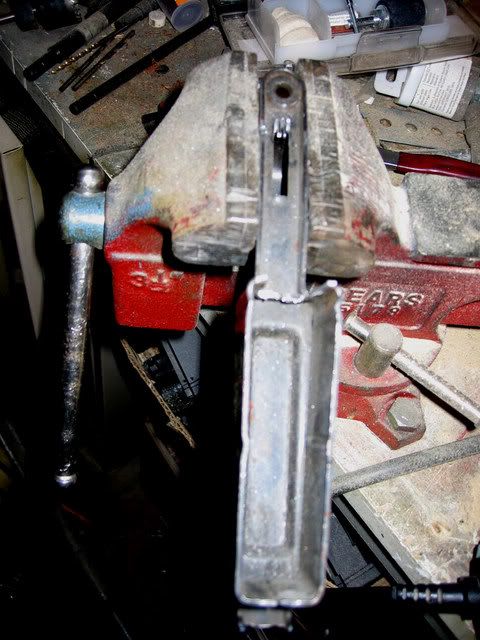 |
|
Ersatzjack
Corporal
  "That silly Franz... he thinks we are winning."
Posts: 1,093
|
Post by Ersatzjack on Oct 5, 2007 1:06:17 GMT -5
2nd Bat - I want to see the scope you are using. Is it period? That would be pretty neat. Don't forget to include a finish picture with the whole thing mounted. How are you mounting it on the receiver? No rush. Just don't forget to post pics of that crucial step. Most everyone who does one of these will probably want to scope it as that is how they were used by and large in the ETO.
|
|
|
|
Post by 101steasykid on Oct 5, 2007 8:58:50 GMT -5
He is using a 330C weaver scope. It should arrive in a few days  . And yes Ezsatzjack, it is a period scope. |
|
2nd Bat
Master sergeant  
Posts: 11,813
|
Post by 2nd Bat on Oct 5, 2007 12:56:30 GMT -5
Customer supplied.
|
|
2nd Bat
Master sergeant  
Posts: 11,813
|
Post by 2nd Bat on Oct 6, 2007 1:01:41 GMT -5
Here is another update on the production steps and challenges. The Springfield mag well and trigger guard assembly has to be modified in order to be used.  The front extends into the area below the stock that would interfere with the VSR base rifles magazine so this part has to be cut off. In addition the trigger housing is such that in it's un modified form the VSR trigger is both too long and too far back. In addition the rear bulkhead on the mag well itself would interfere with the base rifles trigger assembly.  You must cut out the rear bulkhead on the Springfield mag well. Note that I have also removed the front most extension and began the process of enlargening the trigger channel. In addition to making the trigger channel longer you will also have to widen it slightly. You do have to cut off some of the length of the VSR rifles trigger so it will fit. I could grind it to a narrower width but felt widening the springfield channel would be more prudent. I use a dremel and file to do most of this work. Once done I will remove the trigger housing from the assembly (It's welded and rivetted) and move it back 1/4 of an inch 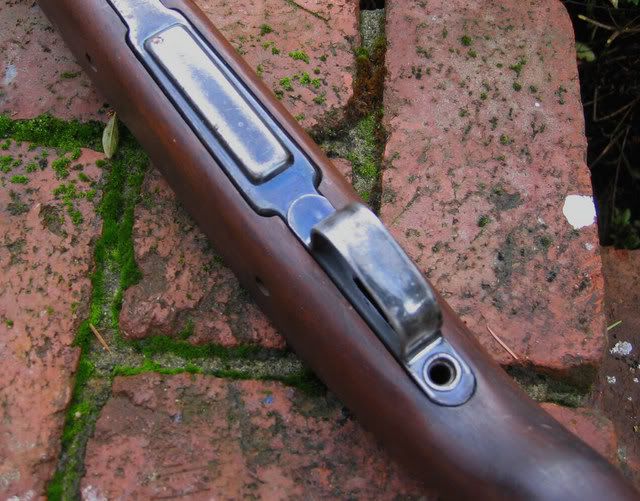 Next begins the process of enhancing the appearance of the VSR rifles receiver group so it looks more like a Springfield. The first step is to fabricate and attach the firing pin bolt to the rear of the VSR receiver group. I purchased an appliance knob that looked right and was roughly the right size. I inserted a section of hex wrench into the knob, glued it in and cut it off 1/8th of an inch from the end. This section of hex tube will fit snugly into the rear of the VSR bolt and once attached with JB weld will hold firm 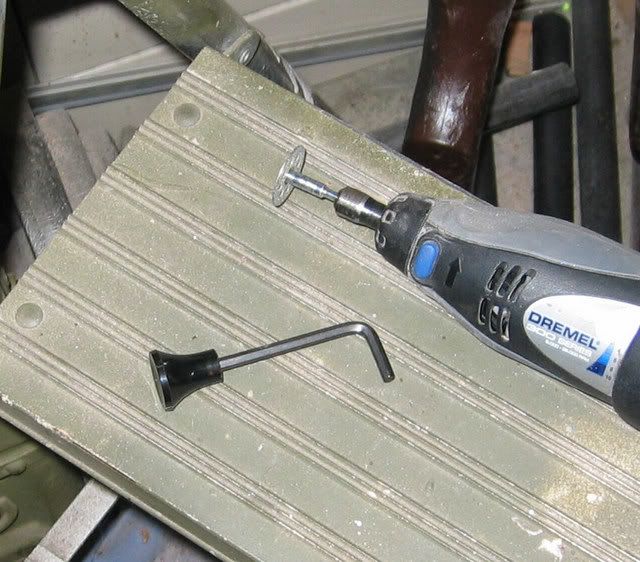 Placing the rifle, muzzle down I insert it with JB weld and allow it to dry overnight. This is the first step in the receiver group enhancement. Once dry I will attach an actual READY switch Springfield safety to the top of the knob (JB Weld) and after that is dry I will attach the bolt ON OFF switch to the side allowing it to dry. The JB weld must be applied in layers and allowed to dry and once built up sufficiently it can all be dremled, filed and sanded until shaped like the actual Springfield receiver group.  The process is very messy and time consuming and doesn't look very good while being done. Once comnpletely dry and carefully shaped and painted it looks quite good. This is tedious and somewhat artistic in nature. The closest I'll come to being a sculpture. It helps to be looking at the real thing as you're doing this work. Once done nothing functions with regard to the Springfield safety or bolt ON/ OFF switch but they look right on the replica. The gun operates with the original VSR safety. 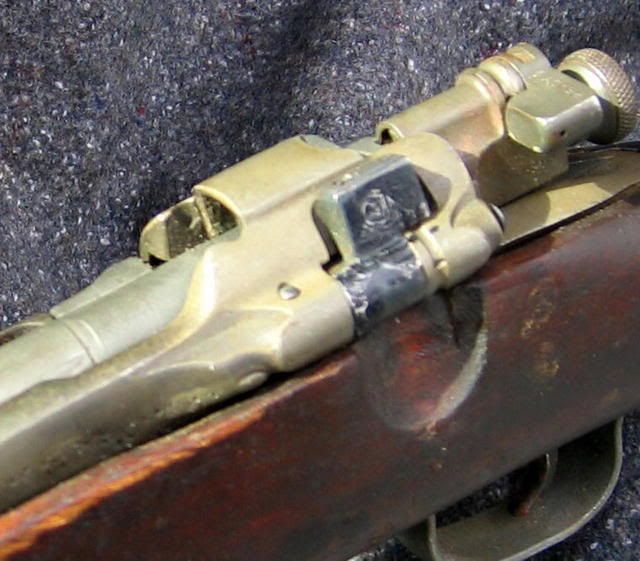 (Actual rifle) |
|
2nd Bat
Master sergeant  
Posts: 11,813
|
Post by 2nd Bat on Oct 6, 2007 1:18:30 GMT -5
Expect to use lots of cutting wheels and in the course of doing two or three guns burn out a dremel. Weapons grade steel is very very stubborn and hard to cut. I recommed a special diamond cutting wheel for your dremel but even then a single one won't be enough to do a rifle. (They cost 12.00 each!)
The final detail work is what makes the gun look right as a replica and we are just now getting into the artistic portion of the work. With the Springfield there are a multitude of variations that can be doen. The traditional M1903 straight stock with it's ladder rear site. The housing has to be fabricated and adapted if used. The later war M1903A3 with the longer upper handguard and a rear peep site and the sniper variant with no sites and a scope mount and housing and modified bolt.
The stocks varied from straight stocks, with or without finger grooves, scant stocks with or withour finger grooves and the C stock. Each variant may or may not have stock bolts. There were four main variations for WW2 M1903A1 through A4. Perhaps 16 fairly common Springfield 30 06 variants.
I hope to build at least one each of the four main variants. I've done a couple C stock variants a straight stock and am doing another straight stock and a scant stock now.
|
|
2nd Bat
Master sergeant  
Posts: 11,813
|
Post by 2nd Bat on Oct 9, 2007 19:48:42 GMT -5
Here is the receiver group after the addition of the Actual Springfield Bolt ON OFF switch, Firing pin bolt and READY switch has been added and cosmetics added. This variant features the rear peep site. Rear upper view of this rifle which is a C stock M1903 A3 with the old style upper handguard. The receiver group has been modified and the bolt alterred  This a 3/4 front view of the rifle which actually used an extensively modified actual lower stock from the VSR base rifle. With this stock I was able to sand and file in finger slots since the finger grooved stocks from an actual Springfield do not allow enough depth on the stock sides to accomodate the VSR magazine. This rifle required perhaps 215.00 total in parts to produce but perhaps 20 or 30 hours to complete. (spread out over a couple months or so)  Here are three variants in the process of conversion. Note the two upper handguard variants. The rifle in the center features the longer M1903A3 variant which was most commonly used on those rifles using the rear peep sight in place of the rear ladder type (M1903A1) shown on the rifle in front and the rifle in the rear. 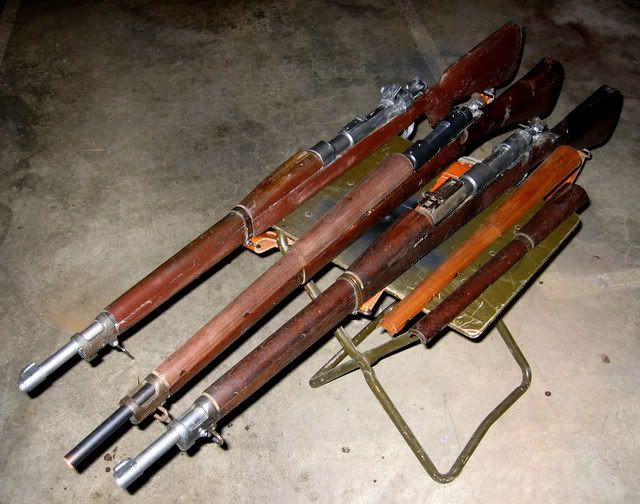 The longer A3, upper handguard was the most common variant on sniper rifles which are distinguished by their lack of sights (front or rear) At this point the A3 handguard on the middle rifle (which will become a sniper variant when done) has not been installed as the handguard requires considerable interior filing and sanding to fit. Once done it will fit snug and be held in place with the two stock bands.  In this upper front view you can see the two styles of handguards both on the rifles and on the small table to the right of the guns. Note how much longer the later version handguard was. This will be the first one I've done with the A3 handguard and hopefully it will work out as it looks good (I think) even though the A1 handguard is the traditional upper handguard that I always think of when I picture a Springfield. Either handguard would be appropriate for WW2 and of course with the A1 style you'd also have a rifle that would be appropriate for Chasing Poncho Villa or going over the top in WW1! |
|
|
|
Post by indianskid7220 on Oct 9, 2007 20:29:27 GMT -5
2nd bat just a question. How much are these running? I am amazed at how much you guys have made. This is incredible. I am very new to the site and am just blown away by all this.
|
|
2nd Bat
Master sergeant  
Posts: 11,813
|
Post by 2nd Bat on Oct 9, 2007 22:49:01 GMT -5
There are some incredibly creative guys on this site and I know several of them, way back when, inspired me to tackle various custom conversions and I've been having fun ever since.
I'm sharing the details and lessons learned in this effort so others will perhaps be inspired to build their own. They are as you can tell too labor intense to be a product that can be retailed by me at an amount that makes sense, especially when tacked onto the expensive components needed for a Springfield.
With the Kar 98s and Enfields, Mosin Nagant etc. available for 100.00 or so the conversion is fairly inexpensive in materials. It's the labor that kills it as a commercial venture. I've managed to find the neccessary parts for a Springfield for between 250 and 500.00 so clearly once you add even a nominal charge for doing the work and you can quickly see that they need to be fairly expensive.
I sold the last one for $750.00 which will probably work out to around 20.00 an hour and all the sawdust you can eat. I have quickly figured out why custom guns usually sell for 1,000 to 1500.00 each and are built in such small quantities. I enjoy making them and am primarily building them for my own use and the use of the local WW2 airsoft community. I suspect I will sell a few more perhaps but would almost have to price them on an individual basis since each varies so much in parts and effort. I built one trying to cut as many corners as I could and still had $200.00 in parts alone. The work building it was virtually the same as doing it right so I won't go to that trouble again.
Knowing that the bulk of the expense is in labor I share my discoveries in hopes that others will take on the projects themselves. There are other very competent builders on this site that do a great job and may be willing to build them on a commercial basis to specs according to a customers wishes.
AA Dan and Ersatz are excellent builders and reliable guys and there are probably others as well.
The rifles are fun to handle and shoot and get lots of ooohs and awes on the various airsoft fields. I figured I might sell perhaps a half dozen more of them.
My Garand conversions (AEGs) are selling between $560.00 and $750.00 depending on the base gun and since I've build several dozen of them I've got the templates and procedures such that I can knock out 3 or 4 of them every two weeks or so. I plan to build 18 more of them and call it quits as that will put me at 100 AEG Garands which was double my original goal.
|
|
|
|
Post by valtteri on Oct 10, 2007 3:21:59 GMT -5
Aaarh.
I've always KNOWN that you just cannot do any bolt modifications and the receiver will look stupid on any VSR/APS WW2 rifle conversion. You guys apparently have not known that, so you have gone ahead and just done it. Amazing work. You rock.
|
|
2nd Bat
Master sergeant  
Posts: 11,813
|
Post by 2nd Bat on Oct 10, 2007 12:39:01 GMT -5
Glad you appreciate the extra detail work. Thanks for the nice compliment. It's my opportunity to feel like a sculptor. I'll tell you the first couple I did, I had real mixed feelings about as I was plugging along on it.
|
|
2nd Bat
Master sergeant  
Posts: 11,813
|
Post by 2nd Bat on Oct 13, 2007 20:01:21 GMT -5
I continue to work on the two most recent Springfields I'm doing and continue to uncover additional challenges with using the A3 upper handguard. It is much more difficult to adapt then the shorter more traditional A1 hand guard. I'm also shocked by how much each stock,even in the same variant (straight stock, C stock and scant stock) can vary in terms of internal ribs and bracing. Hence you have to carefully hand fit each stock with careful dremel work, sanding and shaping. I discovered a small nub on the VSR base rifle that was preventing the base rifle from snugging up as it should into the stock and it was a problem not confronted on earlier efforts so I kept looking elsewhere for the impediment. As you hand fit and snug things up if you notice things aren't settling in as you think they should obviously don't try to force things but after making the effort, pull the internals out and see where the fresh metal marks are in the shaved internals of the stock and this will be a clear indication where your challenges are. In this case a small bolt potruding from the base rifle was snagging on a wood cross member inside the stock (Nothing you can see as you try to marry the two up but the obstacle that was keeping them apart.) A quick zap with the dremel attachment in just the right spot and problem solved. A few micro inches and it fits like a glove.
Sometimes as in this case when frustrated you simply have to leave it alone for a while and come back to it later with a fresh open mind. Advice I got from Schmitty a few years back that has served me well.
|
|
|
|
Post by wade on Oct 13, 2007 20:27:50 GMT -5
Hey 2nd Bat, almost got it finished up today, although I have to re-mount that damned mag catch  . Pay day is on or about the 31st, so I should be able to get some pics up by then. |
|
2nd Bat
Master sergeant  
Posts: 11,813
|
Post by 2nd Bat on Oct 24, 2007 21:31:07 GMT -5
Back at it again but now awaiting the scope mount so I can finish it up. Take some pictures and get it shipped off to my wonderfully patient customer. Today I created a fixture for attaching the actual Springfield trigger guard and came up with a means to help hold the entire assembly against the stock in addition to the existing means.
This project has mandated numerous time consuming steps and additional creative approaches that I have not had to do in my previous efforts. I have really learned a lot with this one.
|
|
|
|
Post by grinch on Oct 25, 2007 0:06:53 GMT -5
what have u been using as the... VSR 10? CA M24?
|
|
Ersatzjack
Corporal
  "That silly Franz... he thinks we are winning."
Posts: 1,093
|
Post by Ersatzjack on Oct 25, 2007 0:26:25 GMT -5
For some reason all the images are missing. I hope we get to see the finished product. 100 AEG Garands??? You are like a small company. That's quite a few happy people. That's the part I like best. Someone gets something that gives them a little happiness. It's a cool feeling. I'm dreading the first time someone says they don't like what I send them. I hope it never happens. Yuk!!
|
|
|
|
Post by grinch on Oct 25, 2007 0:44:47 GMT -5
Who? I have to start reading properly, as thats kinda dumb that someone makes these guns for people in he's spare time what he has from house works and job etc.
I would like to see pics too.
|
|
2nd Bat
Master sergeant  
Posts: 11,813
|
Post by 2nd Bat on Oct 25, 2007 3:04:48 GMT -5
I don't know what happened to the images.
|
|
|
|
Post by grinch on Oct 25, 2007 3:26:48 GMT -5
hmmh... you could updat the new links for them... Im interested how you doing with the rifles.  |
|
|
|
Post by Guinness on Oct 25, 2007 9:07:12 GMT -5
2ndBat- Appears as though the Photobucket page has changed- "Page Not Found" Maybe your son has reordered the pages on the album? Best check with him as all the links say "Dad" in them  |
|
|
|
Post by grinch on Oct 26, 2007 13:37:20 GMT -5
|
|
2nd Bat
Master sergeant  
Posts: 11,813
|
Post by 2nd Bat on Nov 1, 2007 23:12:17 GMT -5
I just went through and updated the photos as best I could I have new photos of my progress on the latest gun which is nearing completion and will post them once downloaded. I hope to have this gun finished and shipped to the customer by this time next week. It has been a marathon job I don't intend to do again.
I have figured out several ways to reduce the time requirements but it will continue to be too labor intense to be profitable.
|
|
|
|
Post by Guinness on Nov 2, 2007 11:18:40 GMT -5
Let's sticky this Springfield 'bible' shall we?  Excellent work Captain! |
|


 . And yes Ezsatzjack, it is a period scope.


 . Pay day is on or about the 31st, so I should be able to get some pics up by then.


