
Post by zbear on Nov 19, 2008 10:59:18 GMT -5
Let’s set the way back machine to 1990. November to be exact.
At that time I was involved in World War 2 blank fire re-enacting, 5th SS Wiking.
At one event we had someone come out with an Mg42 that he had rebarreled to 7.62 NATO and blank adapted.
I got to run a belt through it at the end of the day. Amazing feeling, almost godlike, I can smite anything as long as the ammo lasts.
Then the group got together for a live shot several weeks later.
Again I got to run a belt through it. Cut a small pine tree down with a good burst.
The roar of the gun vibration of the recoil and the brass spilling out of the bottom ejection port was a visceral experience.
I smiled for a week.
Every since then I have wanted one.
The only problem is that I have never had to money to buy the ammo let alone the gun.
History of the real Mg42
Copied from the Military Factory www.militaryfactory.com/smallarms/detail.asp?smallarms_id=64
MG42 (Maschinengewehr Model 42)
the cheaper-to-produce MG42 was much loved by its Wehrmacht users and respected by the Allies who faced it.
The MG 42 (full designation of Maschinengewehr Model 42) was a direct result of the small arms shortages that plagued Germany through the middle and later years of the war. The system was designed from the outset to be easy to manufacture and produce in large quantities. As such, the weapon borrowed heavily from the visual appearance of the equally successful MG34 system with some of the manufacturing breakthroughs encountered in the development of the MP40 submachine gun.
The MG42 was a large suppression weapon that was engineered to fire an impressive 1,200 rounds per minute. Because of this rate of fire, the system was also developed with the ability to change the barrel in less than six seconds for a trained machine gunner. Firing the Mauser 7.92x57mm cartridge, the MG42 could let loose a lethal volley of hot lead from its 50-round ammunition belt. Designed as both a portable bipod-mounted or tripod-mounted system, the MG42 was a deadly portable weapon. The bipod mounting was prone to degrade the accuracy of the weapon whereas the tripod mount offered up great stability.
Between the MG34 and the newer MG42, the MG42 improved on the internal working components with an entirely new locking mechanism. The MG42 still retained the use of the same ammunition belts and ammunition so the two weapons could feed off of one other from a logistical sense very capably. By the end of the war, the MG42 was the weapon of choice over the MG34 for the German Army. Equally, the Allied forces grew so conscious of the lethality inherent in the MG42 that the very sound of the machine gun firing was noticeable to any trained infantryman - and the sensing of impending danger ahead. If the MG42 system had any drawbacks, it was in that the system required an awful lot of attention in terms of maintenance. Dirt and battlefield debris would regularly cause jamming if left unchecked.
The MG42 would later be used as the basis for the post-war MG3 General Purpose Machine Gun for use in the new modern German Army - but this time firing the NATO-standard 7.62mm round. The American-made M60 General Purpose Submachine Gun would also owe some of its design development to captured German MG42s in post-war.
Airsoft Project
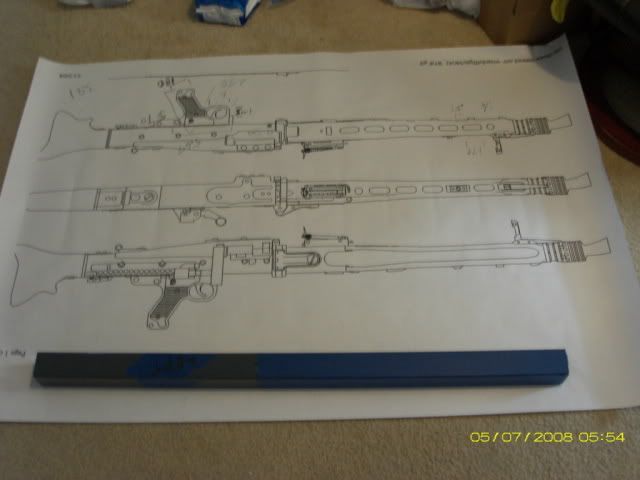
My Airsoft project started with some drawings.
Originally I wanted to do an mg34 based on the drawings here, empireprops.freeservers.com/mg34break.html
However I did not think a mechbox would fit.
So I did some more searching and found these drawings, www.imperial-fleet.com/BBC/community/viewtopic.php?f=26&t=72
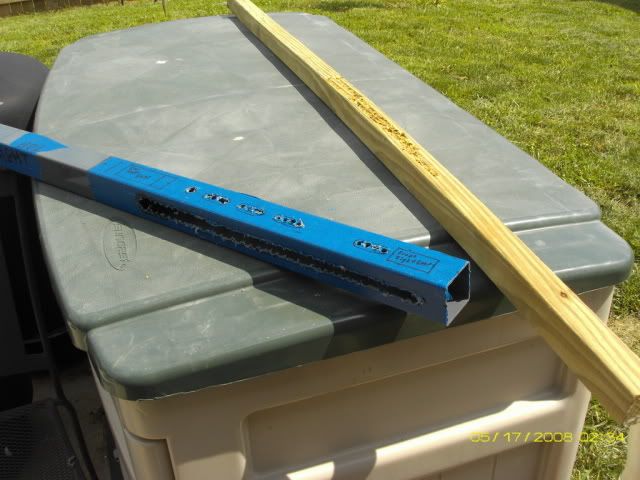
About the same time I found some square PVC tubing listed on the McMaster Carr website. It is just under 2 inches square and came in a lovely side of gunmetal gray.
So I printed the drawings out legal size paper, 8 1/2" by 14" took them to Kinkos and had them enlarged to full size.
It was funny to watch the little hippy looking girl, wrinkle her nose in disgust at having to make a gun blue print.
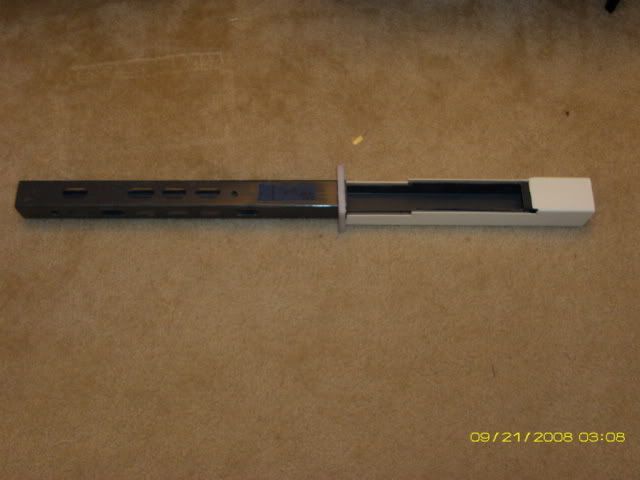
First the donor gun that will be cut up and mutated into my vision of carnage
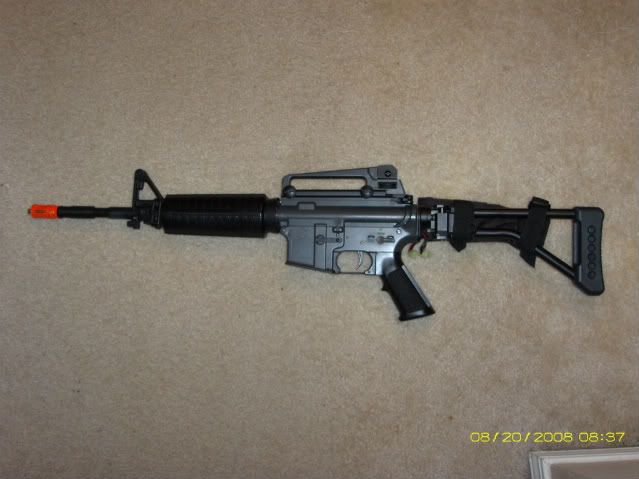
Speaking of which if anyone wants the folding stock and carry handle they are for sale...
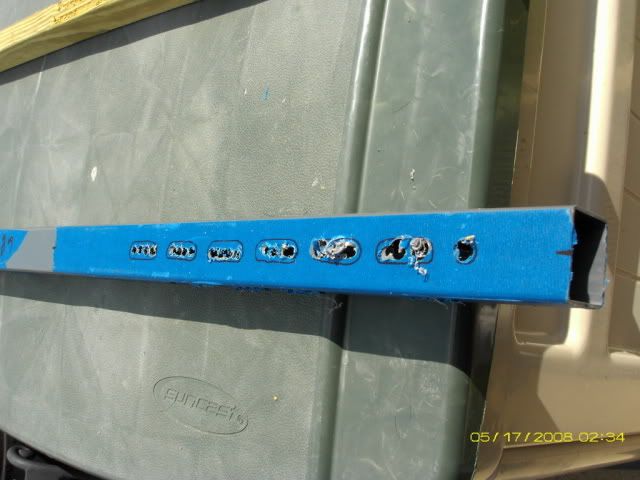
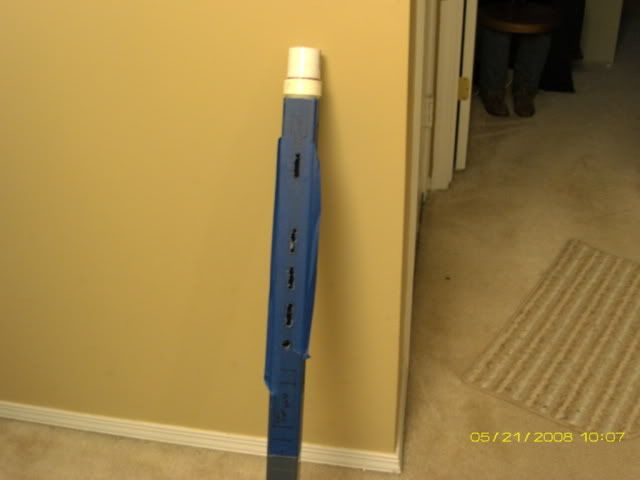
then I put blue masking tape on the PVC and marked the vent holes in the barrel shroud and the rough, okay very rough location of other holes.
Then I started the drill out the holes I out a piece of wood inside to make sure I did not drill all the way through to the other side
Remeber when working with PVC to use a dust mask. The dust produces as it is cut or sanded is fine and probably not the best for your lungs
Here is the start of the right side of the receiver with the barrel change slot
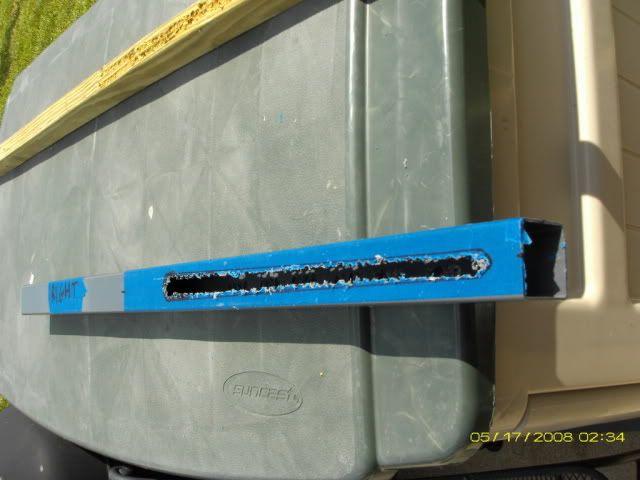
This is the top side of the barrel shroud as the cooling holes get more defined
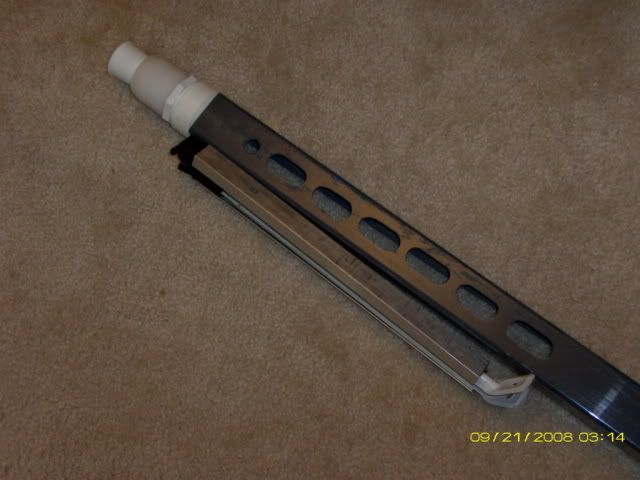
Also in the picture above you can see my first attempt at a recoil booster flash hider made from PVC fittings.
It didn't look the best.
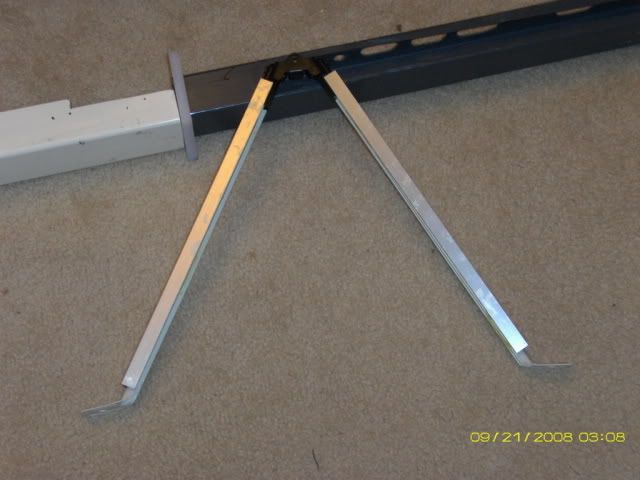
booster and bipod rough built
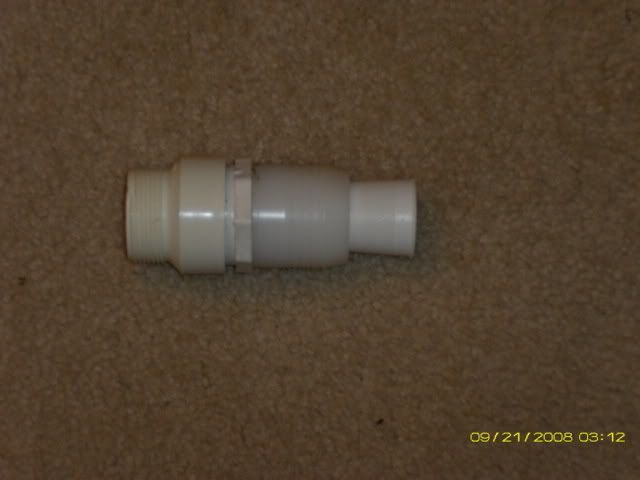
booster
The booster is made from a cone thread spool from a tailor shop and pvc fittings from Tractor Supply Company and Lowes warehouse. Basically I put fittings together in many different configurations until I got something that looked like a MG42 booster.
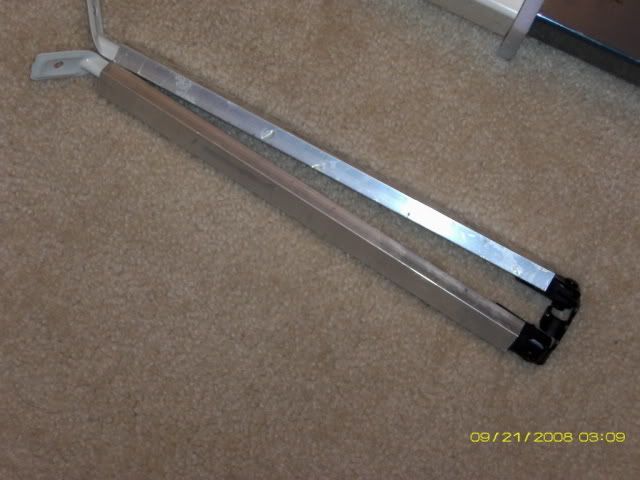
bipod
The Bipod was made form a g36 airsoft bipod, aluminum Channel and 2 shelf brackets. I cut the legs off the bipod the epoxied it into the aluminum channel. Then I cut the shelf brackets down and epoxied them in place as well.
bipod legs opened
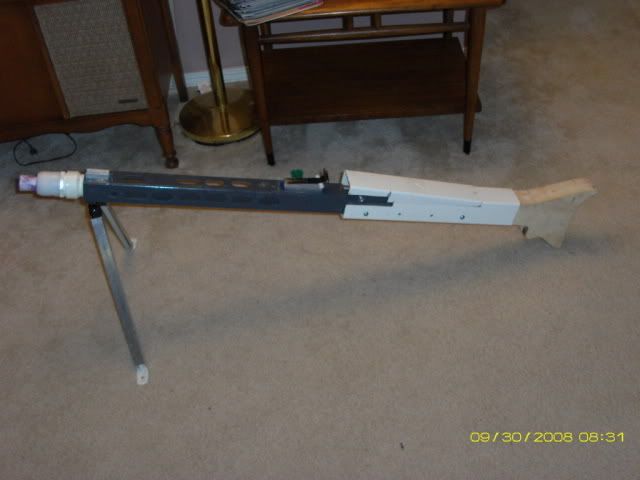
Both reciever portions rough cut and test fitted
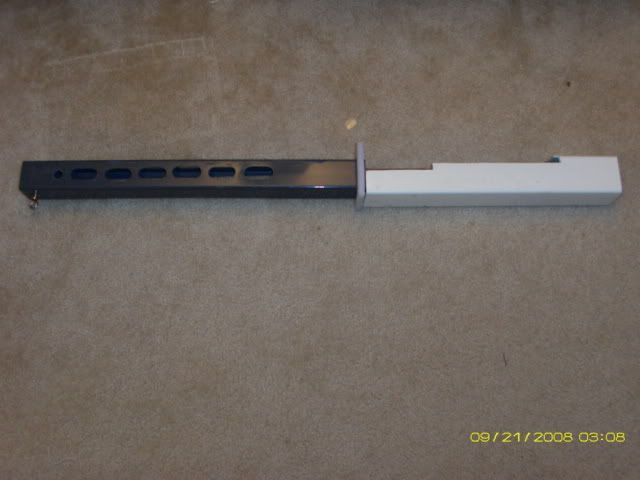
Time for fitting sanding grinding and getting the parts to line up better.
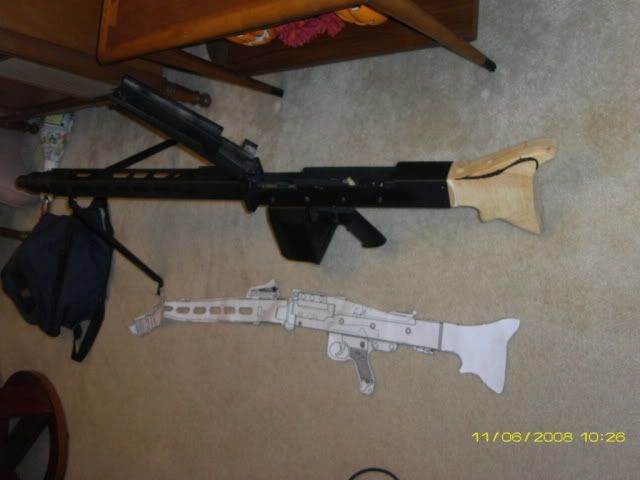
It is starting to look like a MG42 at this point
The Screws are used to duplicate the rivets that held the bolt rails in the original gun. on mine they also hold the gray pvc in postion inside the white pvc. That way if I need to I can disassemble it for repairs or upgrading.
Since the receiver is small it will use LiPo batteries. I am using a 7.2 volt 2200 mah 20c battery pack.
It should give performance on par with an 8.4 v NiMH but be about half the size.
The sight bases are aluminum channel glued onth the pvc. I had to try several epoxies until I found one that worked. I tried Gorilla glue but it did not stick. The one that finally held was Locktite 5 minute gel epoxy. The rear sight is made from a piece of plastic I found at work. Not sure what it was originally. The rear sight will be glued in place on the finished gun. The front sight may fold like the original, if I can make it work. Eventually I want to try and make the mount fior the ring anti-aircract sight out on the barrel shroud. I already have a ring sight that will work with it
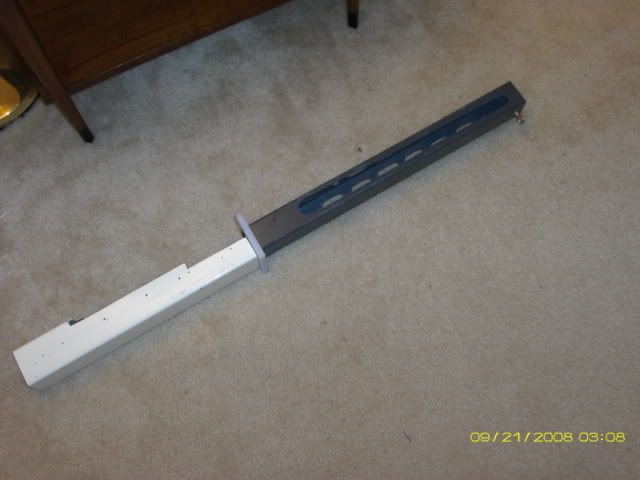
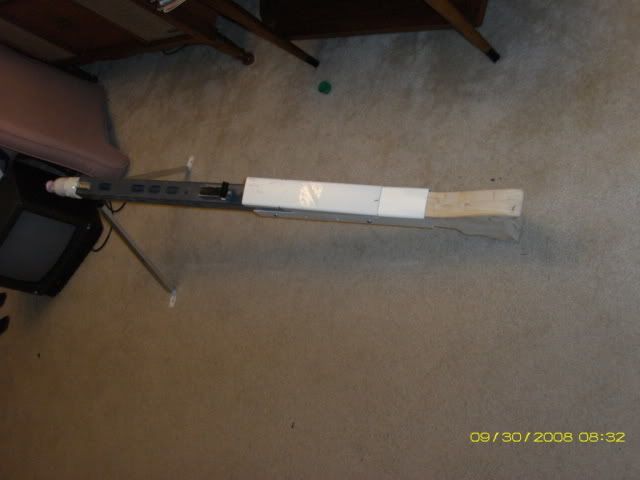
receiver test fit with stock top cover and bipod.
The top cover is a section of the same PVC as the receiver cut to shape
it is coming together
The stock is two pieces of 1 inch thick ash cut to shape sanded and glued together

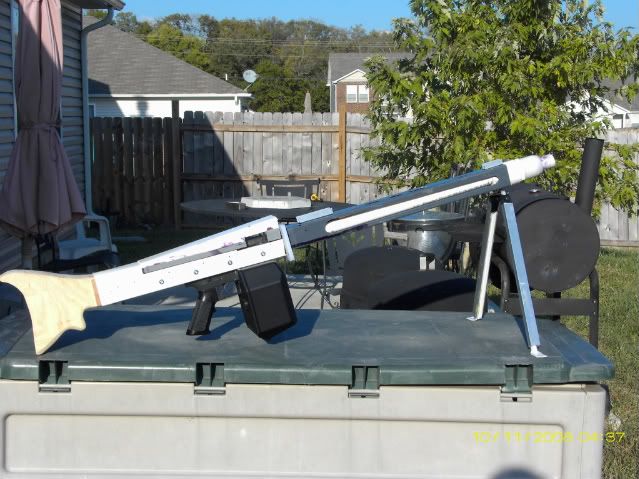
First fitting of all the major components.
The sound activated drum arrived and I got the Echo 1 M4 back from Nashville Airsoft. They installed a type 0 cylinder and slightly stronger spring
finished the first top cover latch not 100% satisfied but it works
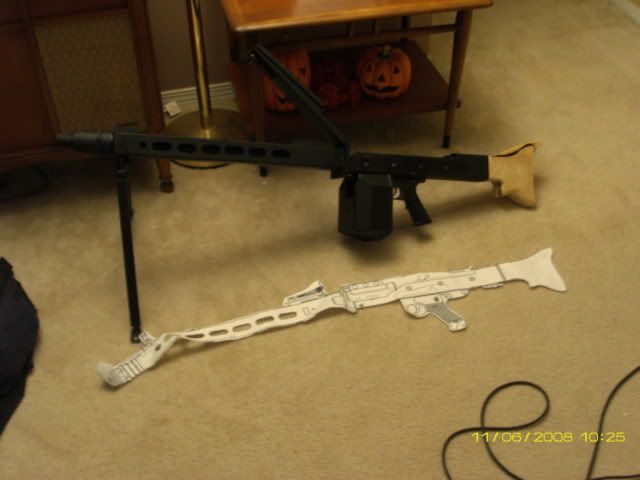
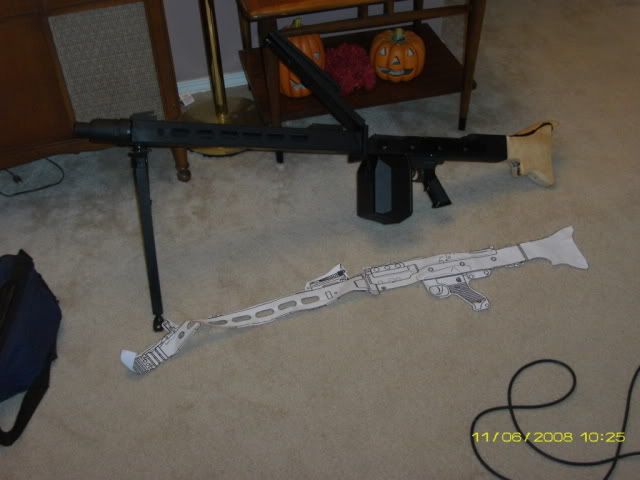
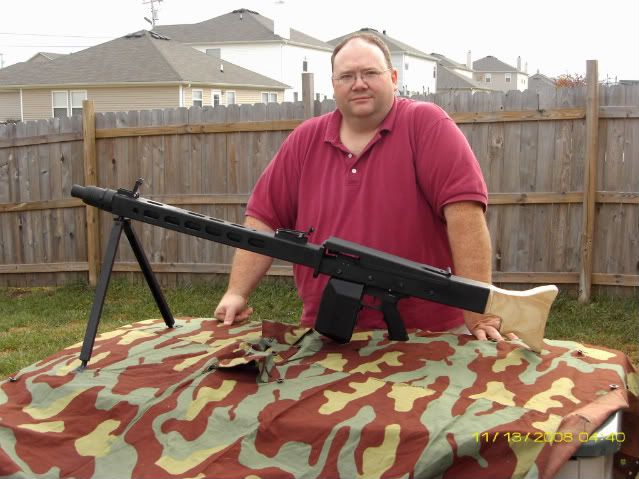
Here it is after a coat of Krylon ultra flat black.
I made my stock too big so it needs to get cut down a little.
Still have to put on the sights and finish the stock.
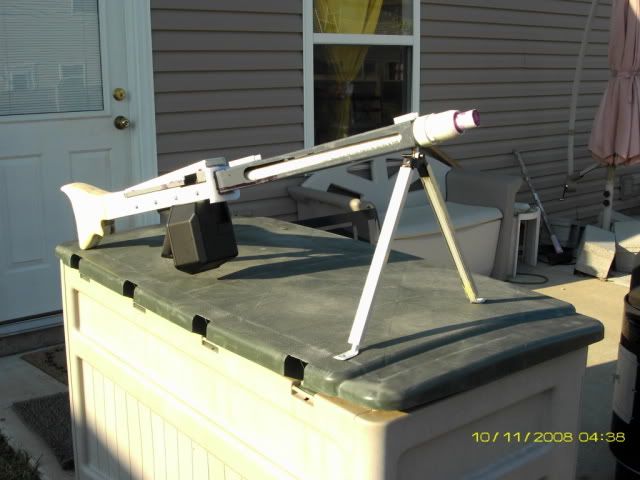
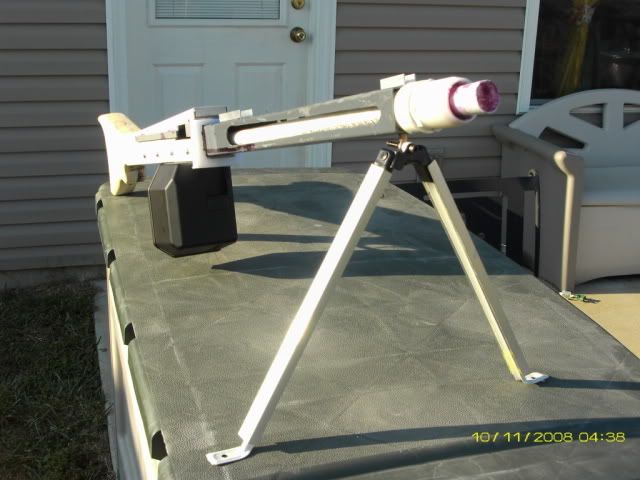
Otherwise it is complete
Chronoed it at Nashville Airsoft shoots 360 to 370 and 13 bb's a second.
Due to booster configutarion it sounds different from most aegs.
Was it worth it to build?
I think so. It is a one of a kind and it looks like a MG42.
Once I have played with it some I may get high speed gears installed and see if I can get closer to 20 bb's a second like the real one.
With the 5000 round drum and a little trigger discipline it should be able to provide a lot of support to any squad I am on .
I am going to use it at the Assualt on Anzio game in Athens Alabama. Be on the look out for an after action report and future improvements here
Time spent very hard to add up. I spent 5 minutes here and there. I would set it aside for a week if I needed to think bout how something should fit together. So maybe a total of 20 to 30 hours over a 5 month time frame.
I did not keep the recipts so I am guessing on some prices
Total cost:
-Echo 1 m4 i got in a trade for an M14. It came with a m2034 and a cqb barrel set that I sold. So it actually funded the project made $120.00 on it
-Gray 2 inch Square pvc $30.00 from McMaster Carr
-White 2 1/2 inch PVC free. It was out of the scrap box at TruValu. I tried to buy it and the manager gave it to me. Bomus.
-5000 round sound activated drum $40.00 from Airsplat. No problems with the order and excellant service
-LiPo Ballancing charger $20.00 same order as above
-7.4 volt 1600 MAH LiPo battery $60 from Nashville Airsoft
-7.4 volt 2200 MAH LiPo $10.00 from Ebay no one else bid on it and I got it rigth before the auction ended
-Taimaya small connector for the Battery above $5.46 installed at Nashville Airsoft
-Upgraded cylinder and spring from Nashville Airsoft $60.00
-Various epoxies and Gorilla glue $15.00
-Aluminum channel $10.00
-Shelf Brackets $7.50
-Various screws ansd hinges $7.00
-Drill bits $5.00
-Krylon ultra flat black sparay paint already had 2 cans in the garage. So I consider that a freebie.
So roughly it cost me about $300.00 for parts give or take. If you factor the parts and acessories I sold from the m4 It was only about $180 spent on the project. Not a bad deal.
Big Question, was it worth it?
Not only yes, but hell yes.
I now have a one of a kind custom airsoft. It can be taken apart easily for repairs or upgrades.
I learned how to solve problems and could make another one much easier.
in fact I plan to do another one some day using an AK or P90 for the internals.
Finally I think it looks very much like a mg42.
I admit it doesn't look as good as as a Shoei but it only cost a fraction of the price of a Shoei.
Will I build you one? Maybe.
However It will cost you an obscene amount of money but in the end you will have a gun build around your internals that will be unique.
As the old saying goes I may be easy but I sure ain't cheap.
At that time I was involved in World War 2 blank fire re-enacting, 5th SS Wiking.
At one event we had someone come out with an Mg42 that he had rebarreled to 7.62 NATO and blank adapted.
I got to run a belt through it at the end of the day. Amazing feeling, almost godlike, I can smite anything as long as the ammo lasts.
Then the group got together for a live shot several weeks later.
Again I got to run a belt through it. Cut a small pine tree down with a good burst.
The roar of the gun vibration of the recoil and the brass spilling out of the bottom ejection port was a visceral experience.
I smiled for a week.
Every since then I have wanted one.
The only problem is that I have never had to money to buy the ammo let alone the gun.
History of the real Mg42
Copied from the Military Factory www.militaryfactory.com/smallarms/detail.asp?smallarms_id=64
MG42 (Maschinengewehr Model 42)
the cheaper-to-produce MG42 was much loved by its Wehrmacht users and respected by the Allies who faced it.
The MG 42 (full designation of Maschinengewehr Model 42) was a direct result of the small arms shortages that plagued Germany through the middle and later years of the war. The system was designed from the outset to be easy to manufacture and produce in large quantities. As such, the weapon borrowed heavily from the visual appearance of the equally successful MG34 system with some of the manufacturing breakthroughs encountered in the development of the MP40 submachine gun.
The MG42 was a large suppression weapon that was engineered to fire an impressive 1,200 rounds per minute. Because of this rate of fire, the system was also developed with the ability to change the barrel in less than six seconds for a trained machine gunner. Firing the Mauser 7.92x57mm cartridge, the MG42 could let loose a lethal volley of hot lead from its 50-round ammunition belt. Designed as both a portable bipod-mounted or tripod-mounted system, the MG42 was a deadly portable weapon. The bipod mounting was prone to degrade the accuracy of the weapon whereas the tripod mount offered up great stability.
Between the MG34 and the newer MG42, the MG42 improved on the internal working components with an entirely new locking mechanism. The MG42 still retained the use of the same ammunition belts and ammunition so the two weapons could feed off of one other from a logistical sense very capably. By the end of the war, the MG42 was the weapon of choice over the MG34 for the German Army. Equally, the Allied forces grew so conscious of the lethality inherent in the MG42 that the very sound of the machine gun firing was noticeable to any trained infantryman - and the sensing of impending danger ahead. If the MG42 system had any drawbacks, it was in that the system required an awful lot of attention in terms of maintenance. Dirt and battlefield debris would regularly cause jamming if left unchecked.
The MG42 would later be used as the basis for the post-war MG3 General Purpose Machine Gun for use in the new modern German Army - but this time firing the NATO-standard 7.62mm round. The American-made M60 General Purpose Submachine Gun would also owe some of its design development to captured German MG42s in post-war.
Airsoft Project
My Airsoft project started with some drawings.
Originally I wanted to do an mg34 based on the drawings here, empireprops.freeservers.com/mg34break.html
However I did not think a mechbox would fit.
So I did some more searching and found these drawings, www.imperial-fleet.com/BBC/community/viewtopic.php?f=26&t=72
About the same time I found some square PVC tubing listed on the McMaster Carr website. It is just under 2 inches square and came in a lovely side of gunmetal gray.
So I printed the drawings out legal size paper, 8 1/2" by 14" took them to Kinkos and had them enlarged to full size.
It was funny to watch the little hippy looking girl, wrinkle her nose in disgust at having to make a gun blue print.
First the donor gun that will be cut up and mutated into my vision of carnage
Speaking of which if anyone wants the folding stock and carry handle they are for sale...
then I put blue masking tape on the PVC and marked the vent holes in the barrel shroud and the rough, okay very rough location of other holes.
Then I started the drill out the holes I out a piece of wood inside to make sure I did not drill all the way through to the other side
Remeber when working with PVC to use a dust mask. The dust produces as it is cut or sanded is fine and probably not the best for your lungs
Here is the start of the right side of the receiver with the barrel change slot
This is the top side of the barrel shroud as the cooling holes get more defined
Also in the picture above you can see my first attempt at a recoil booster flash hider made from PVC fittings.
It didn't look the best.
booster and bipod rough built
booster
The booster is made from a cone thread spool from a tailor shop and pvc fittings from Tractor Supply Company and Lowes warehouse. Basically I put fittings together in many different configurations until I got something that looked like a MG42 booster.
bipod
The Bipod was made form a g36 airsoft bipod, aluminum Channel and 2 shelf brackets. I cut the legs off the bipod the epoxied it into the aluminum channel. Then I cut the shelf brackets down and epoxied them in place as well.
bipod legs opened
Both reciever portions rough cut and test fitted
Time for fitting sanding grinding and getting the parts to line up better.
It is starting to look like a MG42 at this point
The Screws are used to duplicate the rivets that held the bolt rails in the original gun. on mine they also hold the gray pvc in postion inside the white pvc. That way if I need to I can disassemble it for repairs or upgrading.
Since the receiver is small it will use LiPo batteries. I am using a 7.2 volt 2200 mah 20c battery pack.
It should give performance on par with an 8.4 v NiMH but be about half the size.
The sight bases are aluminum channel glued onth the pvc. I had to try several epoxies until I found one that worked. I tried Gorilla glue but it did not stick. The one that finally held was Locktite 5 minute gel epoxy. The rear sight is made from a piece of plastic I found at work. Not sure what it was originally. The rear sight will be glued in place on the finished gun. The front sight may fold like the original, if I can make it work. Eventually I want to try and make the mount fior the ring anti-aircract sight out on the barrel shroud. I already have a ring sight that will work with it
receiver test fit with stock top cover and bipod.
The top cover is a section of the same PVC as the receiver cut to shape
it is coming together
The stock is two pieces of 1 inch thick ash cut to shape sanded and glued together
First fitting of all the major components.
The sound activated drum arrived and I got the Echo 1 M4 back from Nashville Airsoft. They installed a type 0 cylinder and slightly stronger spring
finished the first top cover latch not 100% satisfied but it works
Here it is after a coat of Krylon ultra flat black.
I made my stock too big so it needs to get cut down a little.
Still have to put on the sights and finish the stock.
Otherwise it is complete
Chronoed it at Nashville Airsoft shoots 360 to 370 and 13 bb's a second.
Due to booster configutarion it sounds different from most aegs.
Was it worth it to build?
I think so. It is a one of a kind and it looks like a MG42.
Once I have played with it some I may get high speed gears installed and see if I can get closer to 20 bb's a second like the real one.
With the 5000 round drum and a little trigger discipline it should be able to provide a lot of support to any squad I am on .
I am going to use it at the Assualt on Anzio game in Athens Alabama. Be on the look out for an after action report and future improvements here
Time spent very hard to add up. I spent 5 minutes here and there. I would set it aside for a week if I needed to think bout how something should fit together. So maybe a total of 20 to 30 hours over a 5 month time frame.
I did not keep the recipts so I am guessing on some prices
Total cost:
-Echo 1 m4 i got in a trade for an M14. It came with a m2034 and a cqb barrel set that I sold. So it actually funded the project made $120.00 on it
-Gray 2 inch Square pvc $30.00 from McMaster Carr
-White 2 1/2 inch PVC free. It was out of the scrap box at TruValu. I tried to buy it and the manager gave it to me. Bomus.
-5000 round sound activated drum $40.00 from Airsplat. No problems with the order and excellant service
-LiPo Ballancing charger $20.00 same order as above
-7.4 volt 1600 MAH LiPo battery $60 from Nashville Airsoft
-7.4 volt 2200 MAH LiPo $10.00 from Ebay no one else bid on it and I got it rigth before the auction ended
-Taimaya small connector for the Battery above $5.46 installed at Nashville Airsoft
-Upgraded cylinder and spring from Nashville Airsoft $60.00
-Various epoxies and Gorilla glue $15.00
-Aluminum channel $10.00
-Shelf Brackets $7.50
-Various screws ansd hinges $7.00
-Drill bits $5.00
-Krylon ultra flat black sparay paint already had 2 cans in the garage. So I consider that a freebie.
So roughly it cost me about $300.00 for parts give or take. If you factor the parts and acessories I sold from the m4 It was only about $180 spent on the project. Not a bad deal.
Big Question, was it worth it?
Not only yes, but hell yes.
I now have a one of a kind custom airsoft. It can be taken apart easily for repairs or upgrades.
I learned how to solve problems and could make another one much easier.
in fact I plan to do another one some day using an AK or P90 for the internals.
Finally I think it looks very much like a mg42.
I admit it doesn't look as good as as a Shoei but it only cost a fraction of the price of a Shoei.
Will I build you one? Maybe.
However It will cost you an obscene amount of money but in the end you will have a gun build around your internals that will be unique.
As the old saying goes I may be easy but I sure ain't cheap.


 Nice and simple but I bet it turns a few heads and it looks like with that box mag it'll lay down some serious cover fire! Also the ideas of Bren guns etc - right up my street. I've been building models (static and radio controlled) for 25 years and just got into airsoft with a friend of mine. We got talking one day and decided to build an MG42 as well, but we're going about it a slightly different way...
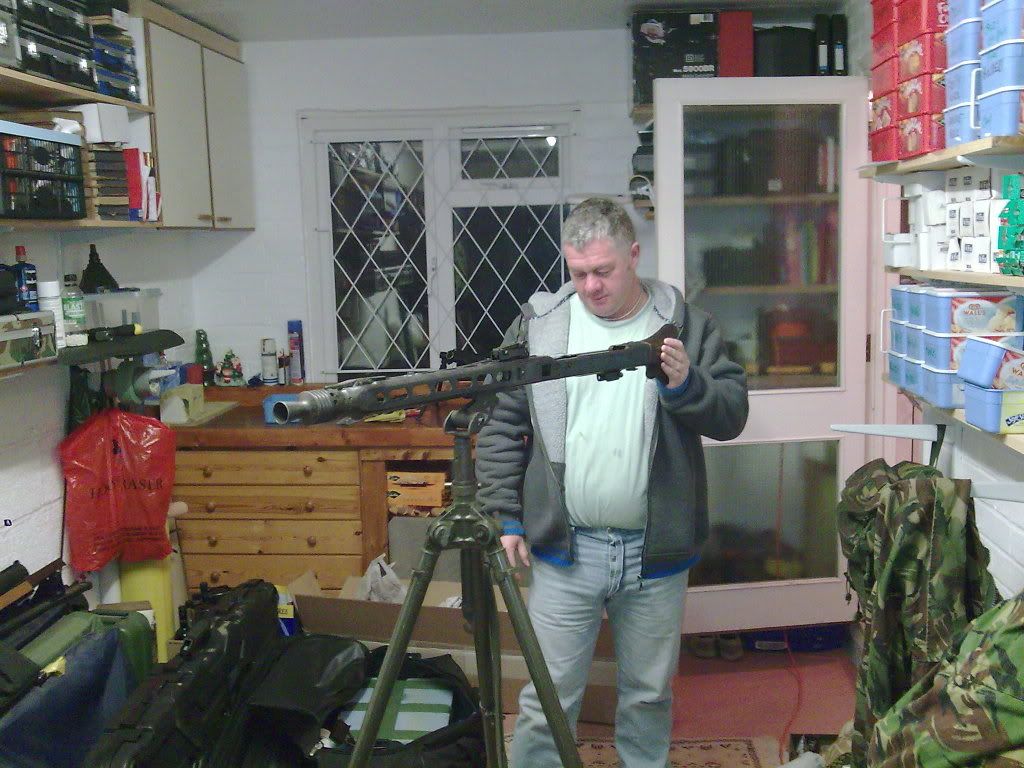
 We both have modern weapons such as M4's etc, but were just looking for something a bit different...
