masterchief
Private
I?m six sigma certified, but does not change anything.
Posts: 28
|
Post by masterchief on Nov 30, 2008 5:24:32 GMT -5
Hi all ;D, I'm starting this 2nd CYMA M14 conversion into a M1 Garand. Here are some of my projects for the WW2 load out, I'm not done yet with my M1 Garand conversion, but it is going slowly. It has taken me 25 days due to my busy schedule, and work gets in the way of my airsoft life. I am using mahogany wood (West Indian or Cuban mahogany - Mahogany has a generally straight grain and is usually free of voids and pockets. It has a reddish-brown color, which darkens over time, and displays a beautiful reddish sheen when polished. It has excellent workability, and is very durable -wiki). I'll post this soon as it is done, but here is what I have so far, enjoy:  Here is the whole rifle, I still need to sand the front part and make the lower stock slimmer.    I did not have the tools to drill, so I'm drilling small holes for the battery compartment, after a few more drilling I could fit the battery really snug.  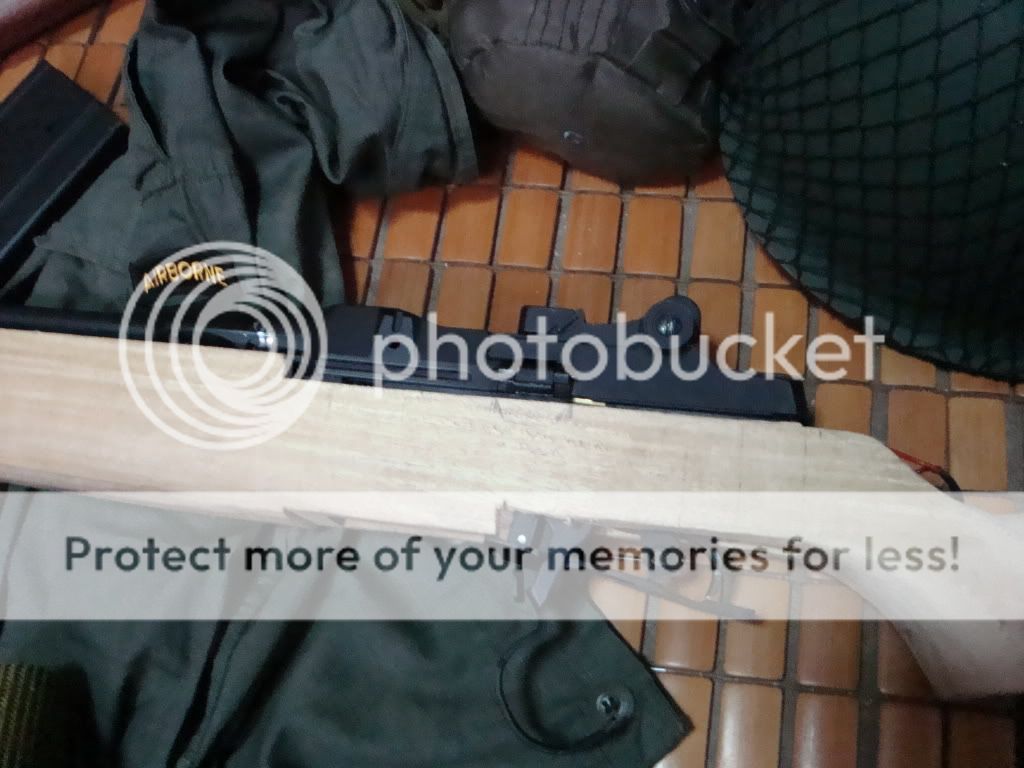       Here is the fat lower stock, I really need a hell lot of sand paper for this.   I tried to place in the Springfield cartouche just for the heck of it...  Here is the wood varnished. But this was tested on a piece of wood. I'll post more in a few days or so. I hope this thread would help some folks with their future projects.  |
|
2nd Bat
Master sergeant 
Posts: 11,813
|
Post by 2nd Bat on Nov 30, 2008 13:56:09 GMT -5
Awsome job. Keep us posted.
|
|
Sgt_Tom
Technical Sgt.
Combat!
Posts: 3,580
|
Post by Sgt_Tom on Nov 30, 2008 14:33:55 GMT -5
Looks great so far.
|
|
masterchief
Private
I?m six sigma certified, but does not change anything.
Posts: 28
|
Post by masterchief on Dec 1, 2008 15:31:46 GMT -5
@
2nd Bat
sgttom
Thanks for the kind words. I hope to get this done by 15th of Dec. I'll post some more pics when the project progresses.
|
|
masterchief
Private
I?m six sigma certified, but does not change anything.
Posts: 28
|
Post by masterchief on Dec 3, 2008 23:33:11 GMT -5
Here we go with day 28 of the project:    I am not done shortening the front hand guard, rear hand guard and the front hand guard ferrule to keep the rifle as a 43.6" (1,107.4mm) in length. As you can see in the picture there is still no space to place the gas cylinder. I've manage to ask a machine shop to fabricate a M1 gas cylinder for me for my project. I'll probably get it after a few days. I have not weighted the rifle yet, but it feels pretty hefty when being carried. Hopefully I'll be done with this before December 15! |
|
|
|
Post by burke on Dec 4, 2008 4:15:27 GMT -5
you should have used a Garand butt plate.....
|
|
Sgt_Tom
Technical Sgt.
Combat!
Posts: 3,580
|
Post by Sgt_Tom on Dec 4, 2008 8:21:28 GMT -5
Yea it probably would have been better to get an M1 Garand but plate. But it looks good so far. I'd say the handguard is a little too wide. Make sure not to shorten it too much. If you need measurements from the real handguards I can give them to you. Good luck. -sgttom
|
|
masterchief
Private
I?m six sigma certified, but does not change anything.
Posts: 28
|
Post by masterchief on Dec 4, 2008 15:12:19 GMT -5
I could not get any M1 butt plate here in the Philippines due to our laws with fire arms.  'However, under Section 877 of the Revised Administrative Code, as amended, the definition of the term "firearm",includes air rifles, except those which, being of small caliber and limited range, are used as toys. In recognition of the fact that certain types of air rifles/pistols could cause the death or permanent maiming of a person and could be used as convenient tools of criminals in their nefarious activities, then President Ferdinand E.Marcos promulgated Executive Order (E.O.) No. 712 on July 28,1981 (a) empowering the Chief of the then Philippine Constabulary(PC) [now Philippine National Police (PNP)] to prescribe the criteriafor determining whether an air rifle/pistol is to be considered afirearm or a toy within the contemplation of Section 877 of theRevised Administrative Code, and (b) declaring that he licensing requirements for the manufacture, sale and/or possession of, and/or dealership in firearms as prescribed in the Revised AdministrativeCode shall apply to air rifles/pistols which are considered inaccordance with said Section 1, ' etc, etc...  fragcdo.com/2008/01/10/pnp-circular-no11/ fragcdo.com/2008/01/10/pnp-circular-no11/- Looks like sgttom will help me out on some detail. Thank you sgttom.  *But, thank you all for your feedback. I do need your opinions. |
|
Sgt_Tom
Technical Sgt.
Combat!
Posts: 3,580
|
Post by Sgt_Tom on Dec 5, 2008 15:51:26 GMT -5
It would probably be a good idea to remove the butt plate flap.
|
|
masterchief
Private
I?m six sigma certified, but does not change anything.
Posts: 28
|
Post by masterchief on Dec 5, 2008 16:54:05 GMT -5
I was thinking about that...infact, that's a great idea.
|
|
2nd Bat
Master sergeant
Posts: 11,813
|
Post by 2nd Bat on Dec 5, 2008 19:10:06 GMT -5
If you remove the flap itself you can apply resin paste in the remaining cracks and once dry can shape, file and sand. This area can be painted to match or come very close to your final stock and handguard finish. Your work is commendable and looks very good. I would eliminate (or reduce somewhat) the hump in front of the trigger assembly. (It doesn't need to stick down like that) You can then taper the shape up to the point it meets the forward handguard. When you look at photos and the wonderful illustration I know you are using you'll note the upper handguard is quite shallow and flush to the top of the barrel. (Only slightly taller than the receiver group) Yours is a tiny bit tall (at present) Also your forward (larger) handguard should be a little less tall (bottom to top) You'll note it is uneven with the Garand stock on actual Garands. By doing this your rilfe will look less stubby and more svelt and aesthetically correct. I understand the thickness through the stock neck as that is critical to accomodate the motor but other than that, try to keep the shape as correct as possible. You're going through a lot of work and doing a great job. You might as well extend the additional effort to make it as correct as possible. Keep it up and keep us posted on your progress.
Incidently the butt plate under the flap looks virtually identical to the actual Garand butt plate (Very hard to tell apart) but if you had and used an actual Garand Butt plate you wouldn't be able to fit the battery in and out since the M14 butt plate flaps trap door is slightly larger and will accomodate the insertion and removal of your battery. Much more convenient than fighting with the screws and sling hardware removal.
|
|
masterchief
Private
I?m six sigma certified, but does not change anything.
Posts: 28
|
Post by masterchief on Dec 8, 2008 17:28:59 GMT -5
@ 2nd Bat Thanks 2nd Bat! I'll keep that in mind. |
|
masterchief
Private
I?m six sigma certified, but does not change anything.
Posts: 28
|
Post by masterchief on Dec 11, 2008 23:18:53 GMT -5
To follow up on my project. First, I would like thank the following; sgttom for the correct measurements & 2nd Bat for the insight and coaching, truly a guru in this field. And Ersatzjack for giving me the inspiration to do this project. If it was not for Ersatzjack , I would not be able to get my project rolling. You guys are really great. Thank you. Now, back to the project. This would be my 40th day with the Cyma conversion last night, and I guess I am in a spot where I really want this project done. But I did not want to sacrifice the quality with rushing on the project. I got in touch with a local machine shop that custom on real firearms, and they finally said yes to my project. Now not determining the actual expenditure that I would roll out in a couple of weeks with the metal parts, I gave them a go to start on the parts that I require. So below, I do have some updates on the project, and started on what 2nd Bat suggested and play with the wood further to make the unit into a M1 Garand. I also took to note sgttom's actual measurements on the M1 wood furniture. And gave it a go.   As you would see, there is some improvement on the cosmetic look on the wood. I have ample time to chip off the unnecessary wood that was an eye sore a few days back. I also took the liberty to shave the upper & lower handguard to it's proper length. In a few days I will be placing a cover on the motor portion to hide the wires and motor.    Again, to the folks who posted a comment and their suggestion, again THANK YOU all . I would not be able to go this far with this project. When I get more time in the week end I'll be chipping 'a little bit' of wood and finally sanding and varnish. Hope to post back soon.. Happy Holidays! ;D |
|
Sgt_Tom
Technical Sgt.
Combat!
Posts: 3,580
|
Post by Sgt_Tom on Dec 12, 2008 15:45:26 GMT -5
Hey the stock is looking much better. Is the Gas Cylinder almost finished? The upper handguard still seems a bit large. I was wondering If you handmade the wooden pieces or do you have a machine?
|
|
2nd Bat
Master sergeant
Posts: 11,813
|
Post by 2nd Bat on Dec 12, 2008 18:14:27 GMT -5
Sometimes when describing handguards things get a little confusing. Technically the Military always decribes rifle locations as though the rifle were standing up in a rifle rack. Hence the upper handguard is the larger one up toward the front. The thin, heat shield, handguard is referred to as the lower handguard. Using that nomenclature the "Upper" handguard needs to be hollow along the bottom. This in turn needs to have a tube filler to represent the gas tube leading back from the gas reservoir assembly. It appears that in your upper handguard you intend to have a smooth finish along the bottom rather than an open channel. It's a detail you may have missed. The AZR replicas also miss that detail and while relatively minor is one more infidelity that is easily avoidable. 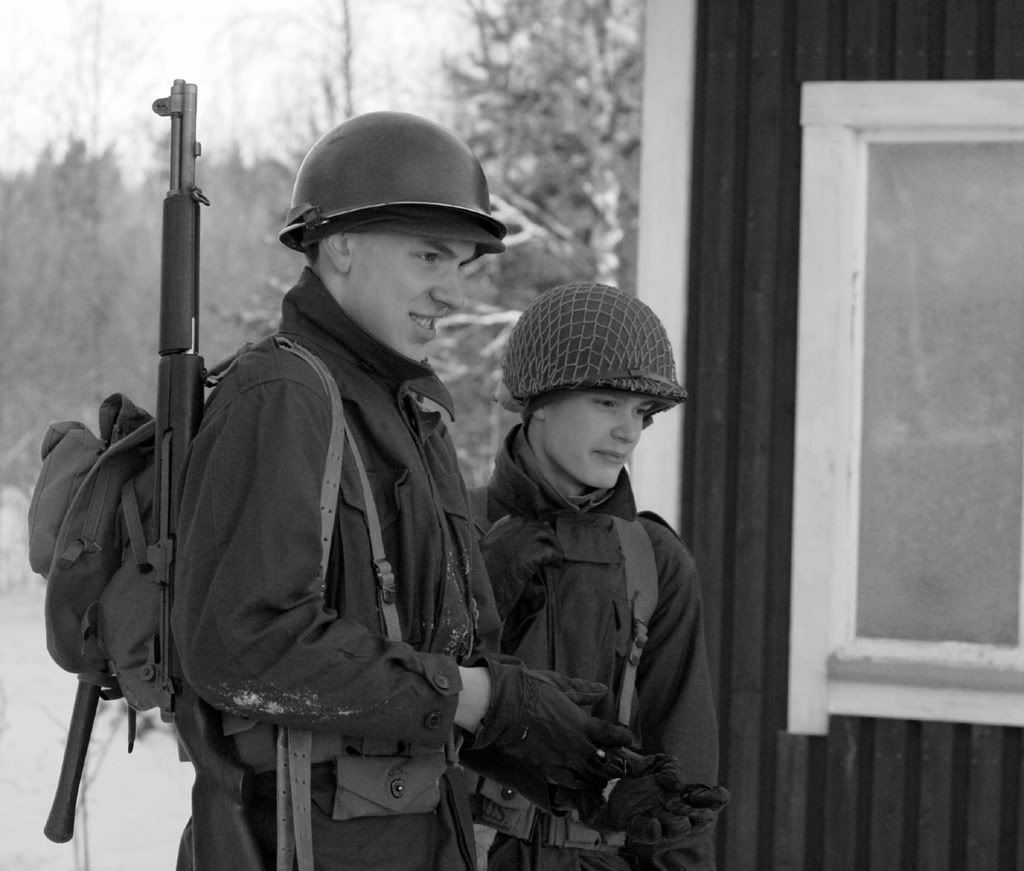 I'm not sure if this photo makes the point or not? If you look at the underside of the "upper" handguard you can see the gas tube is visible through the bottom of the handguard. Leaving it exposed helped cool the gun. |
|
masterchief
Private
I?m six sigma certified, but does not change anything.
Posts: 28
|
Post by masterchief on Dec 15, 2008 19:19:16 GMT -5
@
sgttom
no machine, only hand made. The Gas Cylinder will take over a week to be done.
@
2nd Bat
Thank you for the detail.
|
|
Sgt_Tom
Technical Sgt.
Combat!
Posts: 3,580
|
Post by Sgt_Tom on Dec 15, 2008 19:24:19 GMT -5
Thats really neat. I may have to try this myself. How much work has it been so far? Have you run into any major problems?
|
|
masterchief
Private
I?m six sigma certified, but does not change anything.
Posts: 28
|
Post by masterchief on Dec 17, 2008 22:39:14 GMT -5
@
sgttom
-Measurements does play a major key in wood making.
-Power Tools is a must. I had a hard time without them.
-It takes a longer time without the proper tools, I'm on my 45th day.
Post Pictures later
|
|
masterchief
Private
I?m six sigma certified, but does not change anything.
Posts: 28
|
Post by masterchief on Dec 17, 2008 23:57:48 GMT -5
Day 45  I borrowed the metal parts from the gun shop. This is not a working part, so the detail is not as perfect as the real deal. I'll have to return this ASAP, the machine shop will take off unesseary parts for me.   If I had a week, and tools I would be done with this in a snap. |
|
2nd Bat
Master sergeant
Posts: 11,813
|
Post by 2nd Bat on Dec 18, 2008 16:51:49 GMT -5
I like that you shaved off the overhang just in front of the trigger assembly. That looks much better. The stock is really taking shape. The gas reservoir assembly is clearly going to require some additional detail work but the stock and handguards look very good.
|
|
Sgt_Tom
Technical Sgt.
Combat!
Posts: 3,580
|
Post by Sgt_Tom on Dec 18, 2008 17:11:53 GMT -5
Nice work man. I Can't wait to see the finished product.
|
|
masterchief
Private
I?m six sigma certified, but does not change anything.
Posts: 28
|
Post by masterchief on Jan 11, 2009 23:50:09 GMT -5
|
|
2nd Bat
Master sergeant
Posts: 11,813
|
Post by 2nd Bat on Jan 12, 2009 2:09:28 GMT -5
Congratulations. Your stick to it ness and hard work paid off spectacularly. Great job! I'll be anxious to see how your Springfield project goes but I have no doubt it will go well. It's a true shame you don't have axess to the actual bits because with them you'd have a world class show piece.
|
|
masterchief
Private
I?m six sigma certified, but does not change anything.
Posts: 28
|
Post by masterchief on Jan 12, 2009 2:34:37 GMT -5
Wow! Thank you for your kind words 2nd Bat. I'll post my Springfield 1903 project soon. I just need to take a break for awhile with all the blisters . |
|
Sgt_Tom
Technical Sgt.
Combat!
Posts: 3,580
|
Post by Sgt_Tom on Jan 12, 2009 11:37:10 GMT -5
Wonderful work! You really did a great job on this. The stock and handguards came out beautiful. All you need to do is put the rear sling swivel on. Is the Kar98 a Tanaka?
~Sgttom
|
|
|
|
Post by master chief on Jan 14, 2009 12:15:12 GMT -5
Sorry for the late reply sgttom. It is a Tanaka. Here is my photo finish with prop:  For some reason, I'm unable to log in to ww2aa.proboards45...must be some issue with my IP.... Anyways, enjoy. |
|
masterchief
Private
I?m six sigma certified, but does not change anything.
Posts: 28
|
Post by masterchief on Jan 14, 2009 13:13:37 GMT -5
There we go..just for the record...next stop a 1903, with 2nd bat's blessings. |
|
2nd Bat
Master sergeant
Posts: 11,813
|
Post by 2nd Bat on Jan 14, 2009 13:20:35 GMT -5
Absolutely! Are you going to do the straight stock, scant stock or C stock variation? A1, A3 or A4?
|
|
masterchief
Private
I?m six sigma certified, but does not change anything.
Posts: 28
|
Post by masterchief on Jan 14, 2009 20:25:25 GMT -5
I may go for the 'C' stock. I saw a website with the wood specs. If I find it again, I'll post it.
|
|
|
|
Post by Marecz on Jan 26, 2009 13:39:16 GMT -5
Have some question  I didn't see from how weapon you get a short mag to this M14 Convertion |
|


 I didn't see from how weapon you get a short mag to this M14 Convertion