|
|
Post by insterburger on Jun 15, 2014 15:11:04 GMT -5
OK, here is my recently completed project. I took a few different directions, most notably doing a mod to the upper band to get a very nice mid-war look to the rifle, and a tremendous amount of work to retain the ZF41 mount and make it capable of accepting a RS ZF41 repro-- not something I intend to do again. Did some basic upgrades, but didn't go crazy: Upgraded bucking, 6.03 tightbore barrel, steel trigger/sear set, 170 spring and upgraded piston and spring guide. This is the plastic stock, I used the techniques passed to me by 2nd Bat, and I must say I'm very pleased with the appearance-- thanks, John! So here are some pics... Enjoy! 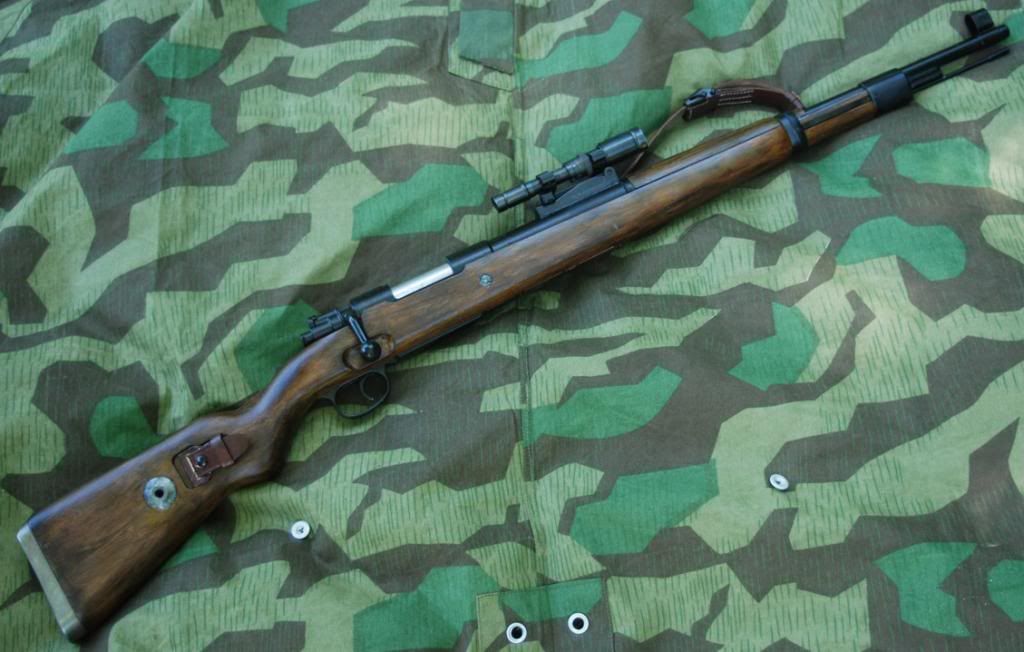 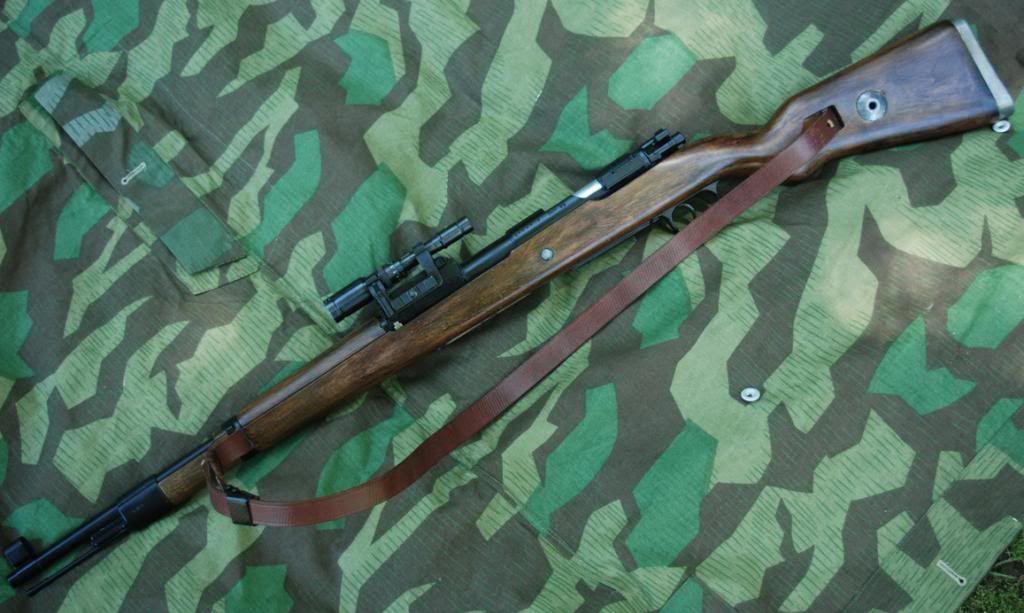 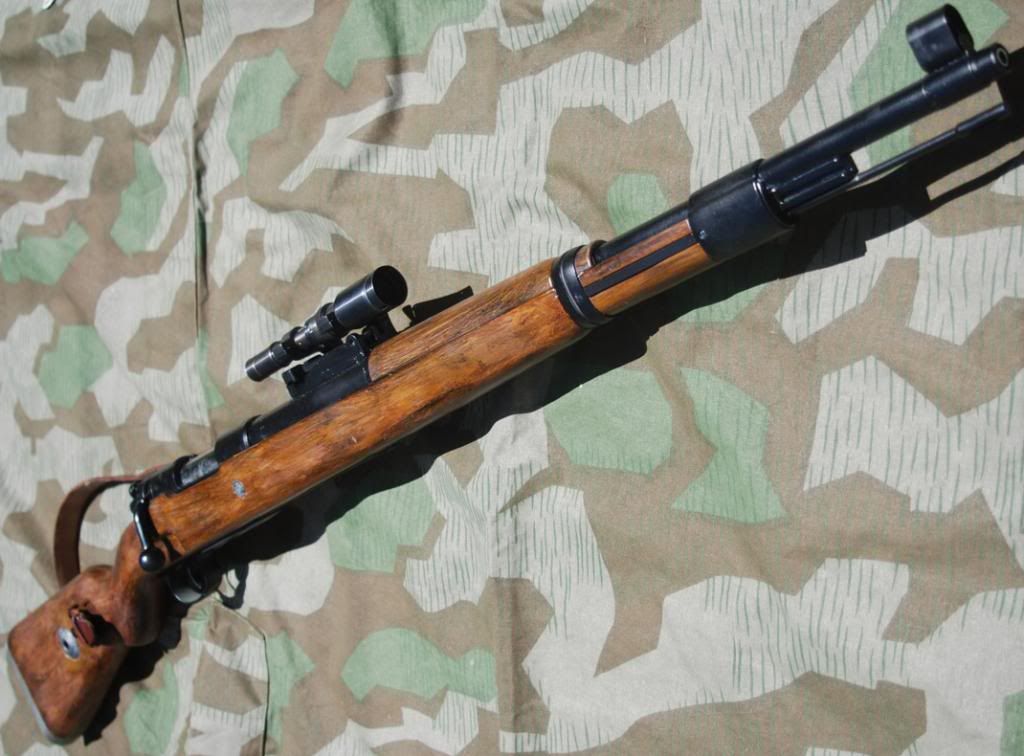 |
|
|
|
Post by insterburger on Jun 15, 2014 15:20:16 GMT -5
A few more, showing some details: 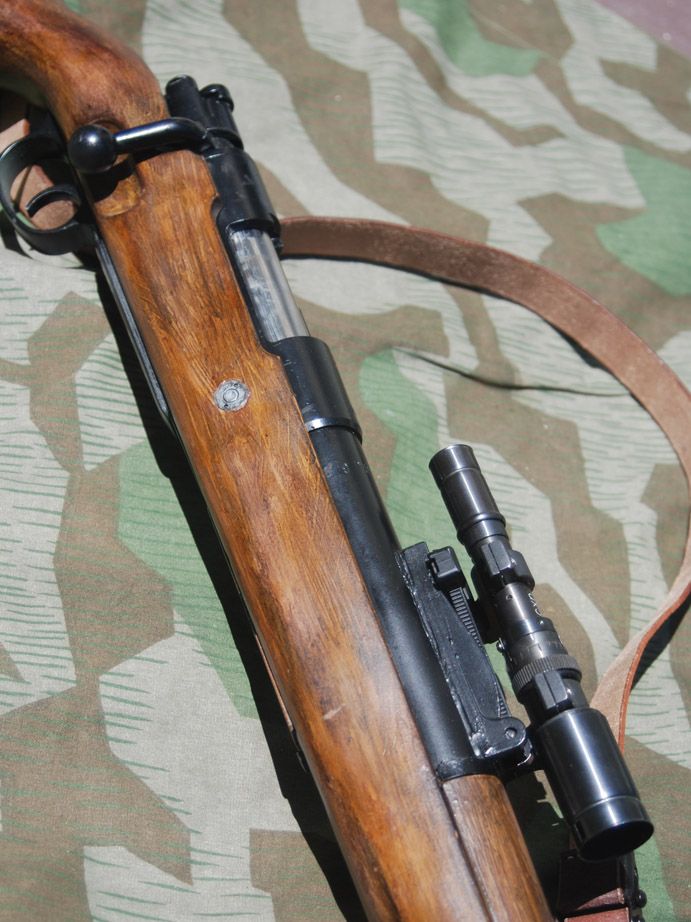 The mid-length magazine worked out well, but not a lot of room to spare between it and the back of the trigger guard! Nonetheless, it fits. The mag release I simply cut away that chunk of 98k stock, then cut out the whole Bar10 piece around the release and pinned and epoxied it into the stock. A bit of sanding and paint and the joint is very hard to notice: 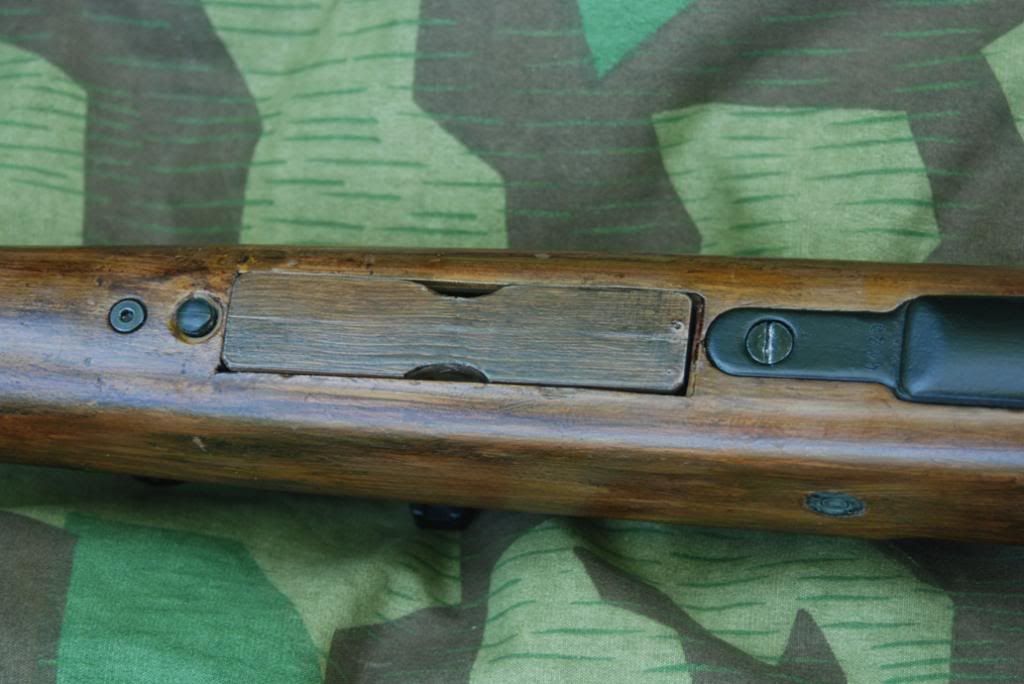 In 42-43, the Germans began switching from the "H" configuration bands to the solid "speed milled" bands. It took some doing to copy this, but was worth it. The bottom I simply filled in with JB Weld and sanded. The top of the "H", being actually open, was more complicated. I needed to cut a piece of the Bar10 bull barrel, bend it a little more to shape, trim it, JB weld it in, then build up around it, sand, and paint. It looks pretty good to my eye. In subsequent builds I hope to add 3 dolops of JB weld to each side to create a late-war welded-style band. Bottom is RD, top is my version: 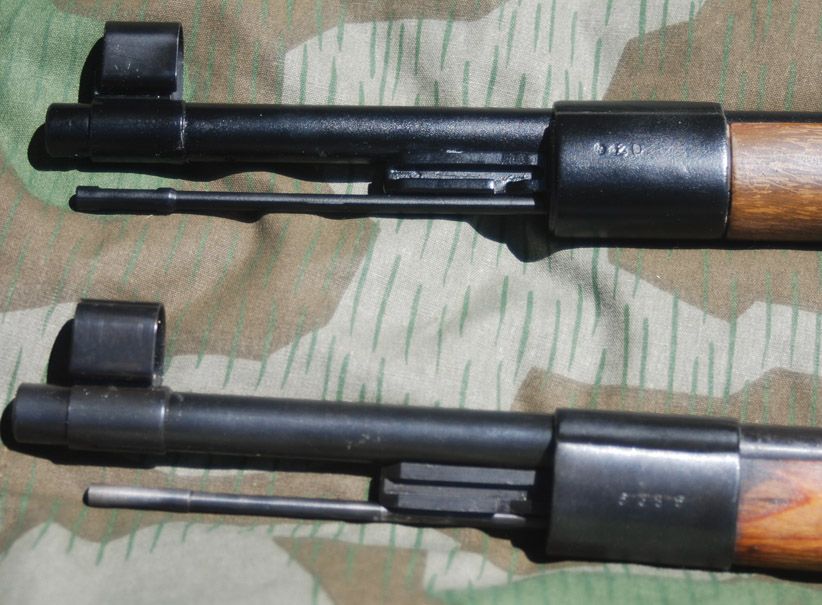 I also ground away the front of the trigger guard to make it look like a 98k one instead of the Gew 98 style TG that they inexplicably have used. Left is the real deal, right is mine. You can see in this pic that the trigger sits a bit forward-- it's not so bad as to be uncomfortable, and well worth it in order to have the action slightly forward, which benefits pretty much every other part of the rifle. 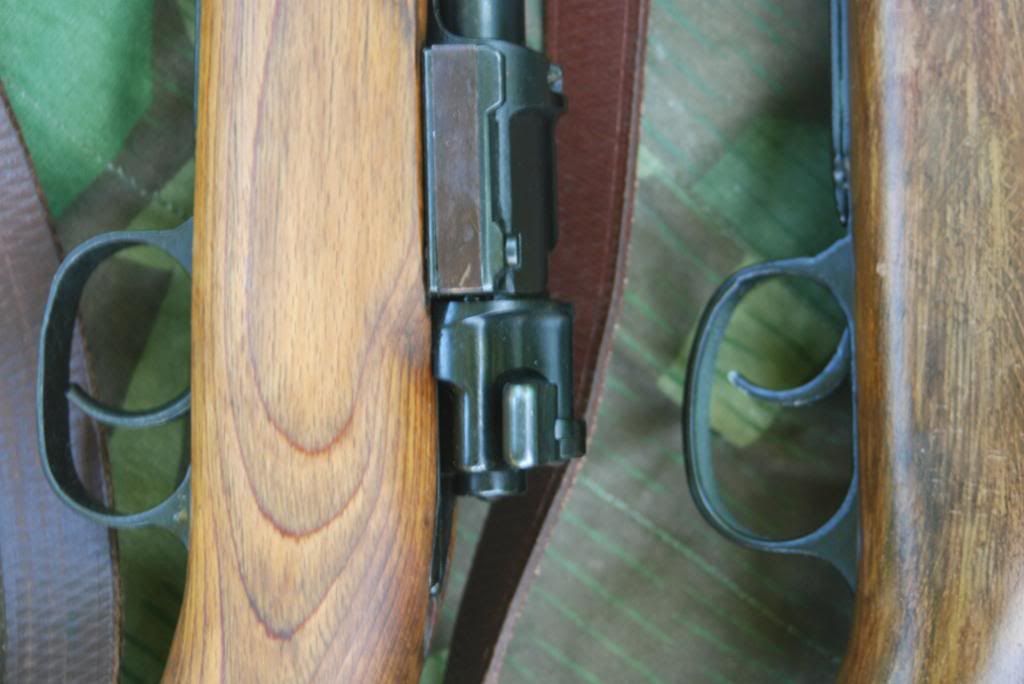 |
|
ScottCollins
Private 1st Class
 A people that values its privileges above its principles soon loses both.
Posts: 548 
|
Post by ScottCollins on Jun 15, 2014 15:21:32 GMT -5
Wow! That looks great! Can't wait to fight against it in July!  |
|
|
|
Post by insterburger on Jun 15, 2014 15:35:23 GMT -5
Thanks, Scott! Here are a few more showing comparisons to two RS 98k's. I based the build on my byf43 (blonde stock, cupped buttplate), but I liked the darker stock on my '39 JP Sauer (the one with the flat buttplate, the gun is a Russian Capture but the stock is a shooting stock I put on it that is marked "7.62" from Israeli service, but has clearly not been refinished through both Wehrmacht and IDF use), so I tried to achieve a darker finish, but one that still implied some wood grain-- kind of a hybrid between the two. Very happy with how it worked out. I also think moving the action up about 1.5cm from the "real" tang screw hole worked out well. The action is almost in exactly the right place relative to a real 98k, and it let me use the 24-round magazines and still clear the trigger guard. The real tang screw sits INSIDE the trigger guard, as does the allen screw that holds in the Bar10 action. The 98k trigger guard is screwed into nuts that are epoxied into the holes, maintaining the original appearance. Here we go... 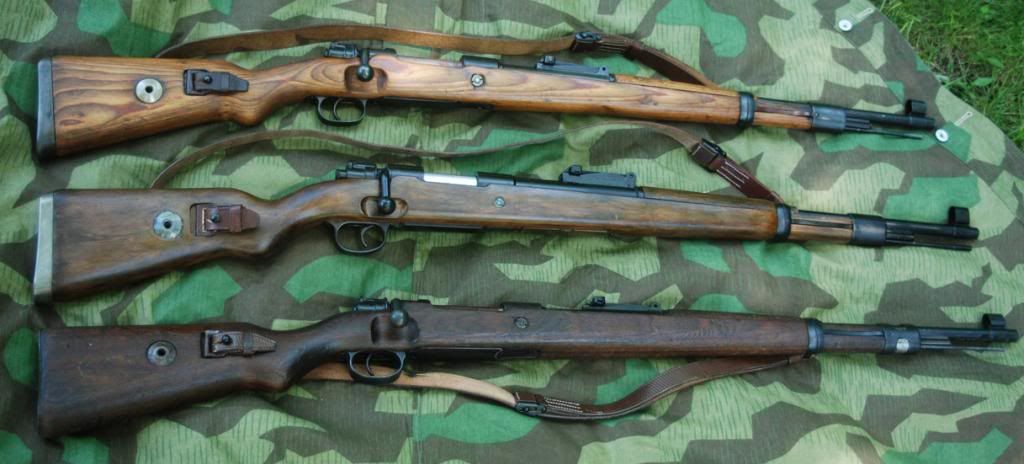 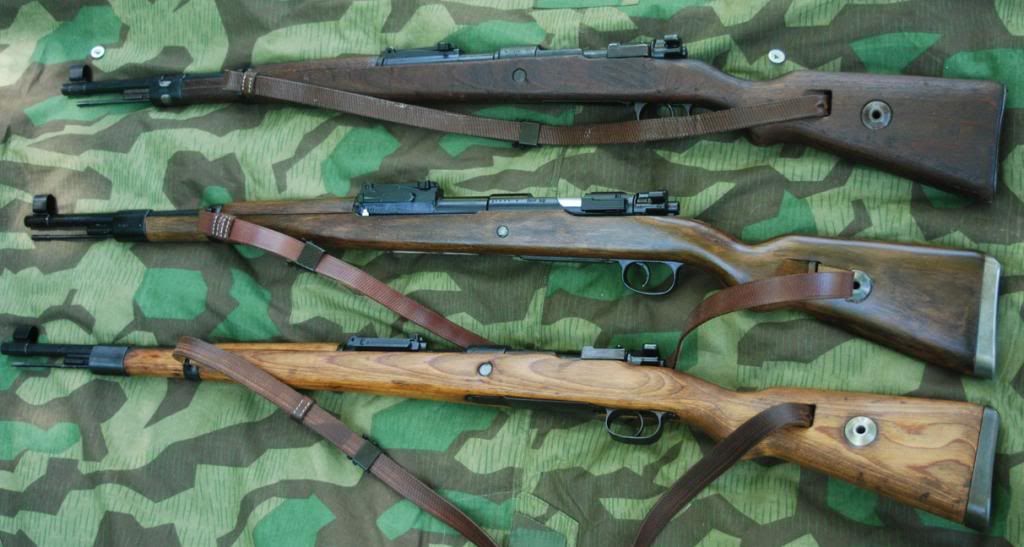 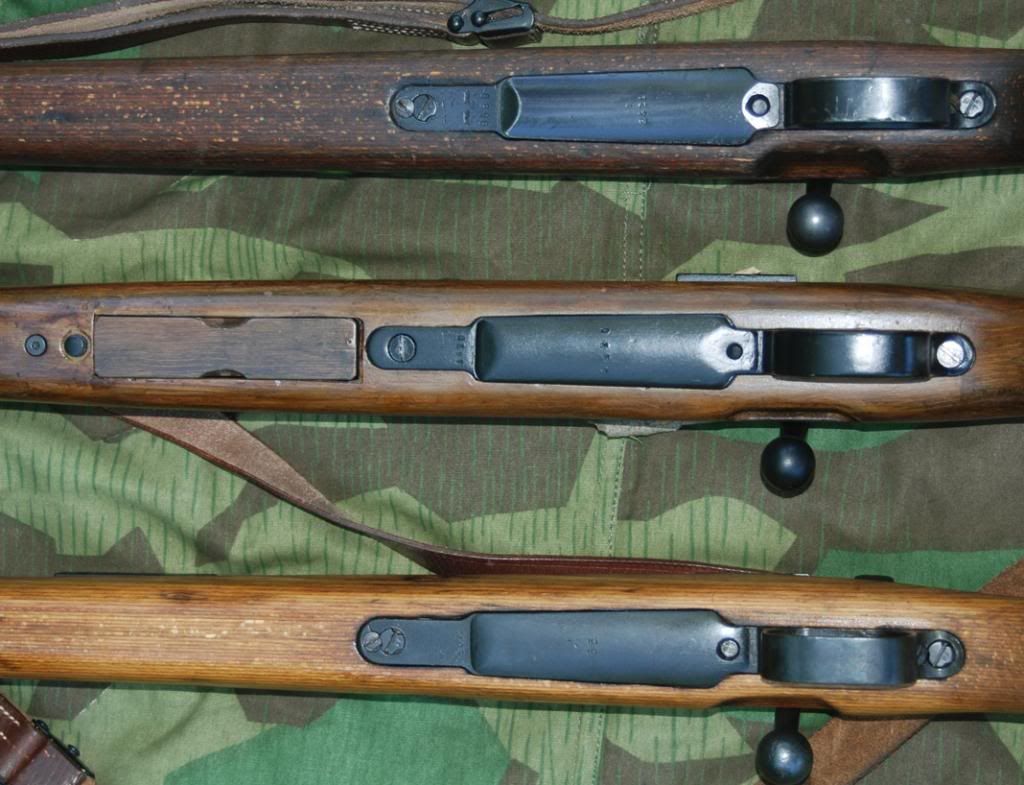 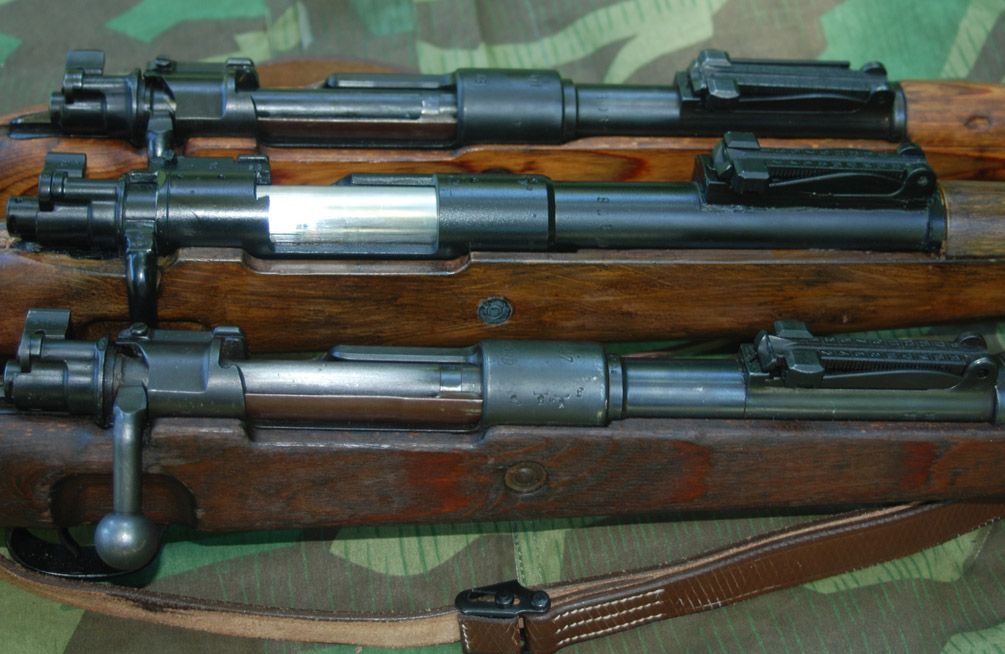 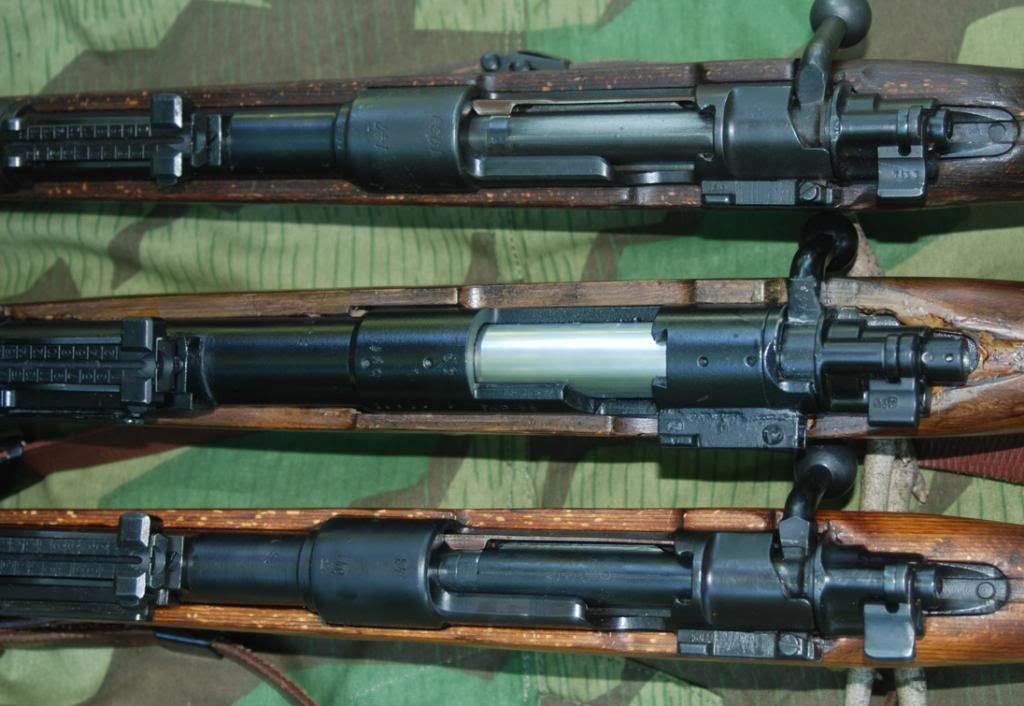 |
|
|
|
Post by insterburger on Jun 16, 2014 17:03:09 GMT -5
A few pics showing some of the technical side of things: First off, here is how the receiver is fit into the stock. I built up the stock inside just ahead of the wrist to allow a new tang screw to be drilled a little further forward. On the bottom, the screw goes straight through the plastic, the Bar10 action screw is put through a bracket screwed into the plastic, and then the whole thing is covered over with the trigger guard, which screws into the stock, but has NO screws that hold any internals in (very unlike a real 98k). 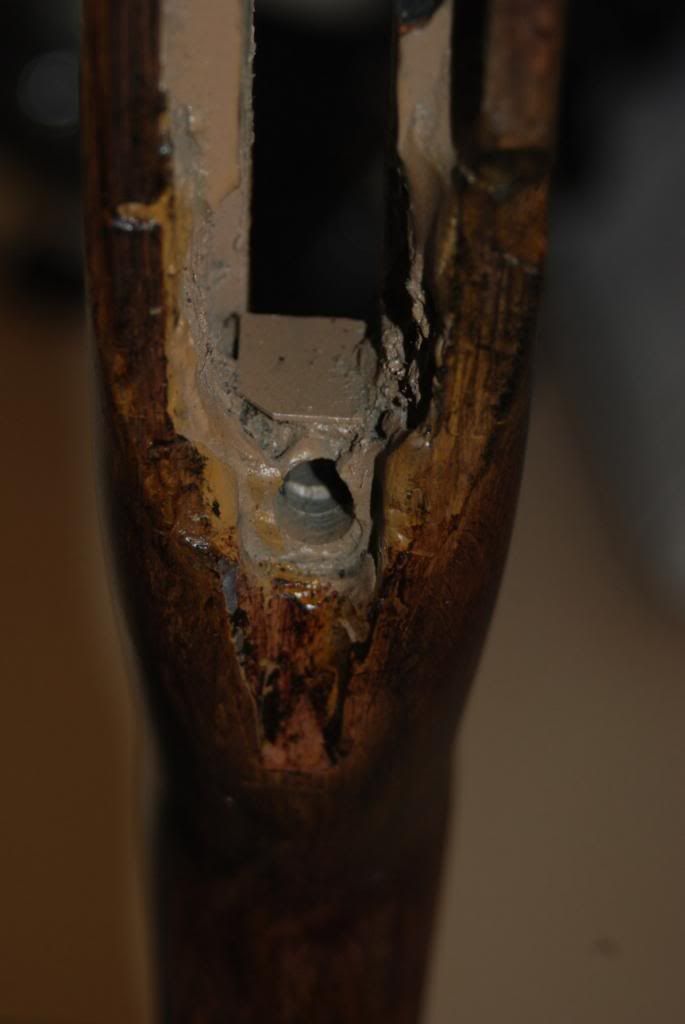 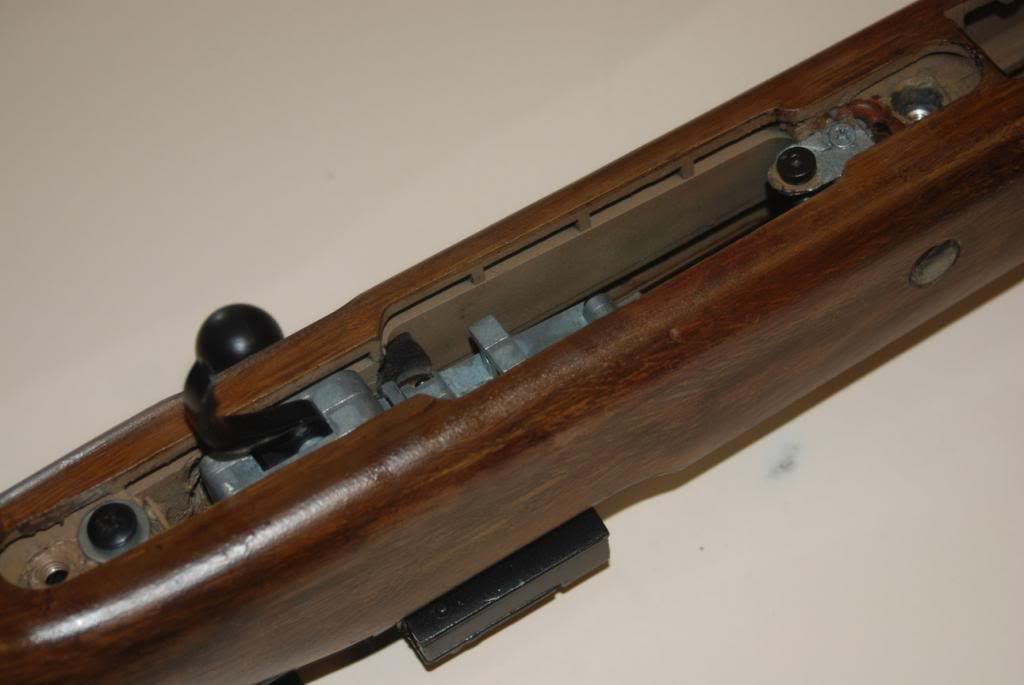 I wish I had taken pictures of the mag release before painting. This was one of the steps I was ost afriad of, but that was really easy. I just cut the piece out of the Bar10 stock, then cut a slightly larger opening ahead of the magwell I made on the 98k stock. By seating the action, then fitting the chunk of Bar10 stock with the release on the fairing under the hop up, I could see how it sit. It needed some very thin shims to bring it flush, which I installed on the stock piece. Once it was sitting correctly, I took a dremel and cut three channels on each of the three sides bridging from the stock to the release piece, then carefully JB Welded cut-off brads into them as pins. Once these dried, the piece was firmly attached, but with noticable gaps at the joints. So I then took JB Weld putty, smushed it into the seams, then quickly removed the action so as not to glue it in. After some sanding and painting, it is hard to detect. In these pictures you can kind of see the joint- the little dimples on the exterior are the ends ofthe pin channels that I didn't quite fill in... call them battle damage. 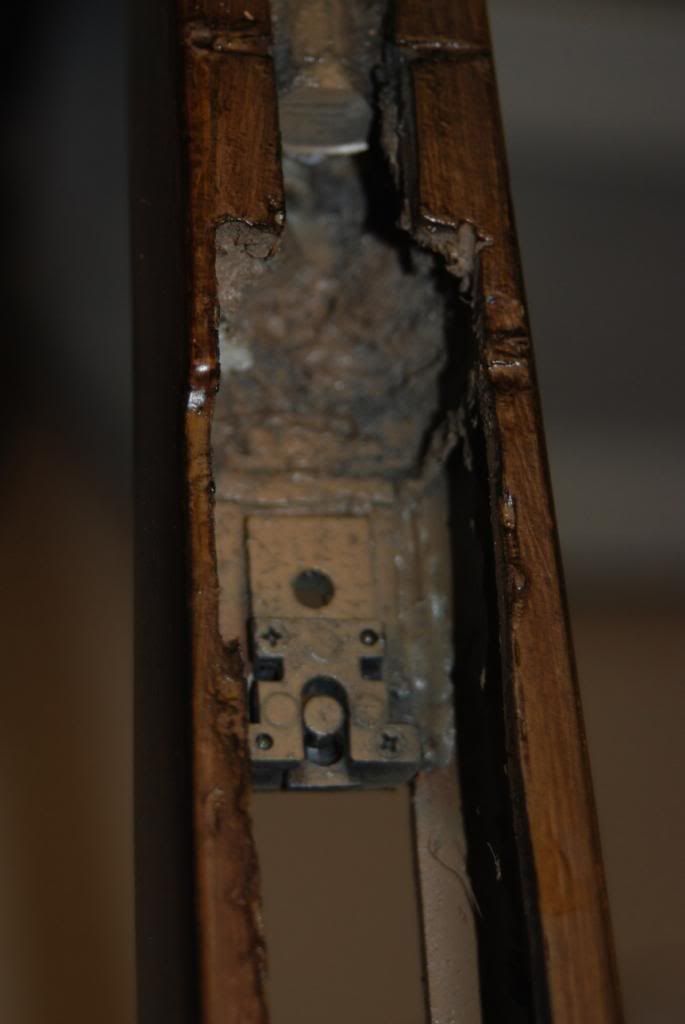 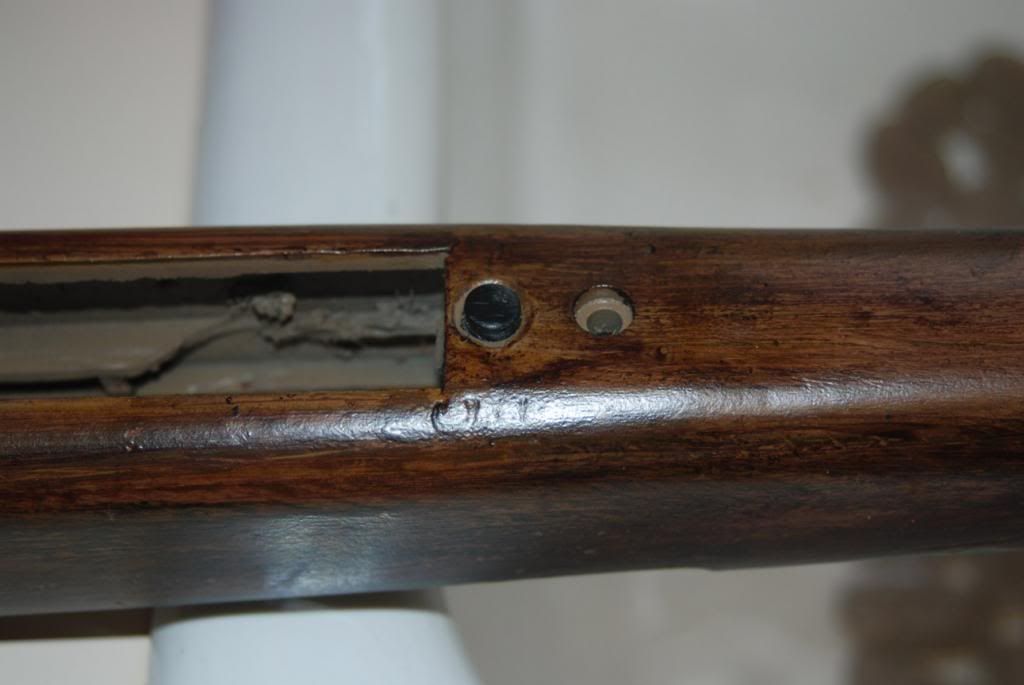 |
|
Jerry-ADK
Private 1st Class
 Unteroffizier, Heeresgruppe Nord-Ost
Posts: 418 
|
Post by Jerry-ADK on Jun 30, 2014 13:59:27 GMT -5
Mark,
yours came out so much better than mine, I am very impressed! I think you are going to be the gunsmith in the unit! My bolt lever did not hold up at all. It finally stripped out after 2 attempt to epoxy it together, pot metal just wont hold up to the steal threads, even with generous amounts of JB Weld. I have ordered a replacement bolt handle from Evike and I am going to try mating the swaged ball only to the stock bolt lever. It wont have the proper turn down of the K98 but it will not strip out and break during combat and it will look ok from a distance. I also like the way you did the bolt shroud. Mine came out rough because I used JB weld to glue the parts of the bolt shroud from the Dboys to the JG. I would probably do what you did next time, just modifying the Dboys bolt shroud to fit on the JG bolt cylinder shaft if that works. Any way great work! I cant wait to see it up close.
|
|
2nd Bat
Master sergeant  
Posts: 11,813
|
Post by 2nd Bat on Jul 1, 2014 0:21:22 GMT -5
This definitely deserves a sticky in hopes it will inspire others! Great work Mark.
|
|
Ersatzjack
Corporal
  "That silly Franz... he thinks we are winning."
Posts: 1,093
|
Post by Ersatzjack on Jul 1, 2014 0:31:43 GMT -5
Nice work. The sharpshooter scope looks nice and it's the best D-Boys conversion I've seen.  |
|
Sgt_Tom
Technical Sgt.
   Combat!
Posts: 3,580
|
Post by Sgt_Tom on Jul 2, 2014 9:08:31 GMT -5
Nice job man. Looks good.
|
|
|
|
Post by insterburger on Jul 6, 2014 18:05:30 GMT -5
Thanks for all the very kind words, we'll see how it holds up to field use. I threaded both the bolt ring and stem as deep as I dared (ring was actually through-tapped, then after installing the bolt handle I filled in the back with JB Weld). I've been making a point of pulling back the bolt close to the stem to as much as possible avoid stress on the joint, too, just for good measure. So far so good.
I have started in on a wood-stocked version, but really would almost rather work with the plastic, it was so easy to manipulate, and the paint really looks the part (I had been very scared of screwing that up). I think the mag release will be much harder with wood, I'm considering doing something a little different than the standard release button. I've been looking in past threads for inspiration, but any new ideas are appreciated.
|
|
Sgt_Tom
Technical Sgt.
   Combat!
Posts: 3,580
|
Post by Sgt_Tom on Jul 6, 2014 19:45:56 GMT -5
Thanks for all the very kind words, we'll see how it holds up to field use. I threaded both the bolt ring and stem as deep as I dared (ring was actually through-tapped, then after installing the bolt handle I filled in the back with JB Weld). I've been making a point of pulling back the bolt close to the stem to as much as possible avoid stress on the joint, too, just for good measure. So far so good. I have started in on a wood-stocked version, but really would almost rather work with the plastic, it was so easy to manipulate, and the paint really looks the part (I had been very scared of screwing that up). I think the mag release will be much harder with wood, I'm considering doing something a little different than the standard release button. I've been looking in past threads for inspiration, but any new ideas are appreciated. My suggestion for the mag release for the wood stock version is to just use the plastic mag release like this. i252.photobucket.com/albums/hh11/Fighten3rd/Kar98%20Conversion%20Pictures/DSC07395-1.jpgChina wood is easy to work with but an original wood stock is a different story. Original stocks are tough to cut through and sand. |
|
|
|
Post by insterburger on Jul 6, 2014 19:59:23 GMT -5
Interesting solution, Sgt. Tom. Matching the finish may be a challenge between the real wood and the plastic, much more than it was with plastic/plastic where I just painted it together as a whole. But it should be doable with some effort.
Many thanks!
|
|
Sgt_Tom
Technical Sgt.
   Combat!
Posts: 3,580
|
Post by Sgt_Tom on Jul 7, 2014 10:31:34 GMT -5
No problem. I've seen people who went the route of carving the mag catch out of wood. It would be quite tricky though to get it that precise so that the magazine catch would work well.
What kind of wood stock are you using original or an airsoft one?
|
|
|
|
Post by insterburger on Jul 7, 2014 10:36:36 GMT -5
It's the DBoys stock. Some sort of oddball tropical wood I think. Very light and should be relatively workable.
Oddly, I have two of the DBoys wood stocks, and they are not the same-- one is approximately 1/2" longer than the other. I'm really curious as to why. Probably a cost-saving measure.
|
|
Sgt_Tom
Technical Sgt.
   Combat!
Posts: 3,580
|
Post by Sgt_Tom on Jul 7, 2014 10:49:25 GMT -5
I found the Dboys stocks didn't take stain well. I ended up having to use gel stain which is for plastic/metal. Shouldn't be hard to make the plastic match up with the wood as you could use the same thing on both of them.
|
|
2nd Bat
Master sergeant  
Posts: 11,813
|
Post by 2nd Bat on Jul 7, 2014 15:14:42 GMT -5
Prior to any stain on a plastic stock I find it helpful to thoroughly sand the plastic until it is dull with the plastic shine completely gone. The sanding seals the pesky seams they often have and actually by using assorted grits of sand paper you can create a convincing grain. Insterbergers stock look very very convincing as do yours SGTTOM which shows what can be done with a little creativity and effort. I really like the direct comparisons shots between actual rifles and your conversions. Truthfully I would never be bold enough to do that with any of the conversions I built!
|
|
|
|
Post by insterburger on Jul 17, 2014 15:12:52 GMT -5
Thanks, John! The process I used was pretty much what you had passed along to me, with a few minor tweaks:
1) Base coat of tan
2) Sand base coat dull
3) Apply a mix of bown paint and faux finish medium, drag with graining comb (trying where possible to emulate grain lines from laminate on the real 98k, even though it got pretty well hidden)
4) Apply a smattering of both brown and black shoe polish, paying special attention to areas that picked up grease and dirt on the real gun (near buttplate, wrist, around bands)
5) A thin wash of amber shellac, which gives it a nice golden tint over the brown and adds some depth
6) A couple coats of matte clear poly.
And that was it. It photographs well, but truly looks the part even in person and fairly up close as those who make it to Nate's event will see. Hopefully the finish will hold up to field use!
|
|
|
|
Post by FritzoftheMidwest on Dec 23, 2014 15:29:04 GMT -5
What shortened magazine did you use?
|
|
Ersatzjack
Corporal
  "That silly Franz... he thinks we are winning."
Posts: 1,093
|
Post by Ersatzjack on Dec 23, 2014 19:30:51 GMT -5
|
|
Jerry-ADK
Private 1st Class
 Unteroffizier, Heeresgruppe Nord-Ost
Posts: 418 
|
Post by Jerry-ADK on Dec 23, 2014 21:51:37 GMT -5
Ersatz, I used these mags in my conversion. They worked good and feed reasonably well. The 2 best things about them is that you don't have to cut the tang screw area on the Kar magazine/trigger guard when making your mag well, and they do fit in both Fallschirmjäger bandoleers and standard Kar mag pouches with little trouble. The ones Insterburger used I believe were the m24 snow wolf style mags which are also shorter than the Bar10 mags by quite a bit. |
|
|
|
Post by FritzoftheMidwest on Dec 23, 2014 23:03:55 GMT -5
Thanks guys. New to all this tech stuff, but I hope to start my own conversion after the Stalingrad event. If it turns out even half as good as Insterburger's, I will be tres content.
|
|
Dracul
Master sergeant  
Posts: 1,341 
|
Post by Dracul on Dec 24, 2014 1:13:31 GMT -5
Wait, the Snow Wolf M24 mags work in VSR-10's?
|
|
2nd Bat
Master sergeant  
Posts: 11,813
|
Post by 2nd Bat on Dec 24, 2014 4:35:28 GMT -5
Dracul,
Some mix of base rifles shown in this thread as some pictures depict VSR base rifles while others are not. The VSR clones and the M24 snow rifles use a different magazine. Even the VSR clones from assorted brands (AGM, JG, TSD etc) have identical looking magazines but they don't always work well in another brands guns. The stubby magazines shown are shorter in length than the VSR and have a smaller capacity (15 rounds instead of 30). I suppose they could be modified to work but my experience attempting such alterations have rarely worked out well (At least for me). SGTTOM has managed it quite well and there are real upsides to the tinier mags but be careful here.
Your most consistent bet with magazines whenever possible is to get the exact same brand as the gun and model unless you're positive they will work. The longer cut in the bottom of the rifle is very inconspicuous in my opinion and Im okay with the fact that they dont fit in the pouches as they fit in uniform pockets just fine.
|
|
Dracul
Master sergeant  
Posts: 1,341 
|
Post by Dracul on Dec 24, 2014 5:07:40 GMT -5
I understand that, but that is exactly why I asked. M24 mags shouldn't work with the VSR-10 clones. The first post said this was a BAR-10 used in the conversion, then M24 Snow Wolf mags were brought up recently.
I remember seeing somewhere else about the those DE shotguns mags working, so I wasn't confused on that.
|
|
Jerry-ADK
Private 1st Class
 Unteroffizier, Heeresgruppe Nord-Ost
Posts: 418 
|
Post by Jerry-ADK on Dec 24, 2014 9:36:36 GMT -5
I understand that, but that is exactly why I asked. M24 mags shouldn't work with the VSR-10 clones. The first post said this was a BAR-10 used in the conversion, then M24 Snow Wolf mags were brought up recently. I remember seeing somewhere else about the those DE shotguns mags working, so I wasn't confused on that. Dracul, Insterburger really needs to chime in here because I'm not exactly sure if he used the m24 type mags or if they were shotgun mags. I just can't remember for sure. He definantly did not use the mags that came with the VSR. Since a new mag well needs to be cut in the Kar stock anyhow using shorter mags works generally. I suppose if for some reason they won't feed you could always cut the mag well bigger and use the stock VSR mags. Cutting the mag well and getting the gun to feed was the hardest part of my conversion. It often takes some fussing around and fitting to make sure the gun works and feeds properly. My gun feeds 98% of the time and I have to hold my hand over the mag while cocking to make sure the gun feeds a new bb into the chamber. It doesn't bother me too much as I'm used to it. Others may not find that acceptable. I could improve it with a little more work. I really like that the tiny mags fit in my pouches as it ads to the realism of my load out. |
|
Dracul
Master sergeant  
Posts: 1,341 
|
Post by Dracul on Dec 24, 2014 11:35:15 GMT -5
I found that out on my own when I did my Kar98 conversion. I honestly think that is the hardest part of the conversion.
I just want some clarification here. I'm not going to run out and buy M24 mags hoping that they will work in a VSR-10 clone.
|
|
|
|
Post by volkssturm on Dec 24, 2014 13:07:33 GMT -5
On the VZ24/BAR10 I'm working on I found this mag is just the right length. It comes right to the front edge of the trigger guard, so I didn't have to cut the tg. I haven't progressed far enough to give it a real test, but it looks promising. www.evike.com/products/39668/ |
|
|
|
Post by insterburger on Dec 28, 2014 9:02:54 GMT -5
Volksturm pegged it: I used the Swiss Arms M6 ASG Steyr UTG Master Sniper Double Eagle M50 Series mags, which are 24 rounds: www.evike.com/products/39668/Feed is EXACTLY like the JG. Fit this mag properly and it should work like a champ. One caveat: Be VERY sure where you're putting your action early in the process, and move the action slightly forward as I did. This mag will almost certainly slightly overlap the front of the TG if you use the normal tang screw location, which is less than ideal. By moving your action forward slightly, you not only solve that issue, but put the action in a place where it better reflects a real 98k, and where the bolt will sit perfectly in the cutout on a DBoys conversion. |
|
|
|
Post by <2>nd Rangers M/Sgt. Tom on Nov 20, 2015 16:52:10 GMT -5
Wow best looking D Boys K98 i've seen Great work, How much was that repro scope?
|
|
|
|
Post by insterburger on Nov 20, 2015 20:18:56 GMT -5
Thanks for the kind words, Ranger. The repro scope is the same one I use on the RS byf 43 98k I based this one on. With the mount it was in the $300 range.
Now I'm tempted to field this with the scope in the upcoming Aachen game. I would just need to get some clear acrylic discs to cover the lenses so that they don't catch a stray BB and chip. That would suck.
|
|