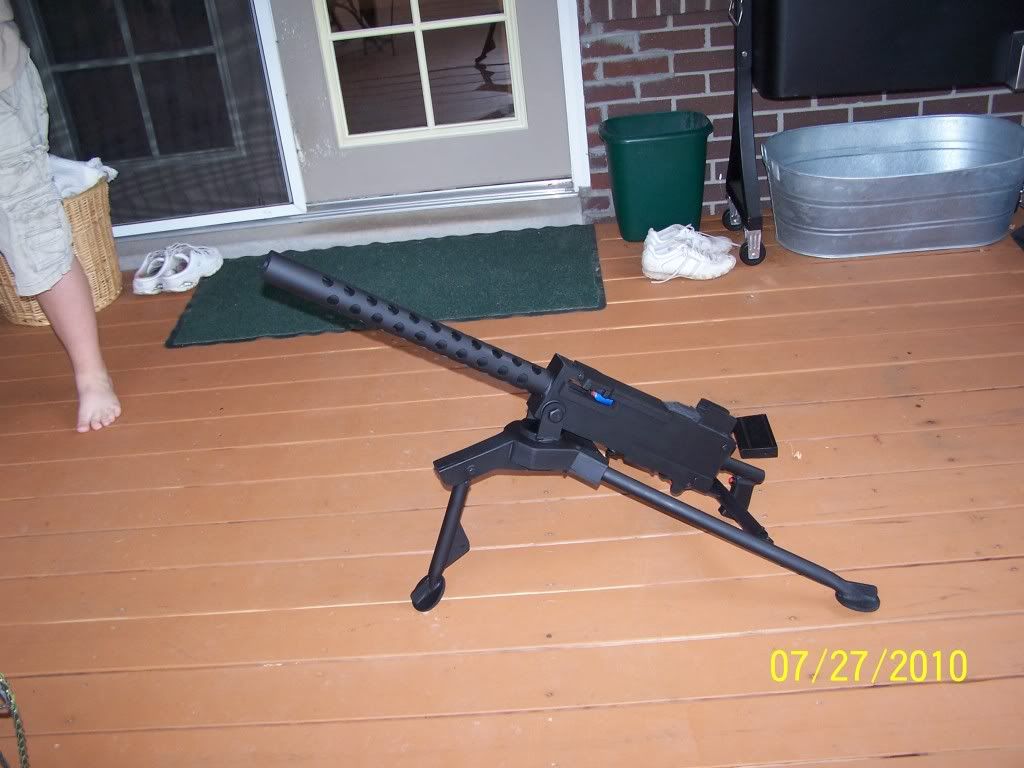
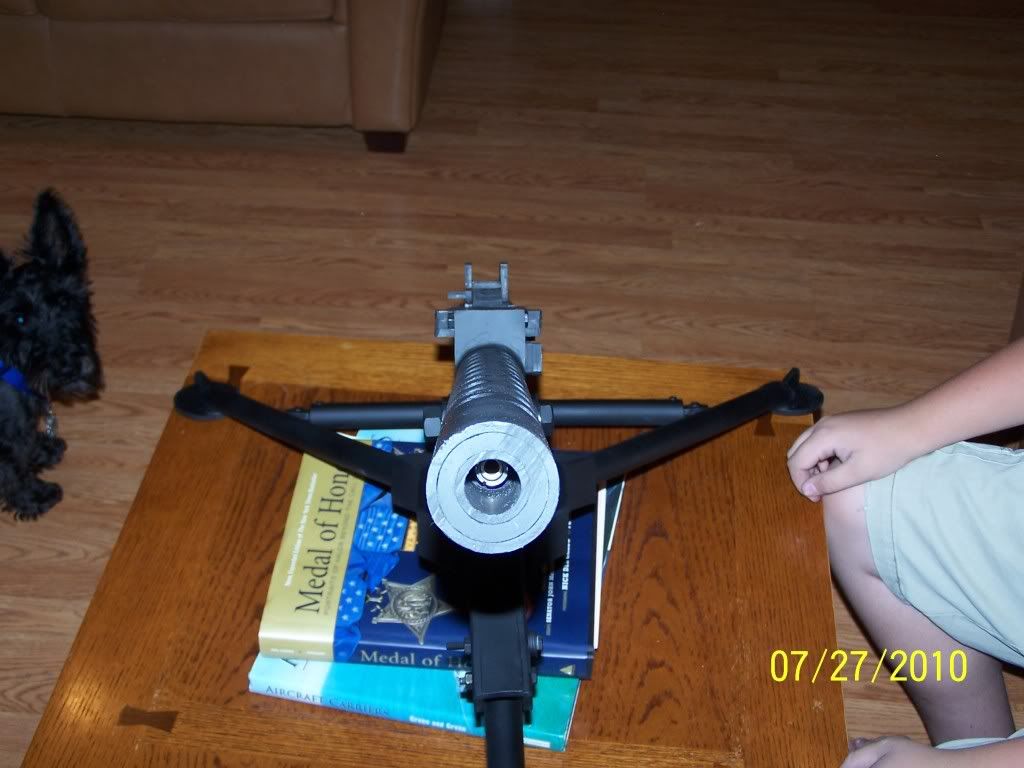
elder90
Private 1st Class

Posts: 643
|
Post by elder90 on Jul 2, 2010 2:19:56 GMT -5
Hi guys Ive been wanting to start this project for a long time but suddenly I will be attending a very Large OP here is Colorado and Need to get it done. I have had the patterns for the M1919 for a long time but have been waiting to have enough money to buy a scrol saw. I need to get this done before the 20th of August and was wondering if I could do this project with a Jig Saw instead of a scrol saw. Would it be possible to get the same cutting efficiency with a jig saw that a scrol saw would provide.
Thanks for you help
|
|
elder90
Private 1st Class

Posts: 643
|
Post by elder90 on Jul 2, 2010 5:59:24 GMT -5
Also what PVC Cement should I use to hold it all together
|
|
2nd Bat
Master sergeant  
Posts: 11,813
|
Post by 2nd Bat on Jul 2, 2010 22:41:27 GMT -5
Use ABS cement! except in those places in the barrel assembly where you use PVC. A scroll saw is best but you can do it with a jig saw, and even a dremel although you'll go through a lot of blades. Be sure to drill any holes required before cutting out your patterns.
I've built three and a half of these and they are certainly doable but quite a lot of work. For looks I have to say I like the old style tripod bettter thatn the final variation he came up with. Either way you have to reinforce the tripod a bit.
|
|
elder90
Private 1st Class

Posts: 643
|
Post by elder90 on Jul 7, 2010 12:36:24 GMT -5
Ok I will look for the cement at Lowe's or home depot. Also a long time ago I bought some ABS to PVC cement that is supposed to glue ABS to PVC will that work for the barrel area?
Is there any modification to the barrel of the M14? I know you have to cut apart the receiver but what about the barrel.
Is the PVC barrel strong? I mean is it Strong enough for a bi pod. Jim Seery might be giving me his old tripod and I think it is one of the old ones. Where will I have to re-enforce it? Like under the legs or what.
Thanks again
|
|
2nd Bat
Master sergeant  
Posts: 11,813
|
Post by 2nd Bat on Jul 8, 2010 23:05:18 GMT -5
I put a rod inside the hollw tubes and squirted expandable foam inside. I also reinforced the contact areas with thin metal JB welded into place as these areas tended to fail. The barrel is plenty strong enough as designed to accomodate a bipod.
|
|
elder90
Private 1st Class

Posts: 643
|
Post by elder90 on Jul 10, 2010 1:13:21 GMT -5
Ok thanks 2nd Bat as ussual the one with an answer to every question (  ) |
|
elder90
Private 1st Class

Posts: 643
|
Post by elder90 on Jul 22, 2010 17:14:41 GMT -5
ahh lots of money and tools later Im almost done! the jigsaw didnt work so I went up to harbor frieght and got a little scrolsaw. It worked great got everything glued together and set but there is one problem that is preventing me from finishing. I for the life of me cannot figure out how to wire the trigger. I was going to do a mechanical trigger but that would leave to much of the gearbox sticking out so I need an electric trigger.
Any help is appreciated
|
|
elder90
Private 1st Class

Posts: 643
|
Post by elder90 on Jul 23, 2010 11:15:39 GMT -5
Can anyone help me I need to have it done soon
|
|
|
|
Post by hairy apple on Jul 23, 2010 13:44:18 GMT -5
Micro switch dude. Radio shack or somewhere like that will have them.
|
|
elder90
Private 1st Class

Posts: 643
|
Post by elder90 on Jul 23, 2010 17:54:07 GMT -5
Not just the switch but the whole thing I'm not very good with this stuff. I am pretty good with externals but the selector switch and all is throwing me off I have the M14 fitted inside the gun but I don't get how the switch will work.
So I see one Black wire going from the battery into a plastic thing on the left side of the receiver. A second black wire coming out of the same thing now, what I believe happens is when you pull the trigger that plastic connector connects the 2 black wires making one wire that goes into the motor. If I am right tell me If I'm wrong tell me how to do this cuz I'm stumped.
|
|
|
|
Post by burke on Jul 23, 2010 20:27:22 GMT -5
Go to the airsharp website, he has diagrams on how to build it and im sure itll show how he setup his wiring.
|
|
elder90
Private 1st Class

Posts: 643
|
Post by elder90 on Jul 23, 2010 23:13:26 GMT -5
It doesnt say how I have checked before and I just rechecked
Jim Seery gave me his old trigger from his M1919 but Im confused how it works
|
|
elder90
Private 1st Class

Posts: 643
|
Post by elder90 on Jul 25, 2010 3:04:05 GMT -5
Ah that was tough we got it figured out though thanks all
|
|
elder90
Private 1st Class

Posts: 643
|
Post by elder90 on Jul 28, 2010 0:30:55 GMT -5
All done now here are some pictures   hope you guys like it |
|
kalbs
Master sergeant  
Posts: 1,142
|
Post by kalbs on Jul 28, 2010 6:09:25 GMT -5
looks very nice elder90. You did an excellent job on it.
|
|
Sgt_Tom
Technical Sgt.
   Combat!
Posts: 3,580
|
Post by Sgt_Tom on Jul 28, 2010 9:09:02 GMT -5
Elder90 The photos you posted are not showing up.
|
|
elder90
Private 1st Class

Posts: 643
|
Post by elder90 on Jul 28, 2010 9:52:21 GMT -5
Thanks Kalbs and SgtTom they are showing up for me and for Kalbs I dont know how to help you hold on
|
|
|
|
Post by burke on Jul 28, 2010 10:27:51 GMT -5
Wow, thats from the airsharp design? When you buy that you get a file and can print it any amount of times correct?
Did you use abs or pvc? And where did you get that from?
|
|
Sgt_Tom
Technical Sgt.
   Combat!
Posts: 3,580
|
Post by Sgt_Tom on Jul 28, 2010 12:50:39 GMT -5
They are working now, not sure why they weren't coming up before. Anyways nice job, must have been some hard work there.
|
|
elder90
Private 1st Class

Posts: 643
|
Post by elder90 on Jul 28, 2010 13:19:55 GMT -5
They are working now, not sure why they weren't coming up before. Anyways nice job, must have been some hard work there. I sent you a PM also with direct links and thanks "Wow, thats from the airsharp design? When you buy that you get a file and can print it any amount of times correct? Did you use abs or pvc? And where did you get that from? " It is the airsharp design. I have had the patterns forever and never had the money to commit to building this bad boy. I worked all summer long got enough money to buy a scroll saw a band saw and a drill press and started. I bought the plastic a long time ago from interstateplastics.com I THINK it was a long time ago. It is ABS and strong as hell. |
|
elder90
Private 1st Class

Posts: 643
|
Post by elder90 on Jul 28, 2010 14:32:33 GMT -5
For the people that have built this or had one built for them how do you strengthen the Grip area. Im not talking about the grip itself but what about the pipe coming out of the gun into the grip it just broke off while doing test fires and i cant seem to get it to stay on.
Thanks
|
|
|
|
Post by jimmiroquai on Jul 28, 2010 21:18:35 GMT -5
You could try using metal pipe instead of pvc. Then strengthen the join with lots of JB weld/ epoxy steel. Nice build BTW! Are you going to be weathering it?
|
|
elder90
Private 1st Class

Posts: 643
|
Post by elder90 on Jul 29, 2010 0:09:22 GMT -5
Thanks and Im not sure how to weather plastic but in this case im going to keep it flat black for ease of touch ups. Im taking it to a National Op (modern game) I have already started to train my gun crew and so far we can set up really really fast so we should be able to take on all the ruskys and terrorists in the world haha
Oh and today I added a working charging handle with a spring and everything it makes me feel sooo good to pull that thing back and start shooting haha
|
|
2nd Bat
Master sergeant  
Posts: 11,813
|
Post by 2nd Bat on Jul 29, 2010 0:21:37 GMT -5
Great job Elder. You'll find that JB weld does not adhere well to ABS but it's presence will still add strength. A better idea is to inplace some tiny screws into the right angle walls of your ABS corners to add additional strength over and above the ABS glue which is generally pretty good. You also can add some abs triangular pieces on the inside of your corners and ABS glue them into place.
|
|
Sgt_Tom
Technical Sgt.
   Combat!
Posts: 3,580
|
Post by Sgt_Tom on Jul 29, 2010 8:57:03 GMT -5
For a more worn finish I'd suggest giving it some coats of black primer then go over it with gloss black then go over it with steel wool. Gives it an almost blued look. A parkerized grey might look good too.
|
|
|
|
Post by 13yearsold on Jul 29, 2010 13:07:16 GMT -5
Whats its FPS, range, ease of setup? More to the point, what are the stats of this bad boy?
|
|
elder90
Private 1st Class

Posts: 643
|
Post by elder90 on Jul 29, 2010 16:38:05 GMT -5
Thanks again guys I did the ABS triangles and that made it really strong.
As for the stats it is 300 to 350 fps I haven't chronoed it. It takes us like 15 seconds to set up and we haven't trained to much we are going to try to get it down to 10. As for range I cant tell you yet this coming Monday we are going to take it camping and try it out and test the range so on Friday I will let you know how far it can shoot
Thanks for the compliments guys!
|
|
elder90
Private 1st Class

Posts: 643
|
Post by elder90 on Jul 31, 2010 1:13:07 GMT -5
Ok good news guys went to Fox Airsoft our local and only airsoft store and left it with them and paid them to install a tight bore a new spring a new piston and head and make it Lipo ready this thing is shooting so fast I cant even believe it
Chronoed at 410 with 9.6v and 450 with a lipo! I LOVE THIS THING!!!
|
|
|
|
Post by 13yearsold on Jul 31, 2010 9:27:13 GMT -5
That, my friend, is the stuff right there.
|
|
elder90
Private 1st Class

Posts: 643
|
Post by elder90 on Jul 31, 2010 12:12:09 GMT -5
That, my friend, is the stuff right there. Sure is ;D |
|