biged
Master sergeant  
Posts: 468
|
Post by biged on Oct 29, 2006 7:22:57 GMT -5
Their gun quality is isane. I've shot their Mini gun before. If I had the money I would DEFINATELY buy one. www.pipersprecisionproducts.com/I have been working on a .50 for 3+ months making everything from scrap steel at the shop I work at. I'm hoping to have mine finished by springtime. 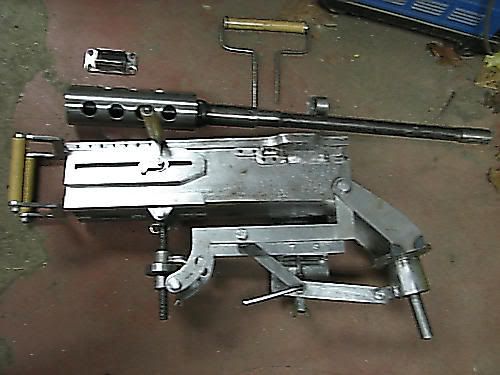 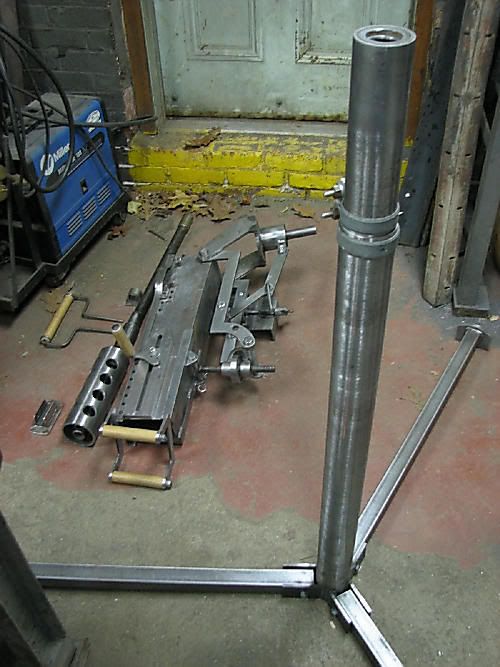 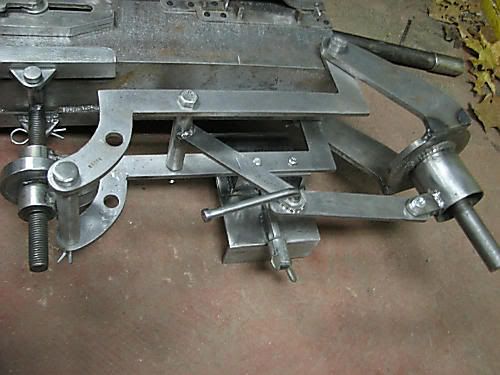 This pile weighs about 45lbs. 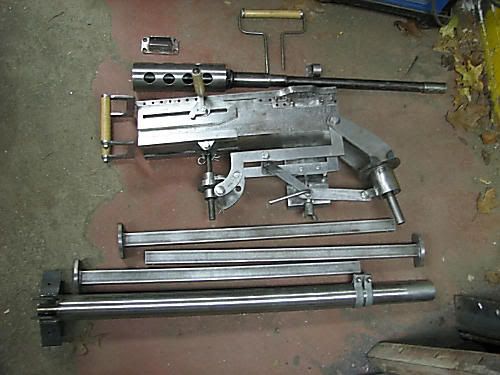 I got the plans for the Pedestal tripod from the liberator crew web site. www.liberatorcrew.com/Tripod.htmExcept I beefed up all the sizes and specs. I would have no fear of firing a real .50 from it. I still have alot of detail work to do on the reciever. TOLCOM Staff Member ///ed/// |
|
|
|
Post by Sascha Gusdorf on Oct 29, 2006 10:43:17 GMT -5
UNBELIEVABLE!!! I'm speechless. That Gatling Gun makes me horny.
|
|
YankeeDiv26
Staff Sgt.
   Frustrated Mac Owner
BDM<33
Posts: 2,462
|
Post by YankeeDiv26 on Oct 29, 2006 12:46:47 GMT -5
wow that thing is a beautie. I play at tolcom frequently ( i live in the boston area) so it would be awesome to see that thing sometime.
|
|
2nd Bat
Master sergeant  
Posts: 11,813
|
Post by 2nd Bat on Oct 29, 2006 14:50:31 GMT -5
Quality work. Even a T&E device. I have access to a 8mm tighbore barrel supplier with a hop up mechanism and have often considering attempting a .50 Cal that would use 8mm BBs.
My thinking was a a WW2 macklashlin system of gas as was done for BBgun MG trainers for bomber crews in WW2 but on a larger scale using 8mm BBs. This as near as I can figure is basically what Precision does with their gatling gun.
|
|
Nimlas
Master sergeant   grumpy
Posts: 1,594
|
Post by Nimlas on Oct 29, 2006 18:46:05 GMT -5
Ed!
What's up dude! I found another recipe for those grenades if want it, I'll PM you.
Your 50 cal looks awesome! That thing will be the terror of bunker hill!
See everyone, Ed here is an airsoft GENIOUS! He put a marui gear box in a top M60, he custom made a Galil.
Screamingeagle-frequently??? How come we didn't see you at TT6 Today?
|
|
savoy6
Private 1st Class

Posts: 428
|
Post by savoy6 on Oct 29, 2006 19:37:52 GMT -5
nice looking project....like the T&E...don't often see that homemade...
|
|
2nd Bat
Master sergeant  
Posts: 11,813
|
Post by 2nd Bat on Oct 29, 2006 21:54:40 GMT -5
Didn't often see it used in combat either come to think of it! Oh well nice touch and a cool detail.
|
|
biged
Master sergeant  
Posts: 468
|
Post by biged on Oct 30, 2006 5:12:02 GMT -5
The T&E works smooth and silky. But for airsoft it really is useless - since you can't get an airsoft bb downrange more than 100 yards.
But the T&E is necessary for holding the gun straight in the cradle.
(I'm hoping I can find someone with a real steel .50 who would fire it on it.)
The cradle itself has a elevation locking arm to lock the gun in a certain angle. Allows the operator to walk away from the gun without having it flop forward or backwards. Traversing is simply pivoting the gun on the tripod itself. I have yet to add a locking bolt so it will remain in place if mounted in a vehical. (That's a another project - a vehical mount to used instead of the pedestal assembly.)
To replicate the devistating fire effects of a .50 cal. I'm using a 3-barreled sweep chamber feed system powered by CO2. The average ROF of a single barrel is 80 BB's per second. I hoping to get between 160-200 bb's per second because of volume of air needed.
As far as being accurate it's not... It will have a cone of 20+ feet in diameter at about 100 feet.
TOLCOM Staff Member
///ed///
|
|
biged
Master sergeant  
Posts: 468
|
Post by biged on Oct 30, 2006 5:23:23 GMT -5
(An early pic and mock assembly) 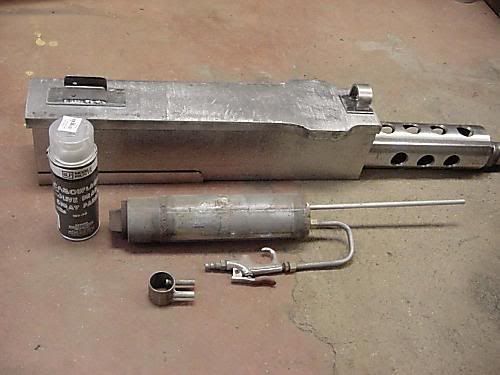 The thing that look like a grease gun. Thats a single barreled sweep chamber "straifer" assembly. I making a 3 barreled unit to install into the gun. There are no moving parts - it just barfs bb's. The other little round piece of steel with 2 tubes protruding from the side is a sweep chamber. The paint can is for scale. (I'm getting bombarded on other boards about how the system works.) ///ed/// TOLCOM Staff Member |
|
|
|
Post by CharleyNovember on Oct 30, 2006 5:59:37 GMT -5
Workings look similar to the same ones that I have seen for a flamethrower. air passes throgh a circular chamber dragging bb's that pretty much sit on top of it in an open hopper shoots them through the barrel. You will need much money to fire that bb hose  |
|
2nd Bat
Master sergeant  
Posts: 11,813
|
Post by 2nd Bat on Oct 30, 2006 12:46:15 GMT -5
What you have replicated is the MacLashlin design for the WW2 trainer BB guns. A very very simple concept indeed. Essentially a sealed chamber that you fill 3/4 of the way up with BBs. A hose leads in from a regulated gas source and a funnel lead out and into your barrel. When the pressure goes in, it forces the Bbs out . You can regulate to virtually any power by adjusting your pressure. Simple but extremely effective. A hop up bucking will staccato your BB flow somewhat and at the same time give you considerably more range. A good barrel should also add range power and accuracy. My experience with this type of design is they tend to jam some so my plan is to add an electric aggitator so when firing the BB reservoir is shaken around. This will replicate the slam from your hand that typically is needed on occassion and will give a sense of recoil which I think will be kinda cool.
Piper Precision tries to get quite secretive about this design concept since it is quite simple to replicate and has applied for numerous patents. Given that the bulk of their design is from a common WW2 training aid I'm not sure how thay feel they can manage it.
We had BB gun .177 Cal MGs for the 1st Brigade 9th Inf division RECONDO school that Ft Lewis training aids built (wish I'd grabbed one) that worked this way. With the power at 80 PSi they were horrific to get hit by even at long range. (We wore fencing masks) At 150 Psi they would tear through garbage cans. (I'm not kidding!) They have the potential to be quite lethal.
The fabrication work on your .50 looks exceptional. Keep up the good work and keep us informed. Dan you're absolutely right this thing will definitely go through BBs. What I envision for mine is strictly a suppression roll gun or vehicle mounted. Another thought we had was to put a pressure limiter on it so at certain power settings it had to be a minimum of 45 degree angled upward so it would always be fired at the higher pressure settings in a plunging fire, long range, mode. In that way you could go to higher pressure settings, still be safe and hurl those 8mm BBs way down range. If lowered to a direct fire angle the gun wouldn't fire or perhaps would only fire at a lower pressure setting.
|
|
biged
Master sergeant  
Posts: 468
|
Post by biged on Oct 31, 2006 5:46:14 GMT -5
Correct on all counts. I am keeping it 6mm. As for the jamming issue. I solved that problem by not using an airsoft 6mm barrel. I made a couple prototypes out of PVC before I started this venture. When a bbs would jam in the barrel pressure would increase. One PVC test unit I was holding in my hand blew up when I was using CO2. I was ok but I switched to steel and I will install burst valve in it to prevent catastrophy. Enter 5/16" brakeline for inner barrels - while loosing accuracy the jamming issue ceased to exist. I even tested it with dried peas. (True bio-degradeable and the ultimate cheap test ammo for lauchers etc.) I will most likey have alot of the external detail work finished in the next weeks. So far I have spent a whopping $10 on the project. (The bronze bushings on the trunion bolt.) 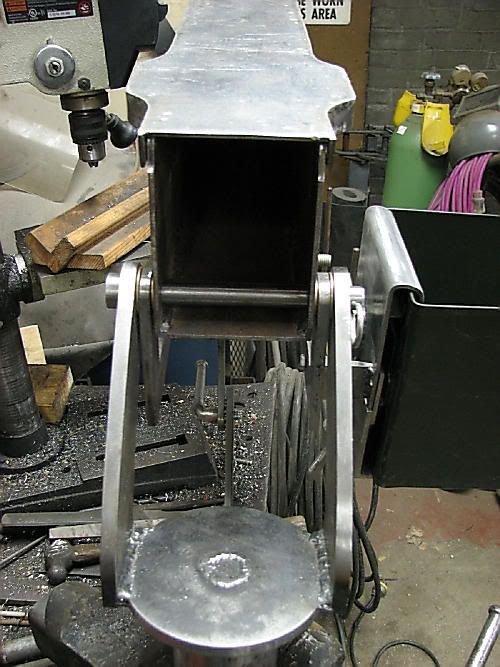 TOLCOM Staff Member ///ed/// |
|
|
|
Post by Jager.Drü on Oct 31, 2006 9:53:26 GMT -5
for only spending $10 I'll say you as good as gold with your .50, it will be rad when its all done.
|
|
|
|
Post by schmitty on Oct 31, 2006 10:00:28 GMT -5
Very nice work indeed. Please keep us updated on your progress.
Schmitty
|
|
|
|
Post by Guinness on Nov 1, 2006 22:47:19 GMT -5
 Well, give yourself credit for the knowledge and ability to put those 10$ worth of parts to good and correct use my friend- Myself on the other hand, regardless of the amount spent would not be able to bend and shape the various pieces of metal into a gun- so hat's off to you indeed! ;D Slainte! -G
|
|
2nd Bat
Master sergeant  
Posts: 11,813
|
Post by 2nd Bat on Nov 1, 2006 23:12:23 GMT -5
The jamming typically doesn't happen in the barrel (unless you try to work with too tight of a tolerance or uneven shaped Bbs. it happens in the funnel that routes and tapers from your BB reservoir to the barrel. Several BBs trying to get through the same space at the same time. That's where the agitator comes in. If you're barrel is too large you'll lose a great deal of your gas power and waste alot of gas and not have a very accurate gun. I realize accuracy isn't a big deal when you're hurling BBs or dried peas or whatever but I think you do want range and you won't get it without a reasonably tight barrel.
As for the 10.00 spent. The shop, tools, soder, steel, aluminum and various bits and peices were all donated? Heck of a deal if you ask me. It all looks super so keep it up and keep us informed.
|
|
biged
Master sergeant  
Posts: 468
|
Post by biged on Nov 2, 2006 6:02:10 GMT -5
All the steel was scrap. Mostly heavy guage door parts, plumbing parts, industrial heating & cooling parts, and finally an old dually truck tire rim. (Look at the cradle. The holes where the T&E is attatched, that is part of the rim.) I spend an hour to an hour and a half each day after work on it. I plan each part. Match it to scale. Get a measurement. Locate the material. Cut it to size. Grind it. Sand it until it looks like tooling steel. Fit it. Weld/drill to complete it. Then finish sand that assembly. Example: I spent an hour making the feed tray cover lever, which looks like a bowtie. (I've been starring at pictures of 50 cals for months now.) I originaly had jamming issues when attatching airsoft barrels to the sweep chamber. I threaded the outside of the barrel and screwed it into the chamber assembly. I can only assume this tightened/warped/mis-shaped the inside diameter. Causing some of the jamming. However even when testing with a brand new bag of bb's I would sometimes get an entire barrel full of bb's. With the brakeline setup I can empty a bag from a single barrel in about 45 seconds. I may have come up with another way of attatching the barrels without threading the barrels. I also do NOT want to permanently attatch the internal barrels to the sweep chamber - however I need to locate 32" to 36" length barrels  ?? (813mm to 915mm) Either way the internals will be modular so I can remove the gas system, barrels and all. I am also looking into a dual Star M249 gearbox system later on down the road. (Cheap and strong setups.) TOLCOM Staff Member ///ed/// |
|
biged
Master sergeant  
Posts: 468
|
Post by biged on Nov 11, 2006 7:24:30 GMT -5
Just about finished the charging handle. Took 4 days of fine grinding with a die & angle grinder to "mill" the plate. I then finished it with a dremel. Then bolted it on - I also ordered the castle nuts for it. Cut the openings for feed ports and started work on a new pawl assembly for this side. The old one just looked flat and out of place.  Put the rivets on the top along with a detent cover detail. Mounted the feed tray lever. Added a bolt/nut assembly (unknown name) and cut the rest of the openings on the left side. I also started the pawl assembly for this side. 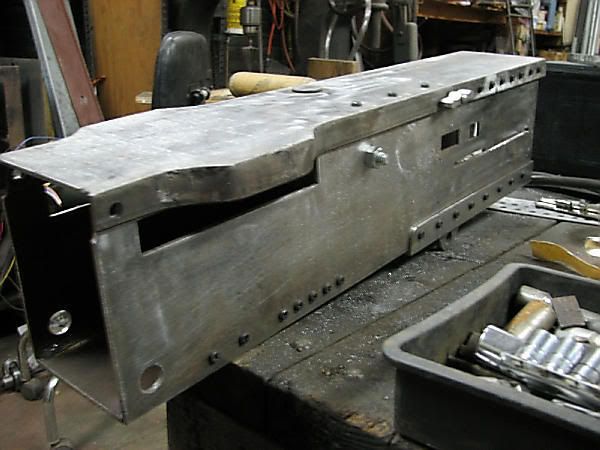 Every time I think something looks good enough. I keep working on it until it is correct. TOLCOM Staff Member ///ed/// |
|
2nd Bat
Master sergeant  
Posts: 11,813
|
Post by 2nd Bat on Nov 13, 2006 17:36:39 GMT -5
Amazing amount of work and it's really taking shape. Considering the option is the precision dynamics M2 airsoft 50 Cal at $3,000.00 plus you're saving yourself some serious dough and probably making a better final product.
|
|
biged
Master sergeant  
Posts: 468
|
Post by biged on Nov 16, 2006 5:58:20 GMT -5
The only future costs will be the CO2 plumbing hardware.
I do really enjoy this build. It will make a helluva conversation piece.
I also intend to make a transit case for the gun and one for the pedestal.
Going to make them from rough sawn material from left-over pallettes.
Had an idea about BRANDING the sides that state:
"MACHINE GUN .50 Cal"
"MOUNT Pedestal"
(I'm open to ideas about the wording - I have no intel on how things were labeled in WW2.)
I did finish the pawl brackets. Some of the most difficult detail work I've done so far.
(I'll post some pics over the weekend.)
Now it's time to work on the backplate and spade grip mounts.
Then the barrel support (shroud) and barrel mounting plate.
Then the easier work: Mounting the rear sight, front sight, and carry handle.
TOLCOM Staff Member
///ed///
|
|
|
|
Post by Guinness on Nov 17, 2006 14:12:29 GMT -5
here ya go:  .50 cal sideplate1  .50 cal sideplate 2  And a .30 cal sideplate just for comparison  Slainte! -G |
|
biged
Master sergeant  
Posts: 468
|
Post by biged on Nov 18, 2006 12:51:21 GMT -5
I finished both pawl assemblies and completed the front plate. 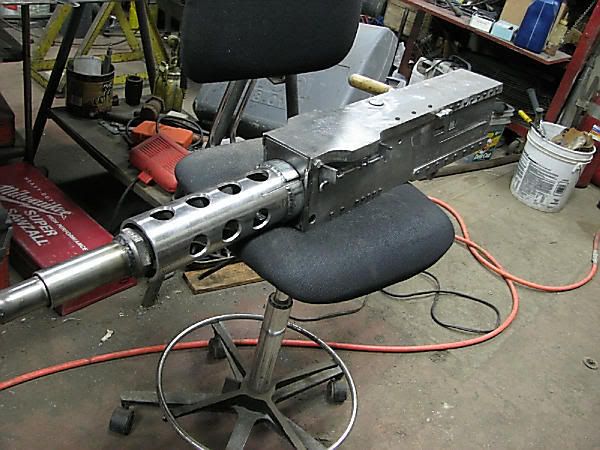 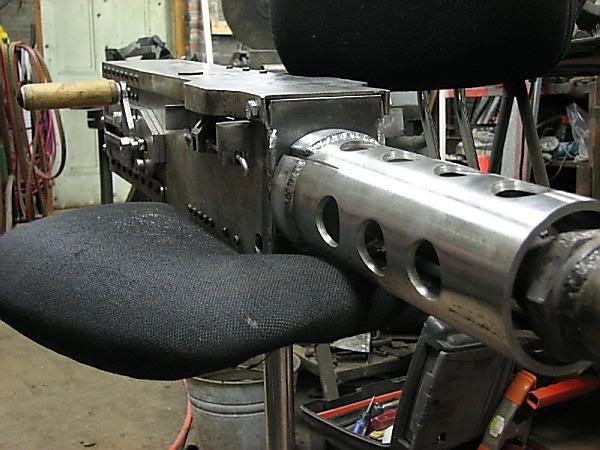 I made the barrel assembly removable like the real one.  Takes about 3 minutes to break the gun down. This way I can continue to add/modify detail on parts. 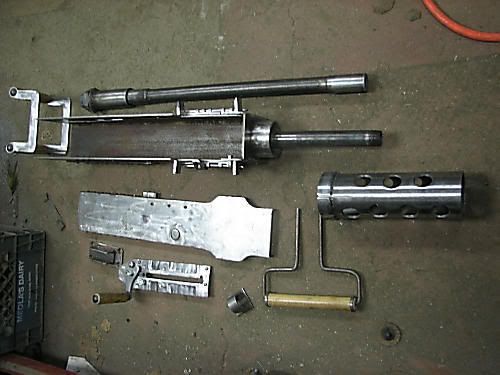 Now I have to start work on the back plate/grip assembly. The sights will be put on last. TOLCOM Staff Member ///ed/// |
|
|
|
Post by Guinness on Nov 18, 2006 22:49:27 GMT -5
Great work! thanks for the pics! ;D BTW, your welcome for the research pics..........  |
|
biged
Master sergeant  
Posts: 468
|
Post by biged on Nov 19, 2006 6:52:22 GMT -5
My bad... Thank you Guinness for the great detail pics!!  I could'nt locate any "straight at" the breech photos. All of mine had angles from the side/back/top. I just noticed that the pawl brackets are angled on the lower corners. I'm am still looking for the markings/wording on WW2 crates that would contain the gun and pedestal/tripod/variant. I dunno if they had "DSA" numbers back then. TOLCOM Staff Member ///ed/// |
|
Nimlas
Master sergeant   grumpy
Posts: 1,594
|
Post by Nimlas on Nov 19, 2006 10:36:25 GMT -5
They didn't have DSA's back then.
All my original uniforms have Stock numbers.
|
|
|
|
Post by Guinness on Nov 20, 2006 1:19:52 GMT -5
It's all good Edward  Slainte! -G |
|
biged
Master sergeant  
Posts: 468
|
Post by biged on Nov 23, 2006 7:20:25 GMT -5
Almost finished with the pedestal, I just have to finish the support covers and finish grinding. I set it up to see how it looked. (The sights are just resting on the top.) 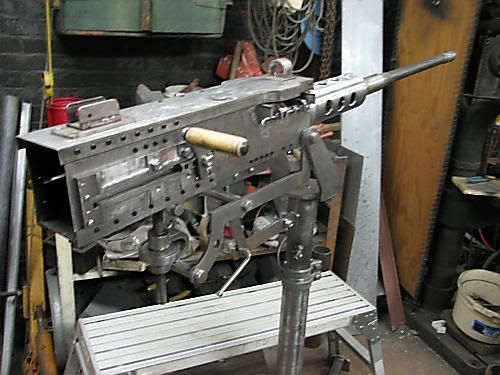 The pedestal is VERY STABLE but it does like to rock/wobble back and forth when fully telescoped up. It will go up 10 inches from this position, and go down another 4 from the setup shown. 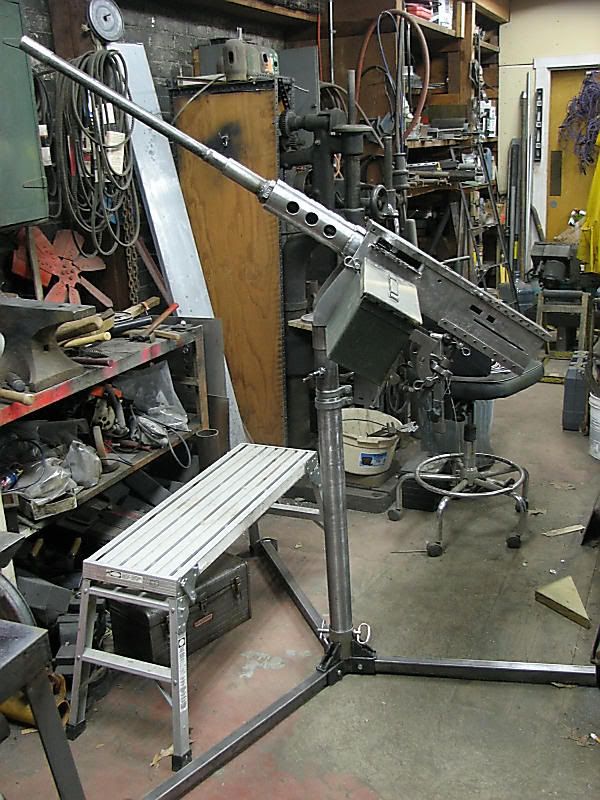 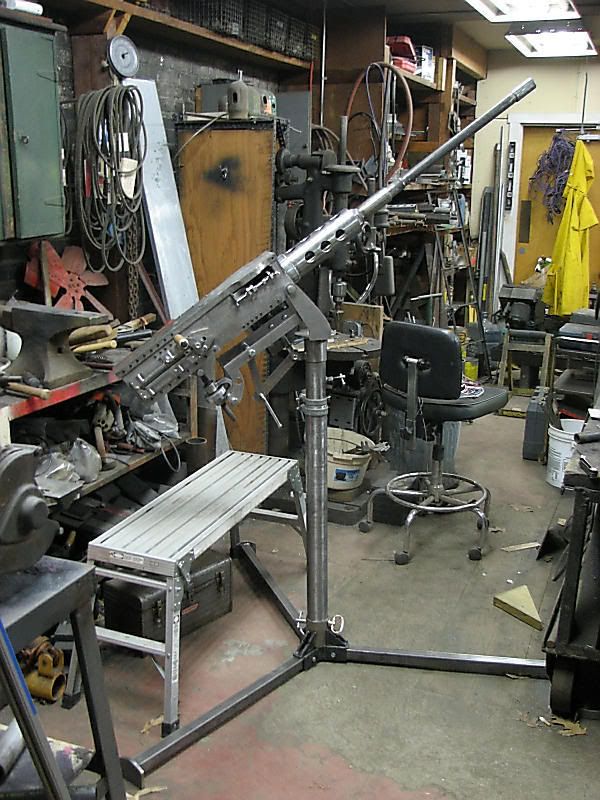 I also have an M2 tripod I made last spring to use when the 50 won't be setup in a firebase/bunker. ///ed/// |
|
biged
Master sergeant  
Posts: 468
|
Post by biged on Dec 2, 2006 6:46:35 GMT -5
Done with the externals!! Now onto the internals. I shortened the pedestal so you can see through the sights comfortably when sitting. It still telescopes upward to use while standing to fire 360 degrees. 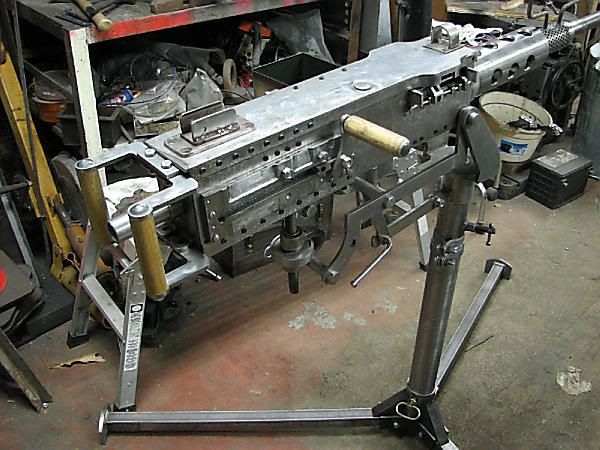 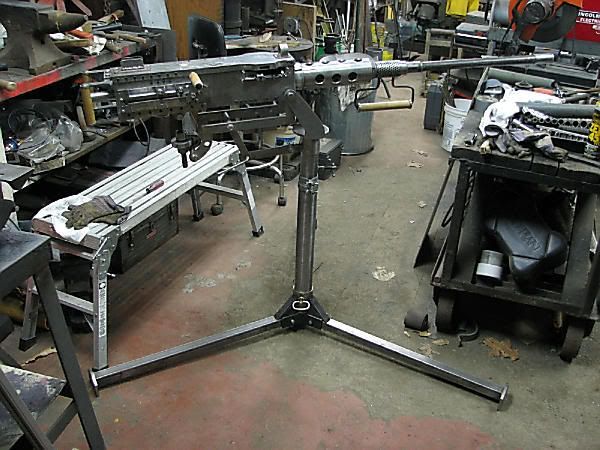 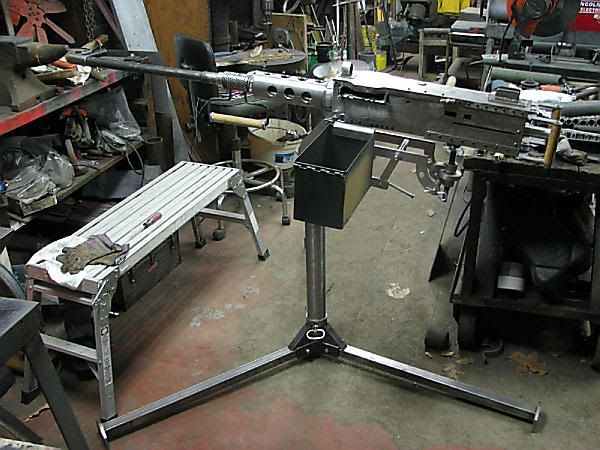 The gun weighs 36 lbs and the mounting system weighs 54 lbs. CO2 tank, internals, regulator, dummy ammo, and ammo box have'nt been factored in. ///ed/// |
|
2nd Bat
Master sergeant  
Posts: 11,813
|
Post by 2nd Bat on Dec 2, 2006 14:05:40 GMT -5
Beautiful. I'll be fascinated to see what you do with the internals. You'll need an incredibly powerful gun to justify that size and weight. One idea my armor friend had was to have two power settings. One when the barrel was at a pronounced upward angle (plunging fire) and a lower regulated power setting when firing direct. He claims that there are relays that will insure in a fail safe manner that the high power wouldn't engage at the direct angle. The only pronounced problem is if your target was in a tree or up a steep hill from the gun. He plans to use the two different butterfly triggers for low and high power setting. He also suggested an agitator that would shake the BB reservoir while firing to prevent or reduce jams and at the same time create a sense of recoil.
|
|
biged
Master sergeant  
Posts: 468
|
Post by biged on Dec 3, 2006 7:11:24 GMT -5
I'm going to start the sweep-chamber setup next week. I may work on the dual gearbox setup later.
Interesting idea about direct/indirect fire. Funny thing, last week, we demo'd the inside of an old bank and I came accross a thermostat with 3 old style mercury switches I saved.
Maybe something in the future.
///ed///
|
|