biged
Master sergeant  
Posts: 468
|
Post by biged on Dec 29, 2006 5:44:08 GMT -5
Being at the mercy of CO2 pressure and specific quick/disconnect line sizes that paintball rigs use. I held off until after tax season to order all of it. I started the finish work on the pedestal instead. In the past couple weeks I also cleaned-out my welding shop at work and built new work benches and painted the walls. I "blued" all the bolts, T&E, ammo can holder, brackets and telescoping tube. 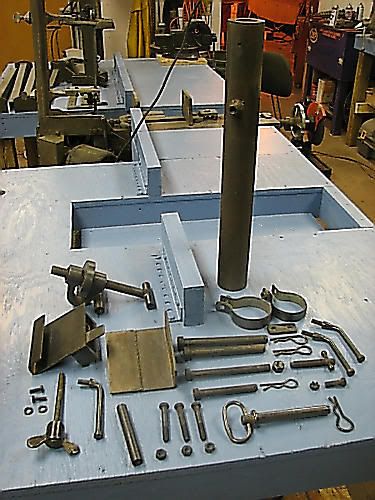 Painted the rest of the pedestal parts, legs etc, with 4 coats of OD. 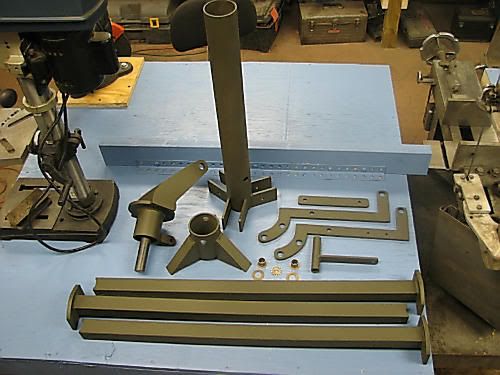 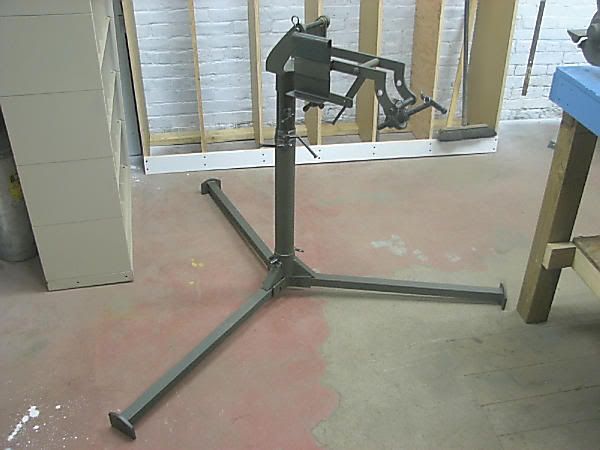 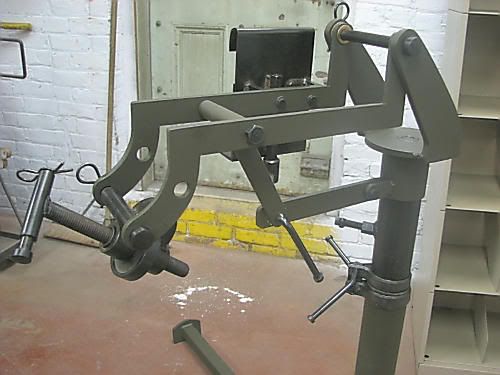 Pedestal is done. ///ed/// |
|
|
|
Post by Capt. Zak on Dec 29, 2006 9:23:52 GMT -5
FAN-FRIGGEN-TASTIC!!!
I am starting to hate biged as much as I hate Schmitty.
Damn you gun wizards...DAMN YOU! ;D
|
|
Russian
Corporal
  Magician
Posts: 923
|
Post by Russian on Dec 29, 2006 11:34:13 GMT -5
Ughh...why does the East Coast and West coast get all the cool stuff?
|
|
|
|
Post by jimseery on Dec 29, 2006 12:35:26 GMT -5
Being a gun wizard is bad enough, but now he's a gun wizard with a clean shop. That's un natural!
|
|
biged
Master sergeant  
Posts: 468
|
Post by biged on Jan 6, 2007 8:54:08 GMT -5
I made an M2 tripod awhile back. 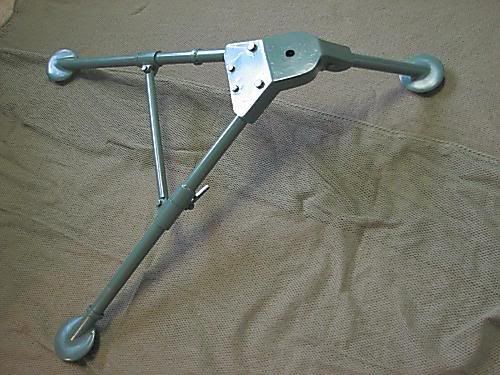 (It has been re-painted the correct OD since this pic.) I never finshed the pintle socket on the head so I'm going to order the correct brass socket for it. I made a couple pintle shafts: 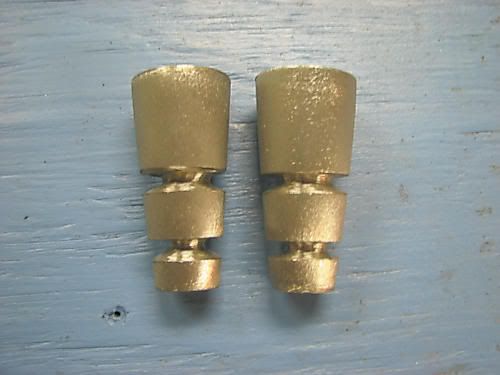 One for my .50 cal project. And one for my M60 - which is a "gooseneck" style pintle. I don't have a ccess to lathe so I made a hand one. www.tau-hq.com/viewtopic.php?t=110&sid=bfe98b1d8359da864d80bacd61d2f3ccI finished the pintle head and ears drilled a 3/4" hole in the center to center the shaft and weld it in place. 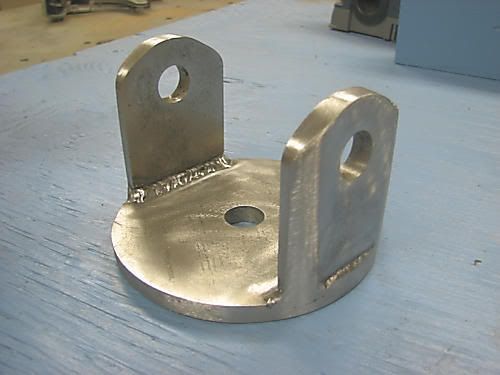 I left in a peice of 3/8" rod sticking up out of the shaft and welded around it. Then welded it all - rock solid. Ground it smooth, and sanded the whole pintle. 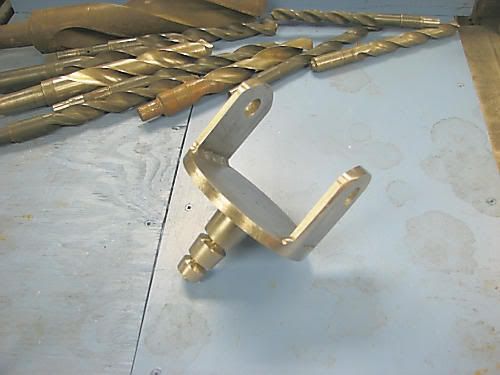 This way I have a second mounting system for the .50 cal. The M2 tripod will be about 40 lbs lighter than the pedestal system. This to spec pintle also allows the system to be mounted to any vehicle with mounts. ///ed/// |
|
|
|
Post by schmitty on Jan 6, 2007 11:02:26 GMT -5
Very Impressive indeed. Very clever stuff, especially without a lathe. I realy like the little mechanism you built so you could grind the angles by hand.
Schmitty
|
|
savoy6
Private 1st Class

Posts: 428
|
Post by savoy6 on Jan 7, 2007 20:16:00 GMT -5
|
|
savoy6
Private 1st Class

Posts: 428
|
Post by savoy6 on Jan 8, 2007 0:51:52 GMT -5
damn..lol..i too have used the brakeline for a few small projects.when the late stg44 over at airsoftzone told me about it years ago i couldn't believe a barrel solution could be that cheap and simple...haven't tried peas through one though...sounds good for a flamethrower...lol
|
|
biged
Master sergeant  
Posts: 468
|
Post by biged on Jan 8, 2007 6:37:43 GMT -5
My gun dimensions are the same.
They use a demilled(?) or reproduction .50 body from a different manufacturer. The Piper .50 is also on a M3 tripod. Real M3 repro tripods run about $1200 (lowest price I've seen) without a pintle. Pipers' products are top of the line craftmanship. I've shot Pipers' Minigun - incredible machining.
My inner barrel "brakeline" will have a cone instead of a stream of bb's.
And because of a safety issue I decided to install a single barrel system instead of 3. This way the ROF should be tame around 60-80 bb's per second.
Down the road I may contact one of the 100's of brass tubing manufacturers on the web. Locating ID tubing around 6.05-6.1mm may not be that hard to locate.
I have to pickup all the CO2 fittings first before I can proceed with airsoft side of the internals. The oxy/propane gas internals for reenactments is another story. ;D
///ed///
|
|
|
|
Post by machinegunairsoft on Jan 10, 2007 8:20:50 GMT -5
wow josh i will have to stop by and see that gun that u made man!
|
|
biged
Master sergeant  
Posts: 468
|
Post by biged on Jan 13, 2007 7:36:44 GMT -5
Finished both pintles. 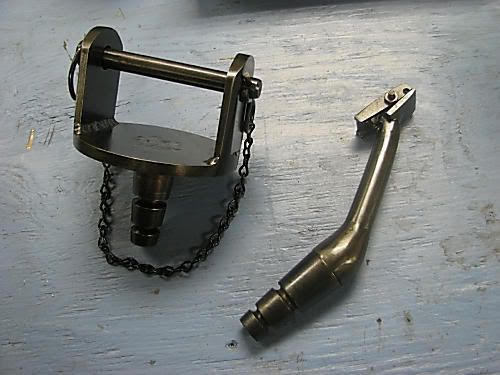 Installed the pintle bushing. 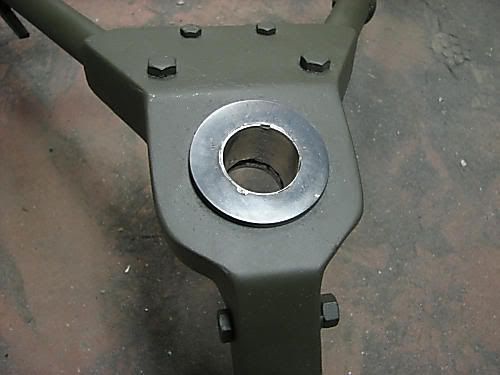 I made this bushing out of a piece of 1.5" tubing and a 2.5" washer. I used silver solder to cast the tapered inside. To do this I welded the washer to the top of a piece of 1.25 tubing to make the socket. I put the finished pintle upside-down and put it on my anvil. Then I put the socket over the center of the shaft with the washer facing down. The next steps are dangerous: I used a propane torch to melt about 2 feet(?) of silver solder into the socket and around the shaft. When it filled up to almost the first ring on the shaft I stopped. (This has to be done to keep the solder from sticking to the center shaft.) I used a set of channel-locks to grab onto the socket and rotate it from side-to-side as the solder cooled. When rotating you also must keep it centered and apply pressure down to keep the solder from running out under the socket. It will get more and more difficult to rotate it until it cools enough to pop from the center shaft. If the solder runs out from underneath you have to start over. I did twice. If it sticks solid, just apply heat to the shaft and it will free up. After I was finished an easier method may be just to pour the solder and let it cool. Then just apply heat to the center shaft rotate the socket until it comes off. It would be safer. I finished it with steel-wool and blued it. Was it a perfect cast? No it has a few pot-marks. But it was better than ordering one for $50 shipped just for airsoft use. With the .50 cal pintle. 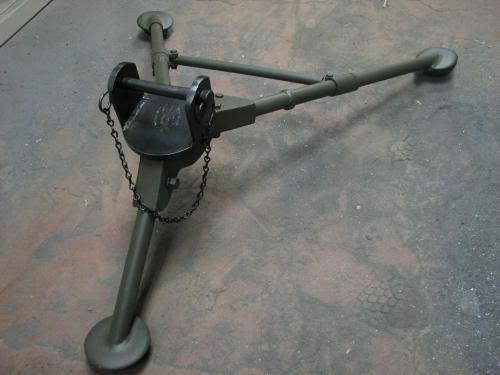 ///ed/// |
|
|
|
Post by phantom12321 on Jan 13, 2007 23:33:00 GMT -5
This whole thing is awesome. How much has the bill been so far?
|
|
biged
Master sergeant  
Posts: 468
|
Post by biged on Jan 14, 2007 7:19:15 GMT -5
$10 for brass bushings.
$16 for gun blue.
$5 for 7 feet of black chain. (I added chain to all the pedestal pins.)
About $31 and about 60(?) hours of work.
I have'nt purchased the CO2 plumbing or the "Park" color paint.
Most likely $100-150.
///ed///
|
|
|
|
Post by phantom12321 on Jan 15, 2007 22:06:28 GMT -5
So do you plan to start selling these?
|
|
biged
Master sergeant  
Posts: 468
|
Post by biged on Jan 16, 2007 6:26:24 GMT -5
No, too much work by hand involved.
Piper came out with their model about a month after I started mine.
I just enjoy building my own custom-custom stuff.
I encourage others to try. I get inspiration from other builders:
Schmitty, 2nd Bat, m-79_Grenadier (different forum), and Airsoft-NY.
I've been shot by Airsoft-NY's browning, got to see it up close but never spoke with him.
Retro fitting a demilled .50 is the way to go. But I'm making mine modular with 2-3 internal setups I want to use. So a scratch built receiver seemed to be the way to go - plus it's alot cheaper.
///ed///
|
|
|
|
Post by Guinness on Jan 16, 2007 8:57:29 GMT -5
biged,
Thanks for the updates!
Did you ever work out the mfg engraving for the side plate?
And can you post some new pics of the whole gun painted and all?
Thanks!
-G
|
|
click
Sergeant
   Company G, 3rd Battalion, 1st Marines, 1st Marine Division
Posts: 1,764
|
Post by click on Jan 16, 2007 9:58:28 GMT -5
biged, Thanks for the updates! Did you ever work out the mfg engraving for the side plate? And can you post some new pics of the whole gun painted and all? Thanks! -G I second that  Click |
|
biged
Master sergeant  
Posts: 468
|
Post by biged on Feb 17, 2007 6:38:31 GMT -5
Still working on the internals. A very simple concept, but fitting (plumbing) into an existing piece is difficult. In the meantime I completed a transit case for the pedestal, cradle, 2 ammo cans, pintle and M2 tripod. I made it in 1.5 hours about a month ago. I kept it in the welding shop to help age it alittle. I made it out of rough cut pine lumber. The two sides are made out of 3/4" plywood where the rope carry handles will be attatched. Locating 3/4" pine wider than 18 inches is more scarce now than back in the 40's. And the shear strength of plywood is stronger for the handles. 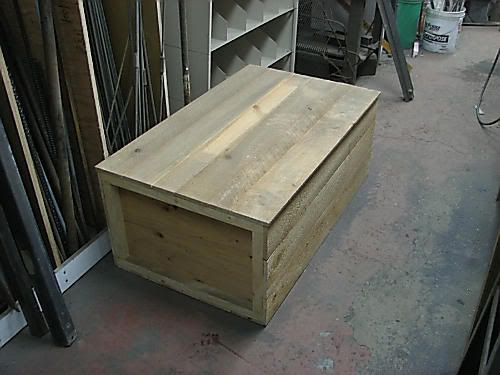 If you look closely at the top of the crate. You can see a clean spot where I had a piece of flat bar stock resting on it. It's not dust on the crate - it's iron filings. 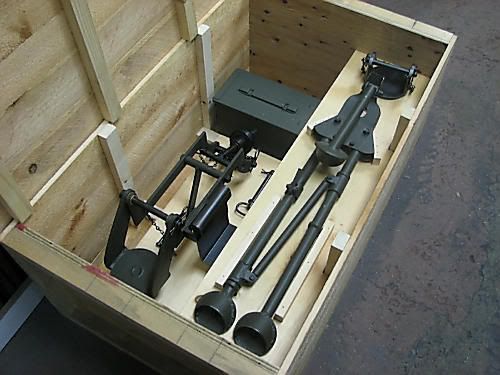 There is enough room for (2) .50 cal cans - only one is present the other is getting painted. 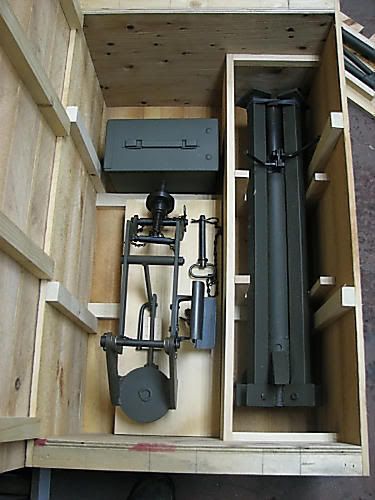 Underneath the M2 tripod deck is the pedestal. ///ed/// |
|
click
Sergeant
   Company G, 3rd Battalion, 1st Marines, 1st Marine Division
Posts: 1,764
|
Post by click on Feb 17, 2007 7:14:55 GMT -5
Holy freakin cow!! That is awesome! Your work on this.50 cal never ceases to amaze me.
Click
|
|
2nd Bat
Master sergeant  
Posts: 11,813
|
Post by 2nd Bat on Feb 17, 2007 16:39:27 GMT -5
I love the question. Do you intend to sell them?  While big Eds material costs are quite low. Remarkably so....(It obvious helps when you have a machine shop and are working with scrap.) He's so far invested an estimated 60 hours labor and he isn't done yet. Let see at machine shop rates of $50.00 an hour that's $3,000.00. I guess a retail price of $4,500.00 might make sense. Then again probably not as I doubt he'd be willing to do another for that. Thanks for sharing your project and please continue to keep us posted. I love the carry box very cool. I imagine you'll do a cool stencil job on it. I keep thinking about doing a carry box for say three Garands in pine with the carry ropes. Very cool and awesome workmanship. |
|
Cpl. Hicks
Sergeant
   Unofficial Flaggrantly Wrong Weapons Policeman
Posts: 1,425
|
Post by Cpl. Hicks on Feb 17, 2007 16:47:08 GMT -5
Wonderful! I can't wait to see everything together!
|
|
biged
Master sergeant  
Posts: 468
|
Post by biged on Feb 18, 2007 7:19:42 GMT -5
I was thinking about how much time I spent building this and really enjoyed building it. (It's challenging) If I had a waterjet (drool) with new/clean material I could have cut the time down by a third. I estimate half of the time spent building it I spent prepping the material - mostly sanding paint & rust off. I did locate some other sources for .50 cal bodies: I think this copy is better than mine - $500 though. cckw.org/m2hb.htmThis guy drew up blue prints for his .50 - the plans are free. www.g503.com/forums/viewtopic.php?t=86813&start=0If anyone wants dimensions sizes, pics, intel about mine, just ask. I'll be glad to help out... I've been working off of hundreds of pictures and actual dimensions from a gun digest circa 1983. I remember reading on the reenactors boards they "Stamped" crates(?) And since paint was not in the budget in the 40's they used roofing tar instead(?) I honestly don't know, but, it would make a nice conversation piece. However, I'm not fond of tar in the summer time... I started on the gun crate the other day - I just cut the lumber to length. Old shipping palettes are a great resource for crate material! ///ed/// |
|
2nd Bat
Master sergeant  
Posts: 11,813
|
Post by 2nd Bat on Feb 18, 2007 13:47:11 GMT -5
And they'd look suitably aged and vintage! Often crates appeared to have "branded" rather then stenciled so that's a good point. Roof tar? Hadn't heard that one but makes me want to llok harder at an old crate. Very cool effort and amazing workmanship.
|
|
160thsoar
Private
UH-60 Blackhawk Hoo-ra
Posts: 134
|
Post by 160thsoar on Feb 21, 2007 20:11:29 GMT -5
dang man u got skill all i can say is put a orange tip on that sucker or u will have the FBI knocking on ur front door.lol
|
|
click
Sergeant
   Company G, 3rd Battalion, 1st Marines, 1st Marine Division
Posts: 1,764
|
Post by click on Feb 22, 2007 16:12:05 GMT -5
LOL! ;D
Click
|
|
|
|
Post by boehler on Feb 24, 2007 11:43:49 GMT -5
hello
Has someone got a schematic drawing of how the "MacLashlin" mechanism works?
i don´t understand how this works without moving parts.... This confused me a little bit.
You told about other forums where you got bombarded with questions, are there any links to the forums?
A.W.
|
|
2nd Bat
Master sergeant  
Posts: 11,813
|
Post by 2nd Bat on Feb 24, 2007 14:20:07 GMT -5
It's not unlike the way those insecticide or chem lawn reservoirs work when you screw the bottle onto your garden hose. The chemicals sit in the bottom of the bottle with a nozzle coming out. When the pressure builds in your garden hose and leads into this vacume chamber it gathers the chemicals on the way out the nozzle. In a Maclashlin mechanism your Bbs fill a reservoir about 3/4 full. The pressure hose enters the chamber and aggitates the BBs. The compressed air or CO2 or green gas or whatever of course is seeking a path out through the nozzle (In this case a tapered funnel leading to your gun barrel) As it vacates the chamber it naturally takes BBs with it in a virtual steady stream. You can turn up your pressure for higher velocity or turn it down for lower velocity.
In the army, Training aids built some for conventional BB's for use at our 1st Brigade RECONDO school. They were set at 80 PS and worked incredibly well. at 150 PSI they would tear through garbage cans at close range. I can't see why a similar arrangement couldn't be used with an airsoft weapon. A 50 cal would certainly provide adequate room.
|
|
|
|
Post by binarypunisher on Feb 24, 2007 14:54:06 GMT -5
Any idea what ever happened to those training aids?
|
|
|
|
Post by boehler on Feb 24, 2007 15:17:53 GMT -5
this means its simply a tank with BBs wich are sucked with the air pressed in the tank and trys to esacape to a second hole/barrel. i hope i understood it right:  Will it work this way? Are the in and outlet correct positioned? A.W. |
|
|
|
Post by mikkel on Feb 24, 2007 22:55:28 GMT -5
I'm not sure if it will work in that configuration. May i suggest to do it like this? www.burntlatke.com/bb.htmlPPP use the same mech for their systems. |
|