2nd Bat
Master sergeant  
Posts: 11,813
|
Post by 2nd Bat on Jun 17, 2009 15:24:53 GMT -5
First make note that I am abundantly aware of the infidelities and compromises. Secondly, these are certainly not for sale. Way too much time involved in making them. I simply thought that the effort might encourage others to create weapons for their own use that look better than what is currently available at affordable prices. I took some M14 AEGs and cosmetically tweaked them to resemble BARs. I say resemble because they are by no means exact. Essentially you cut down the stock, shape the rear butt stock area and add layers of dyna glass and bondo along with a lower gas tube to create the fat handguard and BAR receiver group. 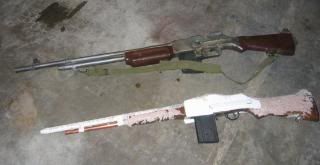 Sculpt and paint and you have a pseudo BAR for a lot less than a VFC. (It's of course no where near as awesome ) I figure total cost of materials is roughly $180.00 but they require a good 20 to 30 hours to build and it's pretty tedious and messy. I had planned to build three in time for Jump to Destiny to use as rentals but didn't get the base M14s soon enough. 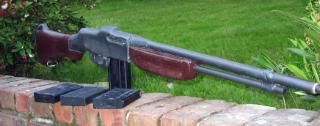  The one shown hasn't had the rear or front sights added. Note, I use the butt plate flap from the M14 which I file flat and cut down slightly. It looks fairly correct and works great. I also use the front site and flash suppressor from an M14 but I place a site hood over and cover the slotted flash suppressor with an appropriate sized tube. This gives roughly five more inches in length which as you can see is required when compared to a Garand. It's still not quite as long as a BAR. (Neither is a Buick come to think of it.) 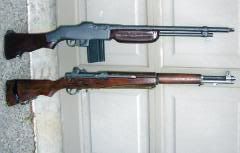 The receiver group is slightly thicker than a BAR but not uncomfortably so IMO. The gun is quite heavy. (10 1/2 pounds), still well below the weight of an actual BAR. It is solid and should prove durable. I use normal M14 magazines which I have a good 70 of. They don't look quite right (Not as long or fat but not horrible in my opinion.) The M14 mag release is tucked underneath the fake BAR mag release mechanism. The M14 safety can be removed or left functional. It is hidden when not engaged. I removed the selector switch and the guns only shoot on fully auto. I am going to build perhaps two more again for use as rental guns at local events. I may or may not add a bipod. I've done two BARs previously which were even more crude than these. 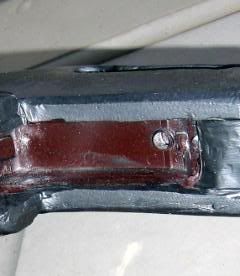 They shoot at 340 to 360 FPS with 20 Gram BBs I added a tightbore barrel otherwise they are stock Chinese clones. I think they will handle field use just fine although will no doubt require cosmetic touch up after each event. I'll get additional pictures after I've added the sights. They are by no means museum quality replicas cosmetically but should work well at events and I think are more desireable than un modified M14s or burlap wrapped AK 47s. Certainly at 10 feet when carried by a guy in a good impression they look pretty good. There is no doubt what it depicts.  I will also add slings and a few more minor details. I still have a few sold orders on Garands pending. I am completely caught up on all but the ones waiting on real wood stocks. My supplier of custom wood stocks skipped out and I'm awaiting replacement stocks from another supplier. I don't want those patiently waiting for their Garands to think I have taken time away from their builds. |
|
|
|
Post by hairy apple on Jun 18, 2009 19:45:34 GMT -5
Wow, that's pretty rad. Very neat project.
|
|
TommyGunner
Staff Sgt.
   Hackjob Mauro
1st Marine Division, 1942
Posts: 2,265
|
Post by TommyGunner on Jun 18, 2009 19:56:39 GMT -5
I like these alot!!! Its a great way to make a very good looking look alike BAR.
I have been fiddling with a project very similar you yours but using a bent and folded hand made sheet aluminum BAR upper and lower reciver assembly put over the M-14 stock and building the front hand guard from wood.
Very good work, I love these types of creative projects!!
TommyGunner
|
|
2nd Bat
Master sergeant  
Posts: 11,813
|
Post by 2nd Bat on Jun 19, 2009 14:51:41 GMT -5
Even after seriously filing down the walls of the M14 stock thru the receiver group you will still end up with a receiver group that is slightly thicker than the BAR . This likewise results in the neck of the stock and the stock itself being a tiny bit thicker than the original but the disparity is fairly minor and the gun feels and in my opinion still looks okay.
|
|
2nd Bat
Master sergeant  
Posts: 11,813
|
Post by 2nd Bat on Jun 20, 2009 18:24:36 GMT -5
Here are follow up pictures with the rear sight, front sight and muzzle brake added. 3/4 front view from the right side: 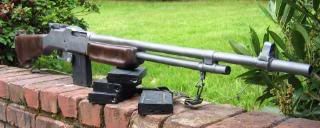 3/4 view from the left side: 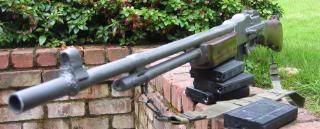 Side shot 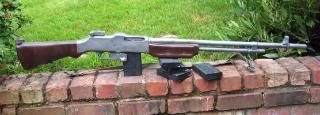 Side shot no magazine: 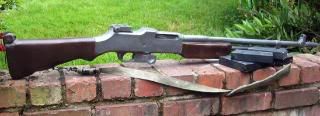 Comparison with a Garand and the M14 it was based on 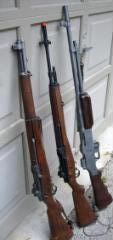 The finishing touches added a lot I think. I'll do a variety of finishes on the three I am going to produce including one depicting a composition stock and one with a darker metal finish and lighter wood. |
|
2nd Bat
Master sergeant  
Posts: 11,813
|
Post by 2nd Bat on Jun 20, 2009 19:17:36 GMT -5
In response to several PMs I know the magazine is slightly wrong. ( As mentioned I used the M14 magazines) The M14 magazine is protrudes down further (30 rounds instead of 20) and is not as thick or as wide. To be correct the magazine would have to be 1/4 inch longer from rear to front and perhaps 3/4 of an inch shorter. Adding the dimensions with resin paste or something would correct that but would prevent them being able to be loaded in my mag well. Cutting them down that tiny amount would be way too much work for the net effect in my opinion but folks are free to modify their own any way they'd like!
|
|
Sgt_Tom
Technical Sgt.
   Combat!
Posts: 3,580
|
Post by Sgt_Tom on Jun 22, 2009 11:34:16 GMT -5
Really nice job 2nd Bat! How have these holded up at airsoft battles?
|
|
2nd Bat
Master sergeant  
Posts: 11,813
|
Post by 2nd Bat on Jun 22, 2009 12:52:26 GMT -5
I didn't get any of these done in time for Jump to Destiny which was my planned test bed. However the earlier two I built were not as well made and the fellows who bought them are still using them I assume.
I do know they will get cosmetically banged up and require some visual touch up after a skirmish but that should be quite easy to do. I used screws imbedded in the resin paste as a sort of rebar so I think they will prove plenty strong. I also used Dyna Glass as the base layers with bondo as the outer coats which is much stronger than plain bondo. One of the BARs dropped off a table top onto my garange floor while I was waiting for the finish to dry and it was not significantly damaged. Nothing broke off or worked lose and it still works fine.
I think these will work great as rentals. They should be plenty robust and the thought is they just need to be touched up and cleaned up after a weekend. (At least that is my hope!)
They should "Holed up" okay!
Incidently my son who is now grown and who hooked me on Airsoft in the first place is my worst critic. His comment about my BARs upon seeing them is "They look quite good from afar but dad having shot the VFC, they are far from good."
I reminded him that there is a huge difference between what you can buy for $1200.00 and what you can build for $200.00
|
|
Sgt_Tom
Technical Sgt.
   Combat!
Posts: 3,580
|
Post by Sgt_Tom on Jun 22, 2009 13:38:23 GMT -5
Whoops I should have said held, bad grammer. I will certainly look into the Dyna glass next time I need a bondo type substance. They certainly look great in the pictures.
|
|
2nd Bat
Master sergeant  
Posts: 11,813
|
Post by 2nd Bat on Dec 3, 2009 15:49:55 GMT -5
I am experimenting with adding a powder like dust of mettalic flakes into the plastic to strengthen the material, add weight and most importantly present a more convincing metal finish. I have seen it done with bronze powder and it is amazing. I have orderd the same material in antracite.
I lifted a bronzed resin bust made this way I literally would have guessed it to be solid bronze. I doubt it will be any weaker than pock metal and it will probably be stronger.
|
|
|
|
Post by jimmiroquai on Dec 3, 2009 18:19:31 GMT -5
Great sculpting! Can these still be disassembled? Just in case the mechbox needs repairs and such?
|
|
CptJericho
Private 1st Class
 "We got to stop the Germans from getting the secret weapons!"
Posts: 495
|
Post by CptJericho on Dec 3, 2009 18:20:04 GMT -5
looking forward to see how this turns out
|
|
2nd Bat
Master sergeant  
Posts: 11,813
|
Post by 2nd Bat on Dec 7, 2009 20:59:55 GMT -5
I built three using assorted approaches and learning something from each previous build. One failed to function well once built and I couldn't for the life of me figure out why. I reassembled it and sold it as a "prop" that made electric firing noises. (BBs actuall would come out but barely) I'm sure it was hop up related. It sold for 346.00 on Ebay which busted me out of the production cost. Another sold as a finished firing gun and brought $650.00 which was a pleasant surprise. It functioned and looked fine. (It's one of the guns pictured above) but it was difficult and involved to take apart so if repairs are required the guys kind of hosed.
The third one was the best of the lot but still not what I want to sell. I have dissassembled it and am reworking some things on it to ease production and overall function. I am toying with the approach of suing the regular M14 magazines which I used on the first three or molding and creating properly shaped and sized BAR magazines. It comes down to production costs, effort, reliability and overall visual appeal. The guns pictured just show M14 magazines and while they look close they are not quite right. To fit over the M14 gear box and still come apart relatively easily the thickness of the receiver group will have to be slightly wider than a real BAR which was surprisingly narrow.
I still haven't recieved the special ordered mettalic powder so I don't yet know how that will work out when mixed in the resin. I have seen bronze and brass flakes in simulated sculpters and they are amazing, Heavy strong and impossible to tell from metal even when held. You gel coat the mold wells and then pour in your resin compound. It creates a outer wall skin that is in appearance and feel, metal. I've ordered anthracite and nickel flakes which apparently have the consistency of TALC powder.
It will certainly be more labor intense than a normal mold pour and will add some costs but I'm hoping will gap the "plastic" obstacle while avoiding the enromous costs of casting actual steel or aluminum parts for a limited run production.
|
|
2nd Bat
Master sergeant  
Posts: 11,813
|
Post by 2nd Bat on Dec 26, 2009 14:24:26 GMT -5
The mettalic powder is a lot of work and quite expensive but it does add both weight and strength to the resin and looks amazingly spot on as metal. I have thus far only done it on Garand gas assemblies as I have not built any additional BARs since experimenting with the mettalic powder.
In the gas assembly mold I literally paint the powdered resin onto the walls of the rubber mold and then pour in the resin. Once hardened and removed it creates an outer cast of what looks and feels like metal.
If I were to do more BARs I use this method for the receiver group and other obviously metal areas although for now the mettalizer paint seems to look pretty good. I now have three BARs finished and no two are the same. I had planned to standardize and build but have other priorities at present.
I am going to sell one of them on Ebay and we'll see if it sells and what it might bring.
|
|
2nd Bat
Master sergeant  
Posts: 11,813
|
Post by 2nd Bat on Sept 26, 2010 21:29:17 GMT -5
Because the Matrix BAR was introduced and offered at a price arpund $300.00 I quickly busted out of all of these that I built and enthusiastically put in an order for two of the Matrix BARs. As you know after 6 months of waiting they still are no where in the pipeline and may never show up so in the meantime I have begun building several more of these (again for my own purposes) I figure I will be in each of them around $200.00 in materials and it's an excuse to put the 100 M14 magazines I have laying around to use.
As for durability reports from the folks who bought earleir ones have been quite favorable. With the Matrix disaster I wish I'd never sold them but I will include numerous lessons learned on the new builds.
|
|
2nd Bat
Master sergeant  
Posts: 11,813
|
Post by 2nd Bat on Oct 18, 2010 1:52:38 GMT -5
Given the non existence of the Matrix BAR this is a viable do it yourself approach for anyone wanting an affordable pseudo BAR but again not a commercial offering and no plans to do so.
|
|
kalbs
Master sergeant  
Posts: 1,142
|
Post by kalbs on Oct 18, 2010 2:55:20 GMT -5
Glad you bumped this 2nd Bat. The topic is very current as you mention. This may swawn some new ides into making an affordable BAR
|
|
2nd Bat
Master sergeant  
Posts: 11,813
|
Post by 2nd Bat on Oct 27, 2010 22:58:40 GMT -5
That would be wonderful. I finished a couple more and they came out the best yet. Someone suggested I shoot a You Tube video of the Garand, BAR and Springfields to showcase what can be done and perhaps promote WW2 airsoft.
To do it right I'd need some local young folks in full impressions and mimick a WW2 training film which would be very cool. (so many projects so little time)
|
|
2nd Bat
Master sergeant  
Posts: 11,813
|
Post by 2nd Bat on Nov 11, 2011 15:12:52 GMT -5
I have again set out to build still another approach to a build for a BAR. There are lots of ways to do this. My latest effort on two rifles began in earnest about a week ago and was going along well but ran into a few unanticipated snags. (I learn something with every build) I will post pictures of this approach and the final results. Right now they look horrible but function great!
I have created these to be fully and easily disassembled and that is a challenge. The last ones weren't able to be taken apart. (easily) These are using more of the base M14 stock and that is actually working better than I would have expected.
|
|
2nd Bat
Master sergeant  
Posts: 11,813
|
Post by 2nd Bat on Nov 11, 2011 21:10:32 GMT -5
I am embarrased that after all my Garand builds and assorted dinking around with the M14 "version seven" type gear box that there are reasonable means to make the set up somewhat thinner and not effect anything essential. Since both the Garand and BAR were set as to whether they were semi or full automatic you can eliminate the whole plastic horseshoe arrangement that stuck out a bit on the side of the gear box (in the back).
Two screws and the selector switch is out and four more on the reverse side and the plastic square horsehoe comes right off. In the case of the Garand nothing further needs to be done but with the BAR I removed the tiny outside spring that holds the flap into semi auto mode and placed it upright in full auto and JB welded it permenently in place with a tiny dab of paste.
This simplifys everything and allows you to cut down some of the width of the gear box housing allowing a thinner receiver group. In the case of the Garand it makes the gearbox somewhat easier to fit into a modified Garand lower stock however that is still a critically tight squeaze.
Wish I had made this discovery several years ago. I bought a reject M14 that had several broken parts on it and given that it was cheap and not destined for anyones actual rifle I decided to experiment.
|
|
|
|
Post by volkssturm on Nov 12, 2011 18:24:08 GMT -5
Interesting. I set out a while ago to try to replicate your method and it sits unfinished. One ofthe stumbling blocks was realizing just how mjuch thicker the receiver was going to end up than it was supposed to be. That and how to disassemble it for repairs. I'm interested in hearing more on your project.
|
|
2nd Bat
Master sergeant  
Posts: 11,813
|
Post by 2nd Bat on Nov 12, 2011 20:46:35 GMT -5
I reduce the type 7 gear box to as thin an arrangement as possible. (A few steps mentioned above) and use a dremel to cut down some of the non essential protrusions. (You have to cut away most of the M14 reciever group leaving just the forward section to support and house the hop up. I save the cut away components and make dummy Garands with this fairly intact receiver group. The M14 gear box is still slightly too wide for a BAR I will show pictures of the early stages as soon as I can get them downloaded. I then build up the shape using dyna glass resin paste which is a fiber resin that contains strands of fiberglass and once hardened is quite hard and durable.
Pictures on all this to follow.
|
|
2nd Bat
Master sergeant  
Posts: 11,813
|
Post by 2nd Bat on Nov 15, 2011 1:45:01 GMT -5
Begin by removing the M14 receiver group and barrel assembly from the stock by lifting up and pulling out the trigger assembly and then seperate the tamiya tab which is taped closed inside the stock neck and lift out the entire M14 assembly from the stock. (CYMA and Marui have a tamiya tab inside the stock neck the other clones do not) Once out, remove the handguard, charging handle and support brace with several tiny screws. The M14 receiver group cosmetic section comes off fairly readily. with several additional screws and a little applied force. You'll note that the version seven gear box is fairly small although it is still too wide for a BAR. One way to make it thinner is to remove the selector switch and the U shape plastic brace. (Six screws is all it takes to pull this item off along with the selector switch. Reattach the four screws once the U shape plastic is removed. 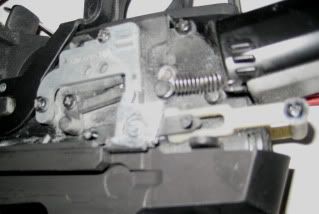 The picture below shows the U shaped brace removed: 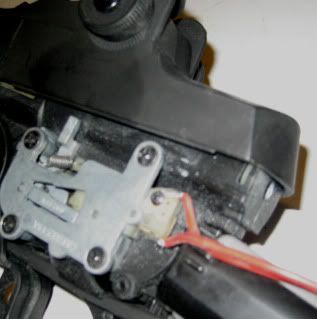 For a full auto rifle you will need to remove the tiny spring that forces the mechanism back into semi and put a tab of JB weld to hold it in place. (The U shape plastic piece guides the selctor switch and with it removed the gun automatically goes to semi) Here is what the naked receiver group looks like: 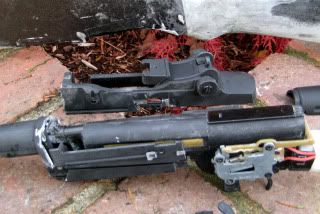 I used an actual BAR butt stock to drive the re-shaping of the M14 stock. A couple gouge cuts and some fiberglass resin paste and the shape came out pretty close. I then shortened the M14 stock and added a BAR receiver group shape to the side area. (I traced the shape from an actual BAR and then used thin plastic sheeting. 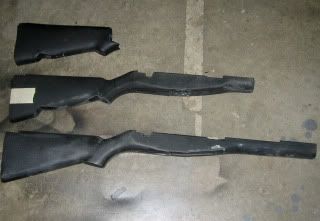 In front I attached a shaped front handguard made out of a black of wood. This provided the rough shape for the project. I attached the front handguard using fiberglass paste and a supporting dowel for strength. I selected a section of iron pipe to mount over the M14 barrel which is too small and slid it into place over the M14 barrel. I will reattach the site and flash suppressor and will mount a section of pipe over the flash suppressor to increase the barrel length and then will mount a cover over the site according to the way a BAR was set up. 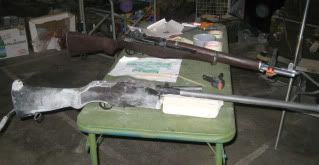 I will mount a phoney gas tube below for visual effect and will finish off the receiver group and cosmetic work. At this stage it looks horrible of course but with finish work it will come to life. More to follow: |
|
2nd Bat
Master sergeant  
Posts: 11,813
|
Post by 2nd Bat on Nov 18, 2011 4:01:12 GMT -5
With regard to the two newest ones I'm building here are some additional pictures and details: The receiver walls have been created as a fixed part of the lower group. A dam is created at the base of the actual version seven gear box set up and an inserted inner wall is butted against the lower dam and then the inner area is filled with dyna glass resin. Once hardened it can be sanded and shaped and the outer wall (since it is seperated by the inner wall) allows the upper assembly to be removed for disassembly. 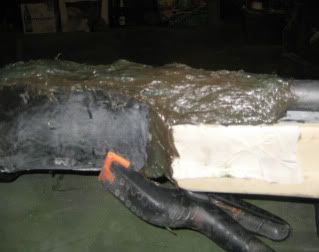 The resin paste looks really sloppy (and it is) I over fill as once hardened it will be sanded and shaped down to the desired sculptured shape. Unlike bondo this resin has fiberglass strands which make it remarkably durable. It can be filled sanded and smoothed to a very fine finish which can then be stained or painted. I put a section of shaped ABS at the base of the handguard below the barrel so the resin set on it and didn't thus attach itself to the handguard which is a portion of the lower assembly  30 minutes worth of sanding and it is taking shape quite nicely. This gives an idea of the size: 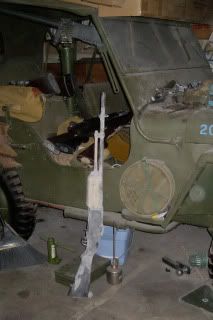 At this point the rifle simply requires the final detail work. I still need to create the front site hood, attach the butt plate flap,(which I fabricated from the M14 butt plate flap) create the shroud for the mag area, fabricate and attach the outer bolt slide and cut in the extraction channel. Obviously a lot of minute sanding and final paint work.  More to follow. From here on out it is just detail work and final sculpturing. They are coming along nicely and are going to be my best BARs yet. They present a nice overall weight and are rock solid. I am replicating the M1918A2 which was the most common variant in WW2 and Korea. I probably am not going to do a bipod as this was unpopular with the troops and often ditched |
|
daug
Private
Posts: 37 
|
Post by daug on Nov 18, 2011 9:42:45 GMT -5
very awesone and very good job...I have the same project, and I have a question : How to make the body for the b.a.r....What do you using and making? thanks
And again very very good job....
|
|
2nd Bat
Master sergeant  
Posts: 11,813
|
Post by 2nd Bat on Nov 18, 2011 15:11:55 GMT -5
The skeleton of the whole assembly is the base M14 stock. The outer cosmetics can be created using a variety of materials. I have used styrene plastic or ABS sheeting and I'm doing one of the two I'm currently building using thin sheets of steel. In both cases I drew out the shape attached the sides to the plastic stock and used dyna glass resin filler to provide the final shape. The hand guard is a wooden block properly shaped and attached to the cut down M14 plastic stock. The barrel is covered with an appropriate size length and thickness of pipe and the gas tube in this case is a wood dowel. (It will look fine for my purposes once painted. A section of metal tube also could be used I just didn't happen to have any handy. The rear sites and magazine details along with the charging handle etc will be made out of on hand materials (probably sheets of ABS plastic again blended with the dyna glass for appropriate shape and looks. This is esentially sculpturing. My daughter calls it my "Truly obsene art" 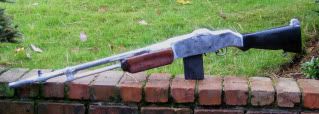 |
|
2nd Bat
Master sergeant  
Posts: 11,813
|
Post by 2nd Bat on Nov 18, 2011 20:51:15 GMT -5
I did some additional sanding and then applied little dabs of filler to coat where needed. Once this hardens I will sand again and assuming it is okay I will create and add the final details. (Charging handle, extractor channel, site hood and rear site assorted small doo dads for looks, sling hardware and final stains.
My second rifle is coming along as well. I would have done them simultaneously which would have saved some time but I wanted to take advantage of any learning opportunities. Thus far all has gone quite well. The second one will be a week behind the first which will be done this week. ("If the good lord is willing and the creek don't rise." - John Wayne.)
|
|
Sgt_Tom
Technical Sgt.
   Combat!
Posts: 3,580
|
Post by Sgt_Tom on Nov 18, 2011 22:43:31 GMT -5
Way to go 2nd Bat. Your work is truly art. It amazes me how many things you get done in so little time.
|
|
2nd Bat
Master sergeant  
Posts: 11,813
|
Post by 2nd Bat on Nov 19, 2011 0:20:54 GMT -5
I am amazed at how much you look like Vic Morrow in your avatar!
Today in addition to the work on the two BARs I mounted the scope hardware on the Springfield M1903A4 and assembled two recruit editions using left over kit components. These will get their final detail work over the weekend and will be ready to display. The BARs should be ready by mid week.
|
|
|
|
Post by newcomer on Nov 24, 2011 0:07:22 GMT -5
Every time I see your work, 2nd Bat, I am in awe. Your BAR is fantastic, I still don't know how you manage to convert M14s so nicely. My feeble "attempts" barely even get close to what you do.
|
|


