2nd Bat
Master sergeant  
Posts: 11,813
|
Post by 2nd Bat on Nov 24, 2011 3:39:42 GMT -5
The first of this most recent batch of BARs is done and drying as we speak. It came out pretty decently. I also finished the M1903A4 sniper and a group of recruit edition Garands. I will post pictures on Friday. I am doing up a GarandM1C although there is great debate as to whether they saw action in WW2.
The arsenal looks pretty impressive.I will assemble the whole collection while they are all in one place and get some pictures.Several are sold so they won't all be on hand for long.
|
|
|
|
Post by Schmozilla on Nov 24, 2011 10:15:30 GMT -5
Maybe you should make affordable BAR sets now  |
|
|
|
Post by m1a1thompson on Dec 14, 2011 2:19:59 GMT -5
I like you jeep haha really cool
|
|
2nd Bat
Master sergeant  
Posts: 11,813
|
Post by 2nd Bat on Dec 15, 2011 1:28:43 GMT -5
The Jeep has been in the family since Christ was a Corporal. It is a 1943 and has 16,180 original miles. Here are some updates progress shots on the latest two builds (#5 and #6 for me) Each is a little different in terms of approach. These are doable projects. Messy, and tme consuming but quite doable. I love the continuing interest in this project but it is too labor intense to offer as a kit or for sale. It would be an excuse for me to use up components I have laying around however. For number six I cut away further on the M14 stock so I could create a narrower receiver group. On number six I also used metal instead of ABS for the receiver group plates. (Note in the picture below how much of the M14 stock I cut away) 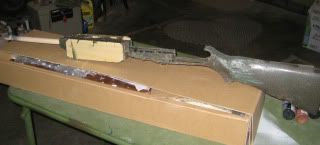 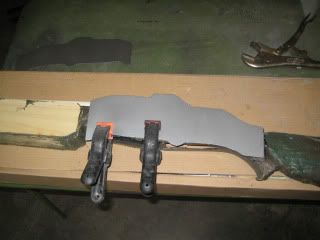 As you can see things were cut down pretty thin. It remains to be seen what the final outcome will be on build number 6. Thus far it is going well. As to number five which is now done (99%) Here is close up on the front site cover. I simply cut a thin strip of tin and folded it over the site. and then applied a thin layer of dyna glass resin to give it the right thickness of the BAR site hood. (Not all BARs had a site hood incidently) 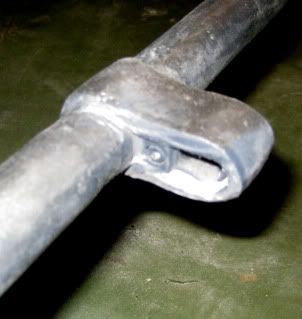 Here is the butt plate flap which required a tall build above the butt plate and then I used the original M14 butt plate but reshaped and repurposed As you see it folds above the butt stock and is not as long but long enough to cover the battery opening. To reinforce the mound I mounted the flap on I placed nails inside the dyna paste as rebar. I drilled a hole through being careful to insure the right movement for the flap and used a bolt and nut. It is remarkably solid and functions great. 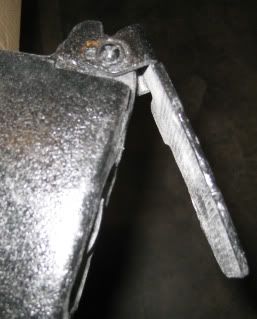 I cut off the lower portion of the M14 butt plate and cut notches in the sides to approximate the butt plate and shoulder rest from the BAR. I ground down the waffle pattern as well. Many items from the base M14 ended up being used which is great. |
|
2nd Bat
Master sergeant  
Posts: 11,813
|
Post by 2nd Bat on Dec 15, 2011 1:35:30 GMT -5
Here are further shots on #5 as it drew closer to completion: Cosmetic work on the receiver group: 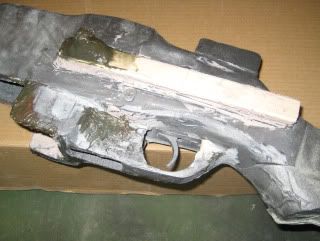 (It's really a lot like sculpture) After sanding and stains 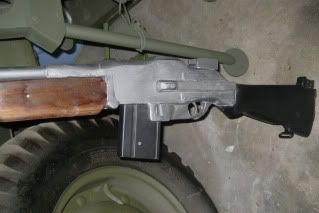 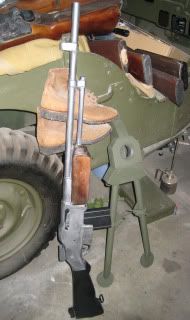 With a great deal of attention to detail but a willingness to accept plenty that is short of perfection the gun begins to look pretty good. Assorted views outside on a modern bipod. By no means perfect but a decent approximation of the BAR: 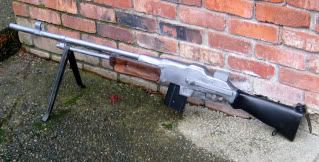 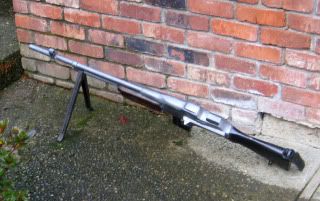 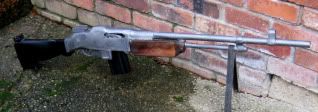 From a distance in a squad of approaching troops they should look okay. I still intend to do a few modified magazines the magazines will look better in the BAR replica but for now the M14 mags are a compromise (along with many others) The total cost of materials including the base rifle (Cyma 032) was under $160.00 each! So definitely an affordable BAR! They are solid as a rock and shoot great. It will be interesting to see how #6 comes out with the metal receiver parts and the thinner reciever group. The actual BAR receiver group was remarkably thin. The M14 motor is actually slightly thicker so it is impossible given these components to end up absolutely correct. Number six will be a 1/4 inch thinner than all the previous BARs I've done which visually should be a good thing. It remains to be seen if it will be as solid. I trimmed an 8th of an inch off the stock sides of the M14 where the side plates go. This extra effort may prove to be unworkable. We'll see. |
|
|
|
Post by Schmozilla on Dec 15, 2011 16:28:20 GMT -5
If you would offer one for sale, how much?
|
|
2nd Bat
Master sergeant  
Posts: 11,813
|
Post by 2nd Bat on Dec 15, 2011 20:58:24 GMT -5
When it appeared Black bear was coming out with an inexpensive AEG BAR I put the rifles I had (Which were not as nice as these) on Ebay and one sold for $650.00 and the cheapest $520.00 so I guess that would be the market. Having said that I have no interest in building and selling them for that (They just require too much work) and in my opinion they simply aren't worth that much. The buyers for the most part were pleased with them which surprised me. )I did get heat from one buyer and had to remind him that the bidding started way below what he ended paying and everything was as described. He was expecting original parts!!!!! The end resulting product is not as nice as my Garands and Springfields. They are fine for what they are but have significant limitations. I will post the progress on this final one and will encourage any and all to build their own if interested.
|
|
|
|
Post by Schmozilla on Dec 15, 2011 21:24:59 GMT -5
Cool. I'll attempt one once I come up with the money.
|
|
2nd Bat
Master sergeant  
Posts: 11,813
|
Post by 2nd Bat on Dec 16, 2011 0:24:39 GMT -5
I probably have the odds and ends needed to do up several BARs as I have so many left over components from all my projects over the years. One possibility would be to create the lower stock assemblies by doing all the mods to the M14 stocks before the fact. I could shape the butt stock and finish that off including creating the build up for the butt flap, attach the front handguard and fake gas tube and add the side plates for the receiver. This would allow the do-it-yourselfer to hit the ground running with a BAR that was fairly far along and all set up for the customers own M14 gear box and finish work. I probably have enough supplies to pre-do about 10 of those.
The work left for the home builder would be straight forward at that point and simply leave the time consuming finish work. Sanding final fabrication, staining and detail work. I'm not sure if there is a market for that or not. I could do those up for around $150.00 to $175.00 All the builder would need is a full length M14 and about $30.00 worth of locally available materials. Hence they'd have a BAR for under $350.00
|
|
Sgt_Tom
Technical Sgt.
   Combat!
Posts: 3,580
|
Post by Sgt_Tom on Dec 22, 2011 22:36:47 GMT -5
I am amazed at how much you look like Vic Morrow in your avatar! A bit of a necro post but Haha That is a complement to me. ;D Would have loved it if someone said that when I was younger.  Anyways interesting idea using the a sheet of ABS plastic to build the receiver. |
|
2nd Bat
Master sergeant  
Posts: 11,813
|
Post by 2nd Bat on Dec 23, 2011 1:38:25 GMT -5
As mentioned earlier in the thread on build #6 I am actually doing the receiver sides in sheet metal which in some ways cuts easier than the ABS sheeting and is working out well (Thus far) For this build I really cut into the M14 sides where the side plates go so much so that I feared I wouldn't be able to successfully attach everything and have it stay. The stock becomes very flimsy and floppy. The walls on the M14 were in essence nearly gone leaving just the lower inner portion where the mag well is and the base where the trigger assembly goes in. I carried the cuts into part of the neck where the motor goes. You can see this in one of the earlier pictures showing the cut up green M14 stock.
The side plates then were pasted into place leaving a much much thinner reciever group. The dyna glass held even with a thin attachment point at both ends. (Like a weld ) Once
in place and sure that everything fit. Fill the rest of the seams in for these side walls and it will be quite solid. Incidently, in hindsight do all the narrowing you can on the motor portion of the M14. Obviously remove the selector switch hardware (as discussed earlier)
and set your gun on full auto with some JB weld. (Careful here not to gum anything else
up) Cut away the M14 receiver group housing and eliminate with your dremel the frame
portion that used to lay at the top of the M14 stock. Look carefully at the picture to see
where those cuts need to be. On the M14 motor, reposition the wires that run on the side across the top of the motor and trim off the channel nubs that the wires routed through. (There are nubs on both sides of the motor than can be dremeled off. (Watch the wires) You need this whole arrangement as thin as possible. Literally insure that the widest part throughout the assembly is the motor itself and the mag well box. When you cut away the M14 outer receiver group, insure you leave the forward portion that houses the hop up and leave the two support screws up there in place. The magazine housing below will also remain. This cut up and ugly assembly will fit inside the new BAR receiver walls.
If and when I do another I will do the stock cuts, position the modified housing inside the stock and then place the BAR walls on the modified M14 stock. Twice in a row I failed to heed my advice and ended up with a BAR housing that was too narrow back at the M14 neck to accomodate even the slimmed down assembly. I then had to cut away, reassemble and start again. Wasted effort, arrrrggggh!!!!! Insure before this final
positioning and production that the housing is snug and complete with the trigger housing
in place securing everything and make sure that everything works. Remember that with
the selector switch hardware removed the gun defaults to semi auto! Then Dyna glass the
side walls into place. Allow it to harden, Test it again and then proceed with the final build out.
Pictures on the next steps to follow. (Sometime after Christmas) The kids are all now home and my wife actually needs me around the house for stuff related to the holidays. I also have sold rifles to complete and ship. Ho HO HO!
This build #6 is going to be the best ever (assuming it all works when everything is said and done.) Having said that I am delighted with build #5 and given that it is much easier would recommend it to anyone. The difference here primarily is that the side BAR walls attach to the un modified outside M14 stock walls. Much much less work but results in a thicker BAR receiever group. Not horrible but thicker than it should be. Even my son who is my biggest critique is impressed with number five which came out quite a bit better than my first four BARs.
A VFC is still your best option for a replica airsoft BAR but if the pocket book doesn't allow it this is a viable option. Good luck. It will be good to see about one in six or so of the folks on the US WW2 teams equipped with BARs! (Most of the others with Garands!) Yee Haw!
|
|
2nd Bat
Master sergeant  
Posts: 11,813
|
Post by 2nd Bat on Jan 17, 2012 3:47:23 GMT -5
Number five continues to function well and has held up to field use very well. Number six is close to completion and is going to be quite nice. I will post pictures updating that build when it's done. The thinner receiver group is a great improvement visually. A lot more work to acheive however. I am starting in on number seven following the number six steps but without the boo boos and need for so many redos. It reminds me of the learning curves when I was first doing up Garands.
I have to admit the BAR is a macho weapon. Big ugly and badass. Definitely a great excuse to use up all the M14 magazines I have accumulated. I did do a extensively modified magazine for each of the guns so at least one mag would look reasonably close to the size and shape it should have. The M14 boxes look a bit small in the rifles. Fine for field use (in my opinion) but overly distracting in a static display. I am doing up each of these three with somewhat different finishes and will post a picture of all of them together when they are all done. I am contemplating attempting a bipod (at least for one of them) but it is surprisingly challenging. Most of them were discarded in the field anyway. I would love to get my hands on a reasonably priced carry handle but it seems everything BAR related is outrageously expensive.
|
|
2nd Bat
Master sergeant  
Posts: 11,813
|
Post by 2nd Bat on Jan 25, 2012 19:08:07 GMT -5
Number six was 99% finished and then a trip came up followed by a severe winter storm and no power. Power is back and the snow is nearly gone so I finished up six and have a good jump on numer seven. Each one was progressively better than the earlier one. The thinner receiver group is more work to produce but it does look much, much better. The side plates made from actual steel is also a nice enhancement although it's hard to tell the difference on the guns. I have had some inquiries about selling the guns and I sold one (essentially to fund the other builds) I could (perhaps) imagine selling pre-done kits with the stock done up, the side plates in place and the front handguard attached along with the lower gas tube and a pre-done outer barrel. The kit would include step by step instructions and have a complete source list for any additional items needed. The buyer would need a full length M-14 (Marui or Marui clone) Initially I could do up perhaps 10 such kits as that's how many stocks I have on hand. I'd price these BAR kits at $195.00 plus shipping. If there is sufficient interest I will do some up and list them in the impressions marketplace section.
|
|
|
|
Post by nile on Jan 26, 2012 12:28:51 GMT -5
Looks pretty damn good to me.
|
|
2nd Bat
Master sergeant  
Posts: 11,813
|
Post by 2nd Bat on Jan 26, 2012 14:33:11 GMT -5
They don't look perfect of course but they do come out quite nice and they are great shooters that are perfectly skirmishable. I will post a picture of these most recent three rifles that I did and perhaps post a picture of what the kit might look like. There would still be build time involved and detail work but the heavy lifting would be done and the overall dimensions and materials in place. I really am enjoying them.
I still wish Blackbear or some other Chinese manufacturer would come out with an affordable BAR but this is an alternative anyway. With each build I figure out new and better way to do it and each one is better than the last one.
|
|
2nd Bat
Master sergeant  
Posts: 11,813
|
Post by 2nd Bat on Feb 25, 2012 18:07:05 GMT -5
Here are pictures of the latest batch of AEG home built BARs I produced. These reflect the sixth seventh and eighth BARs I have built and they seem to get better with each build. 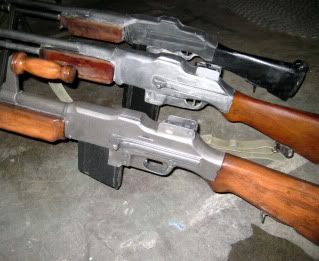 The one in the rear is the final one I built and as pictured wasn't quite done. I still needed to add the rear site, the butt plate flap and a few other minor details. It was set up with a real metal receiver group, wooden front hand guard and simulated bakelight rear stock which was actually not common in WW2. The bipods of course are not correct as I actually build them with the intent to not use bipods. The handle on the middle BAR is an actual item and is removable. The magazines shown are the display magazines I built but the design is intended to simply use M14 magazines which are slightly thinner and a tiny bit longer Not overly distracting visually but far more practical and affordable way to do things. I would sell one for $650.00 plus shipping without the bipod or carry handle but with six magazines. 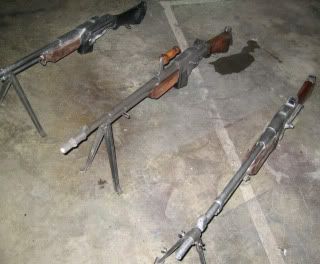 (Low cap or high caps) 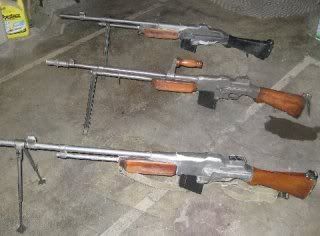 |
|
2nd Bat
Master sergeant  
Posts: 11,813
|
Post by 2nd Bat on Mar 10, 2012 21:57:49 GMT -5
I couldn't resist. I had additional acquired parts so I started in on still another BAR build. This will be BAR #9 for me. I also built three non firing dummy guns using receiver group housings I built that it turns out were too thin to accomodate the M14 gear boxes. I sold one of the firing BARs I made on Evil Bay and it brought the $650.00 I asked in the Buy It Now! I will probably sell another once this latest one is finished. I am going to list the non firing Dummy BARs as well as I have no use for them. Good looking props.
|
|
|
|
Post by brownien on Apr 23, 2012 17:13:37 GMT -5
Those are some nice BARs! great job 2nd! im currently working on my own coversion, eary stages though. Just a quick question about the metal quality in your m14s used for your conversions. Is the quality of the metal good enough to be welded to 1020 steel? I would like to use the barrel mounts from my m14 for the BAR reciever.
|
|
2nd Bat
Master sergeant  
Posts: 11,813
|
Post by 2nd Bat on Apr 23, 2012 17:37:21 GMT -5
I am not a welder so I really couldn't say but from other sources I have heard that welding onto the pock metal isn't consistent or strong. You have very little in the way of thickness to work with even if you shave things down as tight as possible and hence I use as thin a sidewalk as I can while still using receiver sides that will remain rigid.
share your efforts here as you will no doubt come up with creative alternative approaches that will hopefully inspire others to take a home built BAR project on.
|
|
|
|
Post by brownien on Apr 23, 2012 17:57:41 GMT -5
Thanks and i am absolutely going to post my progress! My biggest concern with my conversion is when attaching the original barrel to my future sheet metal reciever, as i would like to cut the upper portion of the original barrel mount form the m14 and use it with bottom barrel attachment part. I am still debating whether to weld it or use machine screws. depending on thickness i may use one or both for reenforcement. P.s. regarding your BAR's magazine wells, have you thought of adding a bit of tubing to the feed tube inside the mag well to let the front of the m14 mag go parallel to the gun? Instead of modifying all the mags that are used with them of course.  |
|
2nd Bat
Master sergeant  
Posts: 11,813
|
Post by 2nd Bat on Apr 30, 2012 2:44:51 GMT -5
I've thought about a lot of things that would refine everything I do but I find the more I leave things as they are the more reliable they are the more likely I am at succeeding at getting my projects done. For each BAR I build one correct sized and shaped magazine for display purposes but leave things so that during skirmishes the regular M14 mags are used. in the heat and motion of an event I don't think many people notice. Since I have several hundred M 14 magazines it make sense for me to do it this way.
|
|
2nd Bat
Master sergeant  
Posts: 11,813
|
Post by 2nd Bat on Aug 2, 2012 3:24:46 GMT -5
I have completed now the production of 11 of these and have sold them off with the exception of two which i have kept for myself. The project is fun and obviously quite doable without any fancy tools. ( dremel is about it). A good sander is a must.
I would encourage anyone to give it a go. Materials cost ( including the base gun) is under $200.00
|
|
|
|
Post by aj czarkowski on Aug 2, 2012 14:58:36 GMT -5
Just wondering, but my friend used to buy a ton of replicas this this place : r-replicas.com/Replica_Firearms.htmlMaybe buying a resin replica of an M1 Garand or BAR from there and then trying to put M14 internals into it wouldn't be too hard? But after doing Bar10 conversions I know how hard it can get to try to fit everything |
|
2nd Bat
Master sergeant  
Posts: 11,813
|
Post by 2nd Bat on Aug 3, 2012 20:17:43 GMT -5
I have seen some of them hanging on walls at surplus stores. I suspect they are solid or relatively solid resin poured on metal rods for strength and weight. Hence hollowing them out to put the airsoft guts inside would be extremely challenging if not impossible. You could probably find use for many of the properly shaped components but my guess is you're just adding additional materials costs to your project and actually a lot of additional work.
The bar replica looks pretty good. I had not seen that before.
|
|
|
|
Post by aj czarkowski on Aug 3, 2012 22:14:20 GMT -5
Your probably right, but I wasn't actually thinking about trying it, just thought it might be easier than scratch building the parts
|
|
2nd Bat
Master sergeant  
Posts: 11,813
|
Post by 2nd Bat on Jan 11, 2013 13:53:54 GMT -5
So the chapter on this project is now closed. i ended up building 13 of these total and sold all but one that I kept for myself. The last two sold for a mere $200.00 due in large part to the wonderful news that there is a reasonably affordable and high quality BAR distributed through ACM and ECHO. I bought one and am blown away by the quality and attention to detail. With that said and perhaps a bit of personal bias I have to say I like the way my creations function better and find them less awkward to field. Like the ECHO BAR, my guns are long and heavy and appropriately awkward to carry and shoot. (The BAR was a lollipops of a gun). With that said mine have more weight to the rear and are better balanced. Mine use the Low Cap or Mid Cap magazines as opposed to the Hi Caps available on the ECHO. The M14 magazines are easier to load and unload and the battery comartment is as easy and accessible a it could be on mine and awkward on the ECHO.
I really enjoyed the project and am glad I sold most of them when I did. I hope the 12 that are out there continue to soldier on for years to come and wrack up lots of Kraut eliminations on WW2 airsoft battlefields. These last two builds got shipped this week. A ton of time and energy went into each of them and they are perfect examples that a home workshop cant begin to compete with a full on production facility.
I cant wait to see the ICS and GnG M1 Garands start hitting the ground so that nitch will at long last be filled as well.
|
|