|
|
Post by schmitty on Jan 13, 2007 2:33:46 GMT -5
Here's one way to get rid of that non scale selector switch from your Chinese MP-40 and while your at it give it the fake-Bakelite treatment. First take the large lower plastic receiver covers off. Remove the two screws (obviously) Then pry the halves apart at the bottom with a skinny screwdriver. They are attached by two tight fitting pins. Also remove the pistol grips. Next remove the selector switch from the plastic cover and its related parts. With an exacto knife or razor blade trim off the lumps from the outside of the cover that where the selector switch stops. From the inside make a piece to cover the hole where the selector was. I used sheet styrene plastic but you can use about anything (cardboard, metal etc.) Super glue it in place from the inside. From the outside fill the hole (and the two smaller ones next to it) with automotive polyester body filler (Bondo) You can buy it at auto parts stores and most hardware stores. When dry sand it flat using a block and sandpaper. You may have to go over it a couple times with the bondo to get it completely flat. Sand with 200 grit paper down to 400-600 to finish it. Next open up the gearbox and remove the parts under the gears you see in the bottom picture on the right (metal lever with philips screw and small spring). That lever is what stops the electrical connection after the gun has fired one shot. We won't be needing that anymore  You can also remove the white plastic piece from the outside of the gearbox that used to lift that lever (that's how the gun selected full auto). From now on it's full auto only!!!!! Now for the Fake Bake. I painted all the plastic parts with Krylon Fusion colour #2340 espresso expresso (yes that's what it's called). Let the parts dry for about an hour. Next you'll need some Black acrylic paint, The water-based non-toxic type you can get at most crafts stores. Pour some paint onto a palette and thin with a little water. With a model brush start dabbing the watered down black paint onto the brown parts. This part is hard to explain but Bakelite has a brown-black mottled look. If you put on two much black you can easily thin it down with more water or scrub it back off again, Experiment until you are satisfied and let dry for an hour. Next you need to clear coat over the black or it will rub back off again. I used Testors #1260 dull cote (available at most hobby and craft stores). You can use other brands (Krylon makes a flat clear cote but its hard to find). But some may not be compatible with the krylon and cause cracking or crazing (test before you spray your parts).  I went over the rest of the MP-40 with 220 grit sandpaper on the black painted metal. Sanding all the way through the paint on some of the edges and just dulling it in other places.   With a sling (from Acme imports) The Chinese MP-40 now looks far more realistic. It should be noted that some MP-40's actually had black Bakelite parts but I think the brown looks more interesting and less like plastic. Schmitty |
|
|
|
Post by imaheretic on Jan 13, 2007 5:04:30 GMT -5
Superb Schmitty, when mine arrives i'll be do the fake bake (catchy:P).
|
|
|
|
Post by Guinness on Jan 13, 2007 10:33:03 GMT -5
Der Schmitty,
As always you are my hero!
Thanks! I will be performing this treatment on my AGM MP007 this weekend!
Slainte!
-G
-G
|
|
|
|
Post by Capt. Zak on Jan 13, 2007 14:10:45 GMT -5
Fantastic Schmitty! I continue to hate you more and more with every helpfull contribution you make to this forum! ;D
You're worth your weight in gold my friend.
|
|
|
|
Post by Gordak on Jan 13, 2007 20:32:41 GMT -5
AMMAZING!!!!!!!
-Gordak
|
|
2nd Bat
Master sergeant  
Posts: 11,813
|
Post by 2nd Bat on Jan 13, 2007 22:54:46 GMT -5
I thought we were going to wait for mine to come in and do it together! Oh well, looks like a very doable project. One concern is, you always hear that it's a good idea with an AEG to fire a few shots in semi before putting the gun away to make sure the spring is left in an unflexed positon to insure long life and renewed strength. Without the selector switch what do you recommend to maintain that good advice?
|
|
biged
Master sergeant  
Posts: 468
|
Post by biged on Jan 14, 2007 8:20:52 GMT -5
Schmitty:
Beautiful work. Excellent how-to intel.
2nd Bat:
I disabled the semi-auto on my Marui AK/RPK last spring. In this exact same manner. The spring did LOOSE 40fps because of it being compressed when stored.
The same thing happened to my M60 converted to a V3 gearbox. Because it was a custom receiver I had no way of selecting safety/semi/auto so I removed the entire system leaving it full auto.
One method I use to decompress the spring:
1. Unload the gun. Discharge it in a safe direction.
2. Flip the gun upside-down and look into the hopup chamber.
3. Fire the gun - very quick trigger pulls. Listen for the pop and watch that the nozzle is fully forward.
I don't like storing my guns with the spring compressed but it has happened...
///ed///
|
|
|
|
Post by schmitty on Jan 14, 2007 11:19:15 GMT -5
Thanks for the feedback comrades.
CaptZak: Believe me when I say I get as much out of this board as I contribute.
2nd bat: I didn't realize you wanted me to wait. If you can bring yours over before LW game we can give yours the treatment and comparison test. Takes a total of 2-3 hours (mostly due to paint drying)
I have several full auto only AEG's and I am very careful to stop them with the spring uncompressed at the end of the day. I do this mostly by sound. with the gun unloaded, just blip the trigger until you hear it stop immediately after the "BOING" sound of the spring popping forward. On some guns (like the Chinese MP-40) you can visually see that the piston is all the way forward by looking through the slot in the cylinder. It isn't hard to do by sound alone though.
Schmitty
|
|
Russianboy
Private 1st Class
 Oberscharf?hrer
Posts: 502
|
Post by Russianboy on Jan 14, 2007 11:40:58 GMT -5
biged,
cant you just remove the Anti-reversal Latch?
|
|
|
|
Post by Guinness on Jan 14, 2007 15:43:56 GMT -5
So here is my effort at following Schmitty's tutoral- Thanks for the tips sir! 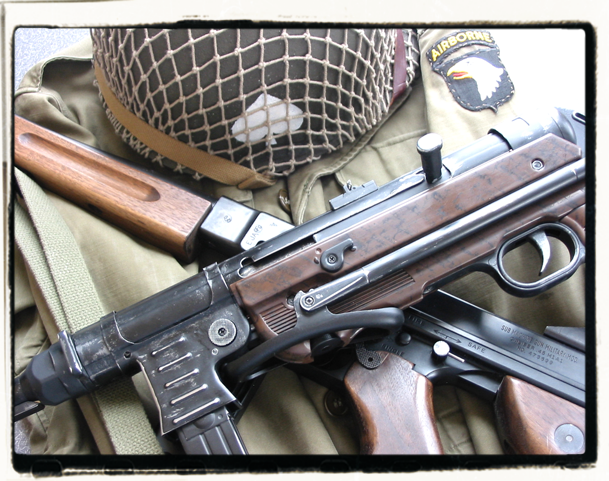 I also did a little 'mod action' myself, I dremelled the plate that covered the back end of the receiver, so that the bolt can travel into the 'safe' position. 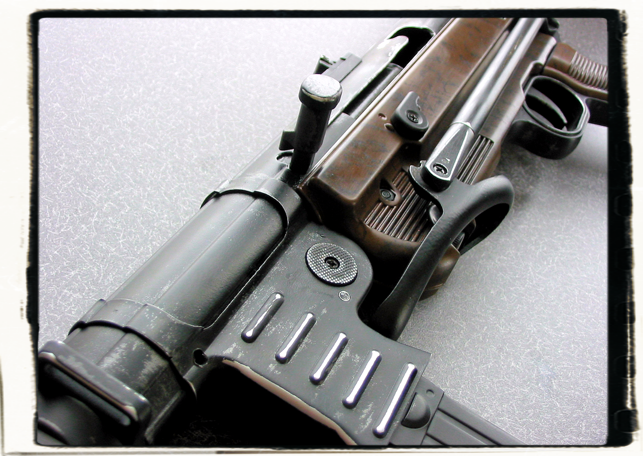 Bolt forward, ejection port cover (hop up) closed- 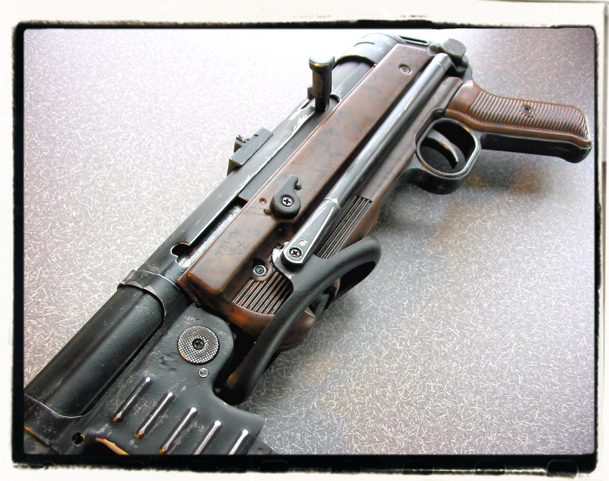 Bolt in safe position, ejection port open- I also painted the gearbox inside a gunmetal color so you don't notice it as much. It's really easy to do and a lot of fun customizing the gun yourself! 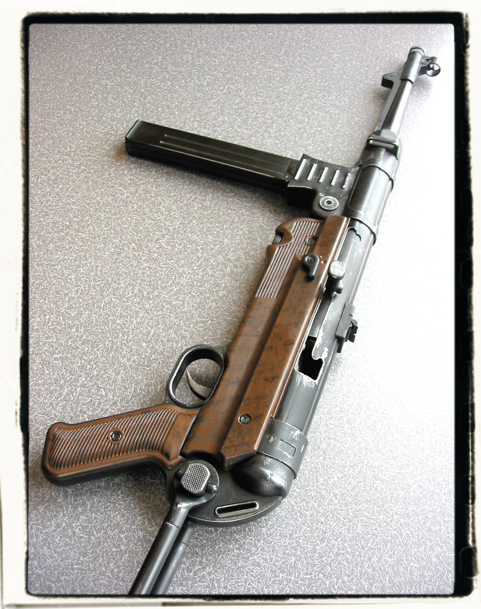  Slainte! -G |
|
2nd Bat
Master sergeant  
Posts: 11,813
|
Post by 2nd Bat on Jan 14, 2007 15:56:45 GMT -5
More fun and cooler then having it come that way isn't it? Beside the effect is actually better with a more attractive and personalized weapon. Beautiful job Guiness. Still haven't gotten mine  or my spare magazines. |
|
biged
Master sergeant  
Posts: 468
|
Post by biged on Jan 14, 2007 16:18:34 GMT -5
Nice Guinness.. You have an eye for taking great pictures.
Russianboy:
I would'nt advise removing the anti-reversal latch. Removing the anti-reversal latch allows for double-feeding.
The real ugly comes from the cam on the sector gear. It was not meant to engage the tappet plate in reverse.
It increases the odds of breaking the tappet plate immensely.
///ed///
|
|
|
|
Post by davinci on Jan 14, 2007 16:31:15 GMT -5
That looks excellent guy´s!
Hopefully i will get my MP40 in a couple of weeks. I´ll be buying from the guy over at Airsoft retreat.
I just hope i can find a good spraypaint in a good color. Krylon is not very common in Sweden.
There clear coats are but not the color range.
|
|
Ersatzjack
Corporal
  "That silly Franz... he thinks we are winning."
Posts: 1,093
|
Post by Ersatzjack on Jan 14, 2007 18:38:45 GMT -5
Here is my finished pic's proving that any simpleton can follow the instructions provided by you. This was a very fun project and you are right about it being nice to individualize each gun out in the field. I even was prompted to get a digital camera and am teaching myself how to use it. I really don't know much about this new electronic stuff. Whatever happened to just having an on and off switch? Anyway, the only trouble I had was finding the color "expresso expresso." I found it in the fourth hardware store and was about to give up. I was going to use "Burgundy" instead as it seems more common. Turns out when I looked at the bakelite on my G43 (see pics) the burgundy would have worked too. I think the handguard is supposedly original on that gun so nobody could argue authenticity. I know there were probably all types of different shades so if you can't find the espresso use burgundy. I really like how it turned out. Thanks Scmitty for this and the private tips about the gearbox website. That helped me too. So getting a gun that isn't 100% ready has its advantages. You have to learn something about it and you get to customize it. You could turn shortcomings in your product into actual selling points using that logic.   Here is the finished product.  Here is the comparison shot |
|
|
|
Post by StukaAce2 on Jan 14, 2007 18:58:01 GMT -5
Stupid question I know, but do you sand down the whole reciever and pistol grip or just the area that was bondo'd?
|
|
|
|
Post by CharleyNovember on Jan 14, 2007 19:32:43 GMT -5
Is schmitty holding out on us?  |
|
Ersatzjack
Corporal
  "That silly Franz... he thinks we are winning."
Posts: 1,093
|
Post by Ersatzjack on Jan 14, 2007 20:01:18 GMT -5
I know your question is posed as humor but I can't help thinking that secretly you are worried that Schmitty is passing out secrets to 500ft/sec upgrades for this MP40. Right? I just contacted him when in my desire to re-grease the gearbox I pulled the lid and everything went flying and not having ever opened an AEG before I was at a loss as to how to put it all back together. He helped in that department. I did ask about an upgrade spring but he thinks its not a good idea and since this isn't a true V3 gearbox, I would guess that not all the upgrade parts are readily available to ensure it stays operating well over a prolonged period. So don't worry, I have a stock gun. No conspiracies here.
Oh, I forgot to mention. I really liked the photos of Guinness's. It's a neat special effect on the edges of the photos. Makes them look old like they were from some old magazine. - Neat!
|
|
|
|
Post by schmitty on Jan 15, 2007 1:12:39 GMT -5
Very nice job on both counts. Great pictures too!! There is definetly a variety in shades of Bakelite on real and now airsoft MP-40's. Guinness: you decided to keep the selector switch? I didn't think upgrading the spring in the MP-40 was a good idea mainly because of the limited battery space. Small batterys have a hard time with High amp drawing stiff springs.
It's nice to see and hear that this treatment is as easy as I claimed it was!!
Schmitty
|
|
biged
Master sergeant  
Posts: 468
|
Post by biged on Jan 15, 2007 7:56:06 GMT -5
A 9.6v (30 amp output) battery coupled with the Systema Magnum motor will put out 30 bb's a second with an M100. The magnetic field is so strong on these motors that nails will stick to the outside grip. Mags have a hard time feeding fast enough with any type of high speed gears. I won't mention the new Systema Turbo motor. We've tested and confirmed these setups at the airsoft shop: (Barrel length and Cylinder Type effect FPS so it varies.) All batteries are high output 30 or 35amp batteries. 340fps w/.20 = M100+8.4v+Systema Metal Bushings 340fps w/.20 = M100+8.4v+SystemaGenuine Gearset+Systema Metal Bushings (Solid long lasting setup) 380fps w/.20 = M120+8.4v+SystemaGenuine Gearset+Systema Metal Bushings 400fps w/.25 = M130+9.6v+SystemaTorqueUp Gearset+Systema Metal Bushings OR 400fps w/.25 = M130+9.6v+SystemaGenuine Gearset+Systema Metal Bushings+SystemaMagnum Motor (Replace the above setup with a 10.8v and you have the ROF of an MG42.) 450fps w/.25 = M150+9.6v+SystemaGenuine Gearset+Systema Metal Bushings+SystemaMagnum Motor 500+fps w/.25 = M170+10.8v+SystemaGenuine Gearset+Systema Metal Bushings+SystemaMagnum Motor Magnum motors should only be installed in V3, V6, V8, V9, G&G M14 boxes, CA249, STAR249, re-inforced V2, or CnC Machined MTHaynes V2 box. A Magnum motor will kill a piston with long bursts (think of a MG42 overheating) they also inhale batteries. I believe these 9.6v packs should fit the MP40: www.onlybatterypacks.com/showitem.asp?ItemID=11218.26I would change it over to Deans connectors. Just like 2nd Bat, I'm still waiting for my MP40....  ///ed/// |
|
|
|
Post by Guinness on Jan 15, 2007 10:09:20 GMT -5
Dayyy-ammm
You guys really know your technology! I'm glad your all members of this board so's I can learn from your smartness-ness! ;D
So BigEd, your saying this should be a reasonable setup with the MP40?
"380fps w/.20 = M120+8.4v+SystemaGenuine Gearset+Systema Metal Bushings"
I have the m120 spring, I will just need to get the Systema parts.
And Schmitty-
No, my local 'greasemonkey' gunsmith-extrodinaire is going to re-lube the mechbox, replace the nozzle, spring guide, etc, all the simple stuff and also remove the fire selector bits from the mechbox- I didn't want a 'ErsatzJack' like explosion of important bits if I tried to open it.
Thanks again for you guys expertise!
Slainte!
-G
|
|
biged
Master sergeant  
Posts: 468
|
Post by biged on Jan 15, 2007 15:48:51 GMT -5
I'm jealous of the beautiful work everyone has done here... I already bought all the paint. Still no gun.  Guinness: As long as the battery has the Intellect cells (30 amp output) in the 8.4v battery. The box will also have to be re-shimmed. I have'nt seen the gearbox so pushing the limits with an M130 and up is a risk. If it was a Marui V3 box I would'nt sweat it. Always buy parts from a local (In your State) reseller when possible. I average about 6 upgrades a week for the past two years. Double that number in repairs/fixes. I do it part time one night a week. ///ed/// |
|
|
|
Post by Guinness on Jan 15, 2007 15:55:29 GMT -5
Well it's a 'mauri-esque' v3 mechbox, it's not a real TM mechbox for sure- I think I will keep the spring stock for now and see what overall reliability is , I'll let someone else lunch theirs by shoving M120 or higher springs in there  ....for now  Thanks again for the tips! -G |
|
|
|
Post by stukaace on Jan 16, 2007 8:56:27 GMT -5
Again, about the sanding. Do you sand the whole lower reciever in preparation for the krylon or only sand that parts that have been bondo'd?
|
|
|
|
Post by Guinness on Jan 16, 2007 8:59:58 GMT -5
stukaace,
I only "krylon'd" the grips- but I did use sandpaper to wear and weather the rest of the body- but that was just the edges and corners to remove some of the black paint to make it look worn.
hope that answeres your question!
-G
|
|
|
|
Post by stukaace on Jan 18, 2007 19:58:15 GMT -5
I plan to take apart my MP-40 tommorow, and I was wondering if it is really vital to remove the full/semi auto selector plate and the intermittent electric lever? If one removes the selector switch, is it really important to remove the pieces in the gearbox, or can one simply set the selector to fully auto then remove the switch and bondo over it?
|
|
|
|
Post by Capt. Zak on Jan 18, 2007 21:02:16 GMT -5
I just applied Schmitty's "fake bake" to the grips of my blank fire P38. I have to say...I hate Schmitty even more! Thanks for the techique! I still hate you. ;D
As soon as the grips dry I'll post a before & after shot.
|
|
|
|
Post by Capt. Zak on Jan 18, 2007 21:29:36 GMT -5
FEast your eyes on this! The fake bake makes a world of difference. Thanks Schmitty!  |
|
|
|
Post by schmitty on Jan 18, 2007 22:59:52 GMT -5
Wow, that is amazing!!! The one you painted looks very realistic. The Un-painted one looks very plasticy (is that a word?) Nice job.
Schmitty
|
|
Russian
Corporal
  Magician
Posts: 923
|
Post by Russian on Jan 18, 2007 23:14:32 GMT -5
Wow! That's awesome!   |
|
Doom
Private
Deutsche Afrika Korp: Arizona-Abteilung
Posts: 297
|
Post by Doom on Jan 19, 2007 0:52:38 GMT -5
|
|
 You can also remove the white plastic piece from the outside of the gearbox that used to lift that lever (that's how the gun selected full auto). From now on it's full auto only!!!!!


 You can also remove the white plastic piece from the outside of the gearbox that used to lift that lever (that's how the gun selected full auto). From now on it's full auto only!!!!!


 or my spare magazines.


